

Imagine hitting the open road on your bike, ready for adventure, but faced with a common problem: your bike lacks eyelets for a rack. You’re not alone in this; many biking enthusiasts find themselves in the same situation.
But don’t worry, there’s a solution that doesn’t require you to buy a new bike. In this guide, you’ll discover the secrets to installing a rack on your bike without eyelets, allowing you to carry your gear effortlessly and enjoy your ride without constraints.
Forget the hassle and frustration; you’re about to learn a straightforward method that will equip you for any journey. This step-by-step approach will empower you to transform your biking experience, making it more functional and enjoyable. Dive in and unlock the freedom to explore with ease.
Credit: cycletraveloverload.com
Choosing The Right Rack
Installing a rack without eyelets can be simple with the right tools. Use P-clamps or seat post mounts to secure your rack. These options provide sturdy support and are easy to attach.
Types Of Racks
There are many types of racks to choose from. Front rackssit on the front wheel. Rear racksgo above the back wheel. Some racks are designed for panniers. Others are made for baskets or bags. Pick the type that fits your bike best.
Material Considerations
Racks are made from different materials. Aluminum racksare light and resist rust. Steel racksare very strong but heavier. Plastic racksare light and cheap but less strong. Choose based on your needs.
Weight Capacity
Each rack has a different weight capacity. Some can hold up to 20 pounds. Others can carry more than 50 pounds. Always check the weight limitbefore buying. Make sure it can support your load.
Tools And Materials Needed
Installing a rack without eyelets requires specific tools and materials. Use P-clamps, zip ties, and a wrench to secure the rack. Select a sturdy rack, and ensure compatibility with your bike frame for a safe fit.
Essential Tools
A wrench setis crucial for tightening bolts. You’ll need Allen keysfor adjustments. A drillhelps in creating mounting points. Use a screwdriverto fasten screws. A tape measureensures accurate measurements.
Additional Accessories
A pair of sturdy mounting bracketsis necessary. Look for rubber washersto prevent damage. Nylon strapsoffer extra security. Zip tieshelp in organizing cables.
Safety Gear
Glovesprotect your hands from injuries. Wear safety glassesto shield your eyes. A sturdy helmetis always a good idea. Ear protectionis important if using loud tools.
Preparing Your Bicycle
A clean frame makes installation easier. Use a damp cloth to wipe dirt away. Rinse with water and let it dry fully. This helps you see the frame better. Check for any cracks or damages before moving on.
Make sure your rack fits your bike. Some racks need special parts. Measure the distance between the seat stays and the rear dropouts. Ensure the rack’s arms are long enough to reach. If not, get adapters for a secure fit.
Use a marker to mark where the rack goes. Hold the rack against the frame to align it. Mark spots for the mounting holes. Ensure marks are even on both sides. This makes installation easier and more accurate.
Credit: cycletraveloverload.com
Alternative Mounting Techniques
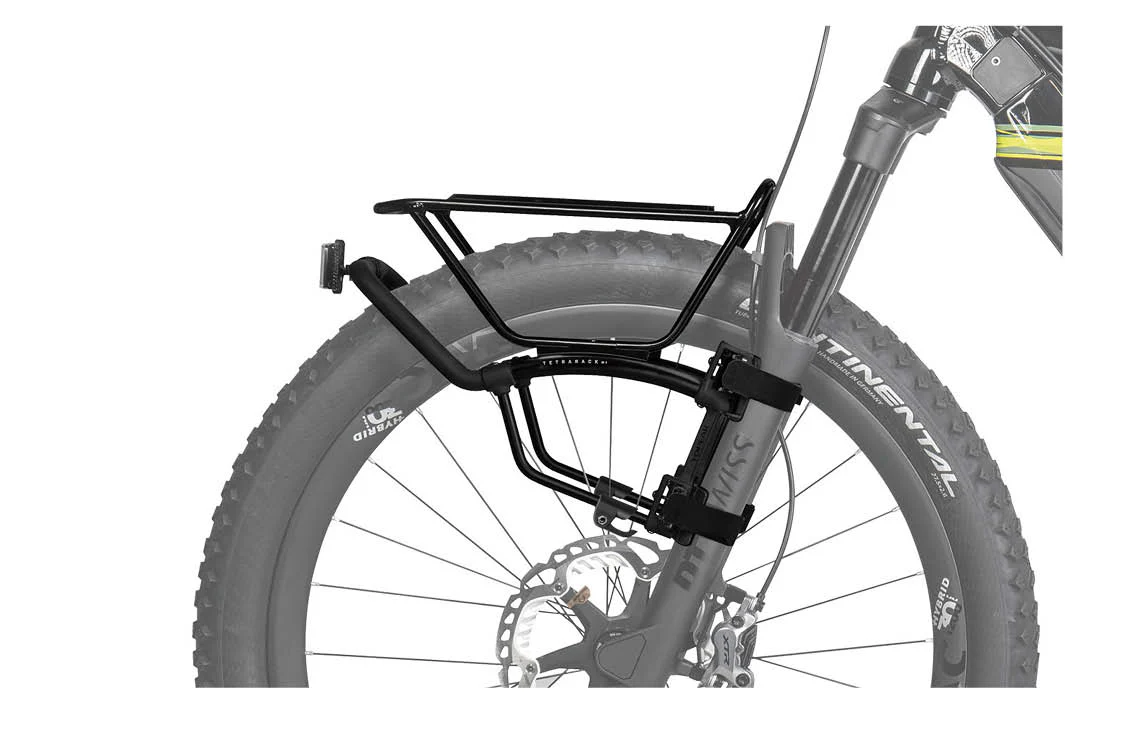
Mounting a bike rack without eyelets requires creativity and simple tools. Use P-clamps or zip ties to attach the rack securely to the frame. Ensure stability by adjusting tension and checking alignment frequently for a safe ride.
Using P-clamps
P-Clamps help attach racks to bikes without eyelets. These clamps wrap around the bike frame. They hold the rack securely. Choose the right size for your bike. Make sure they fit snugly. P-Clamps are easy to install. They don’t need any special tools. Just tighten them properly. Check them regularly for safety.
Zip Tie Method
Zip ties are a quick way to mount a rack. Use strong zip ties for better hold. Loop them around the bike frame and rack. Pull tight for a secure fit. Cut off the extra length. Zip ties are cheap and easy to find. Check them often to ensure they are tight.
Strap-on Racks
Strap-On Racks have flexible straps to attach. They fit different bike sizes. Adjust the straps for a snug fit. No tools are needed. The straps are strong and durable. Make sure they are not loose. Check the straps before each ride.
Securing The Rack
Attaching a rack without eyelets involves using P-clamps or hose clamps to secure it to the bike frame. These clamps wrap around the frame, providing a firm hold for the rack. Ensure clamps are tight to prevent movement during rides.
Aligning The Rack
Ensure the rack is straight with the bike frame. Align it carefully. Use a measuring tapeto check the position. This will help in keeping the rack stable. A misaligned rackcan cause wobbling.
Tightening Bolts
Tighten the bolts using a wrench. Make sure they are firmly tightened. Loose bolts can lead to accidents. Recheck each bolt after tightening. A well-secured rack ensures safety.
Ensuring Stability
Test the rack stability by gently shaking it. It should not move much. A stable rack provides safety while riding. Double-check each bolt and alignment. Ensure everything is well-fixed.
Testing The Installation
Testing the Installation Securely attach the rack using mounting hardware and ensure proper alignment. Check stability by gently applying pressure. Confirm that all components are tightened and the rack holds steady, ensuring safe and functional use.
Weight Test
Place some weight on the rack gently. Ensure the weight is balancedand steady. Check if the rack is holding without wobblingor bending. If the rack bends, tighten the bolts. Make sure the rack feels stableand secure.
Road Test
Take your bike for a short ride. Listen for any strange noises. Feel for any vibrations. Keep an eye on the rack’s position. Make sure it stays in place. If it moves, stop and check the connections.
Adjustments Needed
Check if any part feels loose. Adjust the bolts with a wrench. Make sure they are tight. If the rack is too high, lower it. Ensure the rack is level. A level rack keeps the bike balanced.
Maintenance Tips
Installing a rack without eyelets involves using P-clamps or seat post clamps. These tools help secure racks to bikes. Always ensure clamps fit snugly to avoid movement.
Regular Inspections
Check your rack for loose parts. Tighten any loose screws or bolts. Look for any signs of rust or wear. Rust can damage your rack over time. Replace any damaged parts quickly. Regular inspections help keep your rack safe.
Cleaning And Care
Use a soft cloth to clean your rack. Warm, soapy water works well. Avoid using harsh chemicals that can damage the finish. Rinse with clean water and dry thoroughly. This helps prevent rust and keeps your rack looking new. Store in a dry place when not in use.
Repairing Common Issues
- Fix any bent parts using gentle pressure.
- Replace missing screws with the right size.
- Use anti-rust spray for rust spots.
- Check attachments for stability.
Regular repairs extend the life of your rack.
Credit: cycletraveloverload.com
Frequently Asked Questions
Is It Illegal To Drive With An Empty Bike Rack?
Driving with an empty bike rack is generally legal. Laws vary by state or country, so check local regulations. Ensure the rack is secure and doesn’t obstruct your view or vehicle lights. Always prioritize safety while driving with any attachments.
How To Attach A Bike Rack To A Frame?
Attach the bike rack by aligning it with the frame’s mounting points. Secure using bolts and washers. Ensure tightness for stability. Check compatibility with your bike model. Follow manufacturer instructions for specific details. Use tools like a wrench for precise adjustments.
Regularly inspect for safety.
Can You Add Eyelets To A Bike?
Yes, you can add eyelets to a bike for attaching racks or fenders. Use a drill and appropriate eyelet screws. Ensure proper alignment and secure fitting to maintain bike stability. Consider professional assistance for best results and safety.
How To Anchor A Bike Rack To The Ground?
To anchor a bike rack, choose a stable location and drill holes for the bolts. Insert anchors securely. Use a wrench to tighten the bolts, ensuring stability. Regularly check for looseness to maintain safety.
Conclusion
Installing a rack without eyelets is simpler than it seems. With the right tools, it’s a quick task. Follow the steps closely, and you’ll succeed. Secure clamps hold the rack in place. Choose quality materials for safety and durability. Enjoy your bike rides with new storage space.
Feel proud of your handy work. Share the experience with friends who need help. Your bike is ready for adventure. Embrace the convenience of extra carrying capacity. Happy cycling!


