
This guide explains how a bike trailer attaches to your bike, covering different hitch types, installation steps, and safety tips. Whether you’re hauling kids, gear, or groceries, you’ll learn to connect your trailer correctly and ride with confidence.
Key Takeaways
- Most bike trailers use a hitch system that connects to the rear axle or frame, ensuring a secure and stable ride.
- There are two main attachment types: axle-mounted hitches and frame-mounted hitches, each suited to different bike models.
- Always check compatibility between your bike and trailer before purchasing to avoid installation issues.
- Proper alignment is crucial—misaligned hitches can cause swaying or detachment during rides.
- Regular maintenance of the hitch and coupler prevents wear and ensures long-term safety.
- Test the connection before every ride by gently tugging the trailer to confirm it’s locked in place.
- Use safety flags and lights when riding with a trailer, especially in traffic or low-visibility conditions.
How Does a Bike Trailer Attach? A Complete Step-by-Step Guide
If you’re new to biking with a trailer—whether it’s for carrying your kids, hauling camping gear, or transporting groceries—you might be wondering: How does a bike trailer attach to a bicycle? The good news is that most modern bike trailers are designed for easy, secure attachment, but the exact method depends on the type of trailer and your bike’s design.
In this guide, we’ll walk you through everything you need to know about attaching a bike trailer. You’ll learn about the different hitch systems, step-by-step installation, safety checks, and troubleshooting tips. By the end, you’ll feel confident hooking up your trailer and hitting the road safely.
Understanding Bike Trailer Hitch Types
Before you attach your trailer, it’s important to understand the two main types of hitch systems used today: axle-mounted and frame-mounted.
Axle-Mounted Hitches
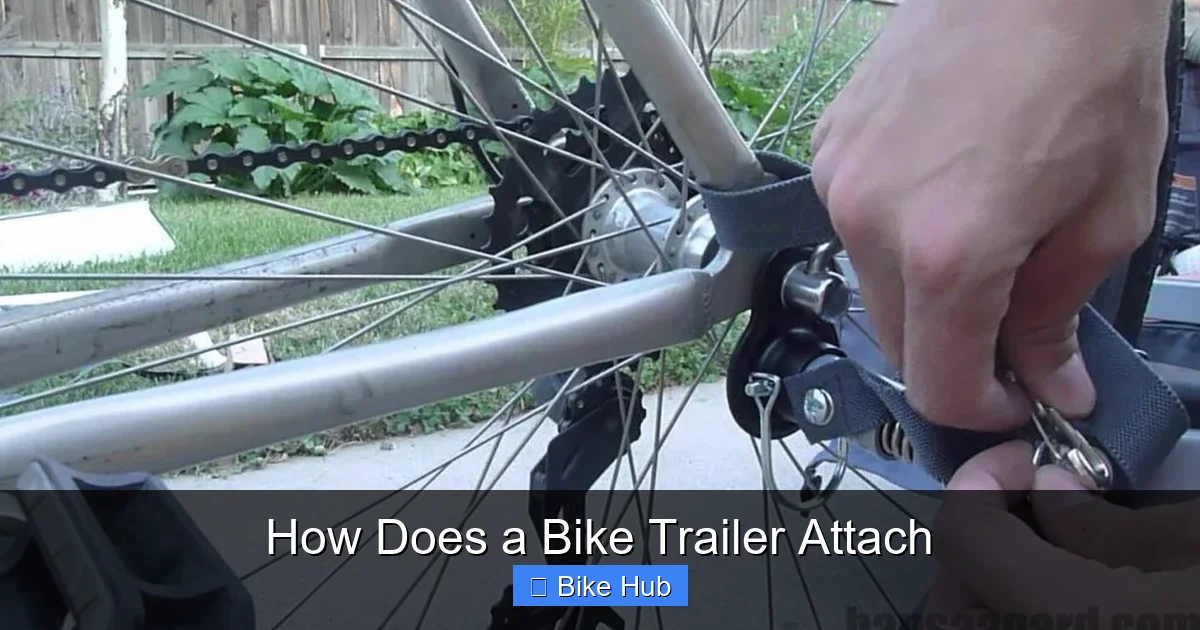
This is the most common type of trailer attachment. The hitch connects directly to the rear axle of your bike, either through a quick-release skewer or a bolt-on adapter. Axle-mounted hitches are popular because they provide a solid, stable connection that reduces sway and improves handling.
Visual guide about How Does a Bike Trailer Attach
Image source: ridereview.com
Many child trailers, like the Burley Bee or Thule Chariot, use this system. It’s compatible with most standard bikes, including road bikes, hybrids, and mountain bikes, as long as the axle type matches (e.g., quick-release vs. thru-axle).
Frame-Mounted Hitches
Less common but still used on some models, frame-mounted hitches attach to the bike’s seatstay or chainstay tubes. These are typically found on older or budget-friendly trailers and may require additional clamps or brackets.
While frame-mounted systems can work, they’re generally less stable than axle-mounted ones and may not be suitable for heavy loads or rough terrain. Always check the manufacturer’s recommendations before using this type.
Step-by-Step: How to Attach a Bike Trailer
Now that you know the basics, let’s go through the actual process of attaching your trailer. We’ll focus on the most common setup: an axle-mounted hitch with a quick-release skewer.
Step 1: Gather Your Tools and Equipment
Before starting, make sure you have:
Visual guide about How Does a Bike Trailer Attach
Image source: full-auto.com
- Your bike trailer with hitch arm
- The correct hitch adapter (usually included with the trailer)
- A wrench or Allen key (if needed for bolt-on axles)
- Your bike’s rear wheel removed (for quick-release systems)
Pro tip: Lay a towel or mat on the ground to protect your bike and trailer during installation.
Step 2: Remove the Rear Wheel (Quick-Release Only)
If your bike uses a quick-release skewer, open the lever and unscrew the nut on the opposite side. Carefully remove the rear wheel and set it aside. Keep the skewer and nuts in a safe place—you’ll need them in a moment.
For bikes with thru-axles or bolt-on wheels, use the appropriate tool to loosen and remove the axle.
Step 3: Install the Hitch Adapter
Most trailers come with a specialized skewer or adapter that replaces your bike’s original quick-release. This adapter has a hitch arm or coupling mechanism built in.
Slide the new skewer through the rear dropout, then reattach the wheel. Make sure the wheel is seated properly in the dropouts and the tire is aligned with the frame. Tighten the skewer securely—this is critical for safety.
For bolt-on axles, follow the same process but use a wrench to tighten the nuts evenly on both sides.
Step 4: Connect the Trailer Arm
Now, take the trailer’s hitch arm and align it with the coupler on the skewer. Most systems use a simple push-and-lock mechanism—push the arm into the coupler until you hear a click.
Some models have a safety pin or locking clip. Always engage this after connecting to prevent accidental detachment.
Step 5: Check Alignment and Tension
Once connected, stand behind the bike and trailer. The hitch arm should be level and centered. If it’s tilted or off-center, adjust the coupler or check the wheel alignment.
Gently rock the trailer side to side. There should be minimal play. If the connection feels loose, double-check the skewer tightness and coupler engagement.
Step 6: Perform a Safety Check
Before riding, do a quick safety inspection:
- Ensure the hitch is fully locked
- Check that all straps, flags, and reflectors are secure
- Verify the trailer wheels are inflated and spinning freely
- Test the brakes (if your trailer has them)
Give the trailer a firm tug to confirm it’s attached. If it moves or feels unstable, stop and recheck the connection.
Tips for Safe and Smooth Riding
Attaching the trailer is just the first step. Here are some practical tips to make your rides safer and more enjoyable.
Balance Your Load
Distribute weight evenly in the trailer. Heavy items should be low and centered. Avoid overloading—most trailers have a weight limit (typically 50–100 lbs). Overloading can affect handling and increase the risk of tipping.
Use a Safety Flag
A bright safety flag increases visibility, especially in traffic or when riding near cars. Attach it to the top of the trailer so it’s clearly seen from behind.
Add Lights and Reflectors
If you ride at dusk or in low-light conditions, equip your trailer with lights and reflectors. Many trailers have built-in mounts, or you can use clip-on bike lights. For more on visibility, check out our guide on how to install lights on a fat tire bike.
Practice Turning and Braking
Trailers change how your bike handles. Take wide turns to avoid clipping curbs, and brake earlier than usual. Practice in a safe, open area before heading into traffic.
Troubleshooting Common Attachment Issues
Even with proper setup, you might run into problems. Here’s how to fix the most common ones.
Trailer Sways or Wobbles
This usually happens if the hitch is loose or the load is unbalanced. Stop and recheck the skewer tightness and cargo distribution. Also, ensure the trailer wheels are properly aligned.
Hitch Won’t Lock
If the coupler won’t click into place, the hitch arm may be bent or misaligned. Check for damage and consult the manufacturer. Never force the connection—this can damage the hitch.
Incompatible Axle Type
Some modern bikes use thru-axles, which require a specific adapter. If your trailer doesn’t fit, contact the manufacturer for a compatible skewer. You can also read our guide on how to choose a bike frame to understand axle compatibility.
Trailer Detaches During Ride
This is rare but dangerous. Always use the safety pin or clip, and inspect the hitch before every ride. If detachment occurs, stop immediately and inspect for wear or damage.
Maintaining Your Trailer Hitch
Like any bike component, your trailer hitch needs regular maintenance.
Clean and Lubricate
Wipe down the coupler and hitch arm after rides, especially in wet or muddy conditions. Apply a light lubricant to moving parts to prevent rust and ensure smooth operation.
Inspect for Wear
Check the hitch, skewer, and coupler for cracks, bends, or excessive wear. Replace any damaged parts immediately. For tips on protecting metal parts, see our article on how to protect a bike frame from rust.
Store Properly
When not in use, store your trailer in a dry place. Disconnect the hitch and cover the bike to prevent dust and moisture buildup.
Conclusion
Attaching a bike trailer is simpler than it looks—once you understand the hitch system and follow the right steps. Whether you’re using an axle-mounted or frame-mounted setup, the key is a secure, aligned connection and regular safety checks.
Remember: always test the hitch before riding, balance your load, and maintain your equipment. With the right setup, a bike trailer can open up new possibilities—from family adventures to eco-friendly errands.
Now that you know how a bike trailer attaches, you’re ready to ride with confidence. Happy cycling!


