
Picture this: you’re cruising down a scenic trail on your bike, feeling the wind in your hair and enjoying the ride. Suddenly, a splash of mud interrupts your bliss, and your clothes are left with reminders of your adventure.
Frustrating, right? But here’s the good news: you can easily solve this issue by making your own DIY bike mudguards. Imagine gliding through muddy paths without a care in the world, your bike equipped with mudguards you crafted yourself. Not only do they protect you from splashes, but they also add a personalized touch to your ride.
You don’t need to spend a fortune or have complex skills; with a few materials and simple steps, you’ll have mudguards that keep you clean and enhance your biking experience. This guide will walk you through everything you need to know, from choosing materials to assembling your custom mudguards. By the end, you’ll have a practical solution that reflects your style and meets your needs. Ready to keep your rides clean and stylish? Let’s dive in and transform your biking experience!
Materials Needed
Gathering the right materials is key for diy bike mudguards. You will need plastic sheets, scissors, and zip ties. Make sure the plastic is water-resistant. This helps keep the mud off your bike. Zip ties will hold the mudguards in place. Scissors are used to cut the plastic to size. A drillmight be needed for some bikes. It helps make holes for the zip ties. Check your bike before starting. This ensures you have all needed materials.

Credit: m.youtube.com
Choosing The Right Material
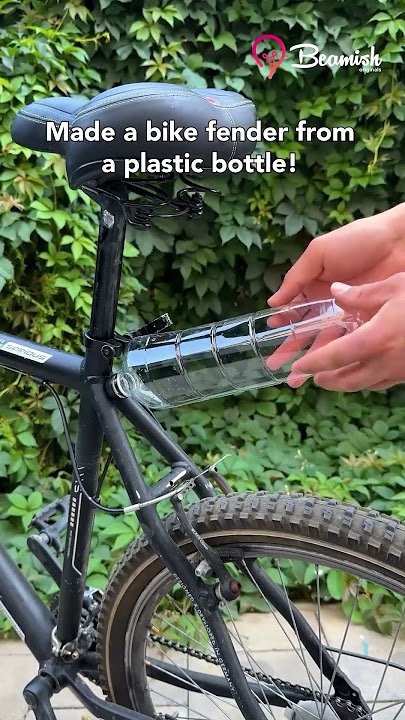
Plastic mudguards are light and cheap. They are easy to cut and shape. Many people use old plastic bottles for DIY mudguards. Simply cut the bottle and attach it to the bike. Plastic is flexible and bends easily. It is also water-resistant, keeping you dry.
Metal mudguards are strong and last long. They give better protection than plastic ones. Many people use aluminum for DIY mudguards. Aluminum is light and does not rust easily. Tin cans can also be a good choice. They are easy to find and cut. Metal mudguards can be a bit heavy. They are great for tough weather.
Tools Required
Gather scissors, sturdy plastic sheets, and zip ties. Use a marker for precise cutting and a drill for holes.
Cutting Tools
Using the right tools makes work easy. Scissors are handy for cutting plastic and rubber. A utility knife is sharp and can cut harder materials. Tin snips are perfect for cutting metal pieces. Always handle cutting tools with care to avoid accidents.
Fastening Tools
Fastening tools help attach parts securely. A screwdriver tightens screws and bolts. Use a wrench for nuts and bolts that are hard to turn. Zip ties are simple yet strong for holding parts together. Duct tape is useful for quick fixes. These tools ensure your mudguards stay in place.
Designing Your Mudguards
Measure the bike wheel carefully. Use a ruler or tape measure. Find the wheel’s width and diameter. These measurements ensure a perfect fit. The mudguard should cover the wheel well. It keeps water and mud away. Check the frame’s space for the mudguard. Ensure there’s enough room to attach it. Measure twice to be sure. A good fit makes the ride smoother and cleaner.
Choose a shape that suits your bike. Some shapes are long and thin. Others are wide and curved. Curved shapes can cover more area. Long shapes protect better from splashes. Use cardboard to test shapes first. Cut it and hold it over the wheel. Check if it fits and looks good. Adjust the shape for better protection. A good shape keeps you clean and dry.
Cutting The Material
Always wear protective gearlike goggles and gloves. Keep your fingers away from sharp tools. A clean workspace helps avoid accidents. Ensure good lighting to see your work clearly. Use a stable table to cut materials. Never rush while working with tools.
Use a sharp cutteror scissors for clean edges. Mark your cutting line with a pencil. Measure twice before cutting to avoid mistakes. Keep your hand steady while cutting. Cut slowly for more precision. Check your work for straight lines.
Shaping The Mudguards
Shaping the mudguards involves cutting flexible plastic sheets to fit your bike’s wheels. Use scissors for precision and ensure the edges are smooth. Secure the mudguards with zip ties or bolts, adjusting for proper alignment to effectively shield against mud and water.
Bending Techniques
Use your hands to bend the plastic. Keep the pressure gentle. Do not rush. Small bends work best. Avoid sudden movements. The plastic might crack. Warm water can help. It softens the material. Makes it easier to bend. Try using a hairdryer. It can warm the plastic too. Use gloves to protect your hands. Be patient while bending.
Forming Curves
Curves give mudguards a smooth look. Use a round object for shaping. A tin can works well. Wrap the plastic around it. Secure it with tape. Leave it for a while. This helps hold the curve. Check if the curve is right. Adjust if needed. Repeat for the other side. Curves help in redirecting mud. This keeps your bike cleaner.
Attaching To The Bike
Secure mudguards to your bike using zip ties or brackets for stability. Ensure proper alignment to prevent tire friction. Check for tightness and adjust if necessary to keep your DIY mudguards effective.
Front Wheel Installation
First, gather all the needed tools. Make sure the bike is stable. Find the spot on the fork for the mudguard. Align the mudguard with the front wheel. Use screws or zip ties to secure it. Tighten them carefully. Check if the mudguard is straight. Adjust as needed.
Rear Wheel Installation
Locate the frame near the rear wheel. Position the mudguard over the tire. Use brackets or clips for attachment. Secure with screws. Make sure it’s tight. Ensure no rubbing against the wheel. Test by spinning the wheel. Adjust if necessary. Make sure it stays firm.

Credit: www.youtube.com
Securing And Testing
Ensure the mudguard is attached tightly to the bike. Check all screws and nuts. They should not be loose. Wiggle the mudguard gently. It should not move too much. If it moves, tighten the screws more. A stable mudguard keeps you safe. It also keeps your bike clean.
Ride your bike through some water. Look for puddles on the road. Watch if the mudguard stops splashes. If water sprays on you, adjust the mudguard. Try riding on different surfaces. Grass, dirt, and pavement are good choices. Make sure the mudguard works everywhere. It should keep you dry and happy.
Maintenance Tips
Create effective DIY bike mudguards using sturdy plastic bottles or old CDs. Cut and shape them to fit. Secure them with zip ties for a simple, cost-effective solution to keep your ride clean and dry.
Cleaning Your Mudguards
Use a soft cloth to wipe dirt off. Avoid using sharp tools. Gentle soap works best for cleaning. Rinse with clean water. Dry with a soft towel. This keeps your mudguards shiny and new. Regular cleaning prevents rust. It also keeps them strong.
Inspecting For Damage
Check mudguards for any cracks or bends. Look closely at all parts. Feel for rough spots with your fingers. These might be signs of damage. A small crack can grow bigger fast. Fixing early saves time and money. Keep an eye on bolts and screws. Tighten any that feel loose. This helps mudguards stay in place.
Credit: www.mtbr.com
Frequently Asked Questions
How To Make A Mudguard For A Bike?
Cut a plastic bottle to desired size and shape. Secure it to the bike frame using zip ties. Trim edges for safety. Ensure it covers the tire to prevent mud splatter. Test for stability before use. Your DIY mudguard is now ready for wet rides!
How To Make Diy Bike Fenders?
Cut plastic bottles in half and trim to fit your bike. Secure with zip ties or duct tape. Ensure they cover wheels to block splashes. Decorate with paint for a personalized touch. Ensure they are tightly secured to avoid movement while riding.
Enjoy your homemade bike fenders!
Do Clip-on Fenders Work?
Clip-on fenders are effective for protecting against mud and water splashes. They are easy to install and remove. These fenders are great for temporary use and fit most bikes. Although not as sturdy as permanent fenders, they offer convenience and flexibility for various cycling conditions.
How Do You Make Fat Bike Mudguards?
To make fat bike mudguards, cut durable plastic sheets to size. Attach them using zip ties or brackets. Ensure proper fit and coverage to prevent mud splashes. Customize for aesthetics and functionality. This DIY approach offers cost-effective protection for muddy trails.
Conclusion
Creating DIY bike mudguards is simple and fun. You save money and enjoy the process. With just a few materials, your bike stays clean. Choose your design and start crafting. Personalize your mudguards to match your style. Keep your bike rides smooth, even in wet weather.
Feel proud of your handiwork on every ride. Share your experience with friends. Inspire others to make their own too. Enjoy the benefits of your creativity and effort. Your bike is now ready for any adventure. Happy cycling!


