

Measuring your head for a bike helmet is essential for safety and comfort. This guide walks you through simple steps to get an accurate measurement and choose the right helmet size. A proper fit ensures maximum protection and a comfortable ride every time.
Key Takeaways
- Use a flexible measuring tape: A soft tape measure gives the most accurate reading around your head’s widest part.
- Measure at the correct height: Place the tape about 1 inch above your eyebrows for the best fit.
- Take multiple measurements: Repeat the process 2–3 times to ensure consistency and accuracy.
- Check the helmet sizing chart: Every brand uses slightly different sizing, so always refer to the manufacturer’s guide.
- Try before you ride: Even with correct measurements, always test the helmet for comfort and secure fit.
- Adjust straps and padding: Use the helmet’s fit system to fine-tune the fit after measuring.
- Replace when needed: Helmets should be replaced every 3–5 years or after any significant impact.
Why Measuring Your Head for a Bike Helmet Matters
Wearing a bike helmet is one of the simplest and most effective ways to protect yourself while cycling. But a helmet only works if it fits properly. A loose helmet can shift or fall off during a crash, while a tight one can cause headaches and discomfort. That’s why knowing how to measure your head for a bike helmet is so important.
In this guide, you’ll learn the exact steps to measure your head accurately, understand how to interpret sizing charts, and ensure your helmet fits snugly and securely. Whether you’re buying your first helmet or upgrading to a newer model, this guide will help you make the right choice.
What You’ll Need
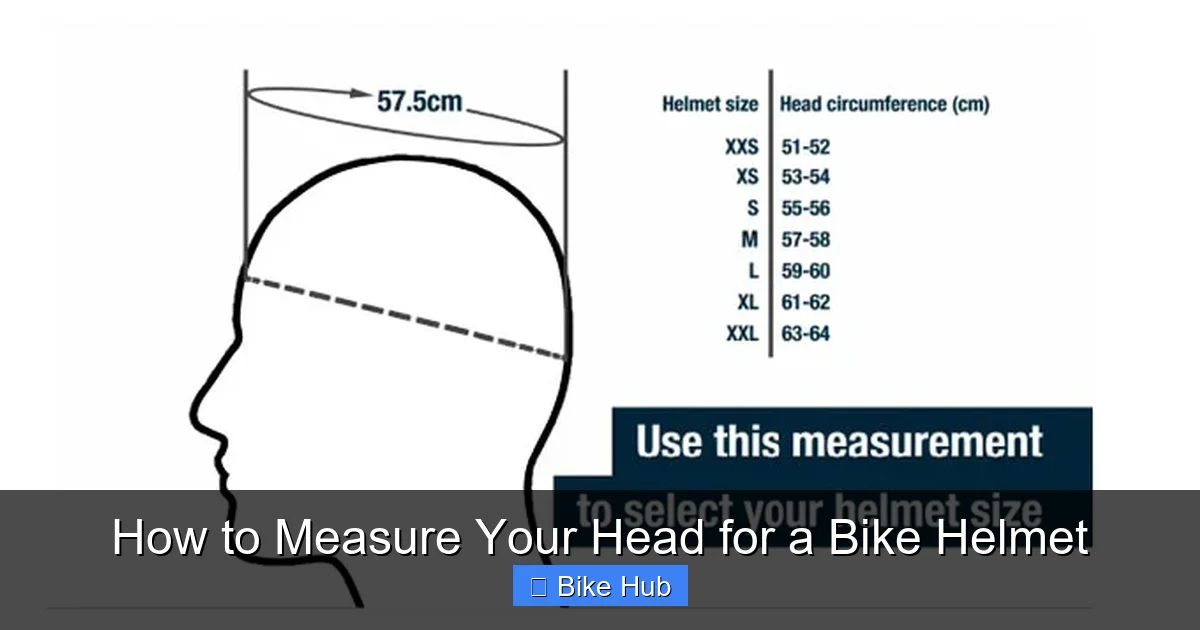
Visual guide about How to Measure Your Head for a Bike Helmet
Image source: billyscrashhelmets.co.uk
Before you start, gather these tools:
- A flexible measuring tape (like a tailor’s tape)
- A mirror (optional, but helpful)
- A pen and paper to record your measurement
- A friend to help (optional, but makes it easier)
If you don’t have a measuring tape, you can use a piece of string and a ruler. Just wrap the string around your head, mark where it overlaps, then measure the length with the ruler.
Step-by-Step Guide to Measuring Your Head
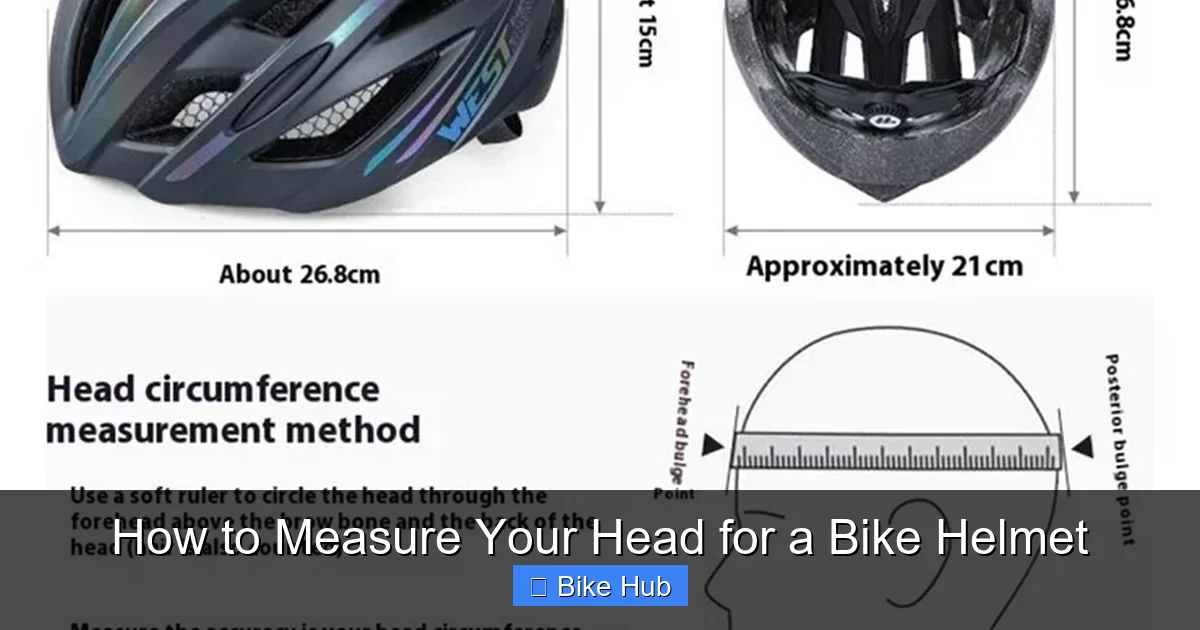
Visual guide about How to Measure Your Head for a Bike Helmet
Image source: img.tvcmall.com
Step 1: Find the Right Spot to Measure
The key to an accurate measurement is placing the tape in the correct position. You want to measure the circumference of your head at its widest point. This is typically about 1 inch (2.5 cm) above your eyebrows—right where a hat band would sit.
Avoid measuring too high on your forehead or too low near your ears. The goal is to capture the fullest part of your head, which ensures the helmet will sit securely without slipping.
Step 2: Wrap the Measuring Tape Around Your Head
Hold one end of the measuring tape at the center of your forehead, just above your eyebrows. Gently wrap the tape around the back of your head, keeping it level. Make sure it’s not twisted and lies flat against your skin.
The tape should pass just above your ears and around the back of your head, where it naturally curves. Don’t pull the tape too tight—it should be snug but not uncomfortable. You should be able to fit a finger underneath it.
Step 3: Read and Record the Measurement
Once the tape is in place, read the number where the ends meet. This is your head circumference in centimeters or inches, depending on your tape.
For example, if the tape reads 56 cm, that’s your measurement. Write it down so you don’t forget.
Step 4: Repeat for Accuracy
To ensure your measurement is correct, repeat the process two more times. Take the average of the three readings. This helps eliminate errors caused by slight shifts in the tape position.
If your measurements vary by more than 0.5 cm, double-check your technique. Make sure the tape is level and positioned correctly each time.
Understanding Helmet Sizing Charts
Once you have your head measurement, it’s time to match it to a helmet size. Most helmets come in small, medium, large, and sometimes extra-small or extra-large sizes. However, sizing can vary between brands, so always check the manufacturer’s chart.
Here’s a general guide:
- Extra Small: 51–54 cm (20–21.25 inches)
- Small: 54–57 cm (21.25–22.5 inches)
- Medium: 57–60 cm (22.5–23.5 inches)
- Large: 60–63 cm (23.5–24.75 inches)
- Extra Large: 63–66 cm (24.75–26 inches)
For example, if your head measures 58 cm, you’ll likely need a medium-sized helmet. But always confirm with the brand’s specific chart, as some run smaller or larger than average.
Tips for a Perfect Fit
Measuring your head is just the first step. A great helmet also needs to feel right when you wear it. Here are some tips to ensure a comfortable and secure fit:
- Try it on: If possible, visit a bike shop and try on helmets in your size. Walk around, shake your head, and simulate riding motions.
- Check the snugness: The helmet should feel tight enough that it doesn’t move when you shake your head, but not so tight that it causes pressure points.
- Use the fit system: Most helmets have an adjustable dial at the back. Turn it to tighten or loosen the fit around your head.
- Adjust the straps: The side straps should form a “Y” just below your ears. The chin strap should be snug—you should be able to fit one or two fingers between the strap and your chin. For more details, check out our guide on how to adjust bike helmet straps.
- Consider your hairstyle: If you wear a ponytail or bun, make sure the helmet still fits securely. Some helmets are designed with ponytail ports. Learn more in our article on how to wear a bike helmet with a ponytail.
Troubleshooting Common Fit Issues
Even with accurate measurements, you might run into fit problems. Here’s how to fix the most common issues:
Helmet Feels Too Tight
If the helmet feels too tight, first check if you’re wearing it correctly. Make sure the fit dial is loosened and the straps aren’t pulling it down. If it’s still uncomfortable, try a size up or look for a helmet with more padding options. You can also replace the helmet padding with thinner or thicker inserts for a custom fit.
Helmet Feels Too Loose
A loose helmet is dangerous. Start by tightening the fit dial and adjusting the straps. If it still moves around, you may need a smaller size. Some helmets come with additional foam inserts to fill extra space.
Pressure on the Forehead or Temples
This usually means the helmet is too narrow or the padding is uneven. Try rotating the helmet slightly or adjusting the fit system. If the problem persists, consider a different model or brand with a wider shape.
Helmet Shifts When You Nod
If the helmet moves up and down when you nod, the fit dial may not be tight enough. Also, check that the chin strap is secure. A properly fitted helmet should stay in place during normal movements.
When to Replace Your Helmet
Even the best-fitting helmet won’t last forever. Over time, materials degrade, and impacts—even small ones—can compromise its safety. Replace your helmet:
- Every 3–5 years, even if it looks fine
- After any crash or hard impact
- If the shell is cracked, dented, or the foam is compressed
- If the straps are frayed or the buckle is broken
For more information, read our guide on how to dispose of an old bike helmet safely and responsibly.
Final Thoughts
Measuring your head for a bike helmet is a quick and easy process that makes a big difference in your safety and comfort. By following these steps, you’ll ensure your helmet fits properly and provides the protection you need on every ride.
Remember, a helmet is only effective if it fits well. Take the time to measure accurately, try on different models, and adjust the fit system and straps. Your head—and your peace of mind—will thank you.
Whether you’re commuting, mountain biking, or enjoying a weekend ride, the right helmet is your first line of defense. So grab that measuring tape, follow this guide, and ride with confidence.


