

Are you tired of your bike helmet feeling uncomfortable during your rides? Maybe the padding is worn out, making your helmet less effective and less comfortable.
Luckily, you don’t need to buy a new helmet to solve this problem. You can easily replace the padding and breathe new life into your trusty helmet. You’ll discover simple steps to replace bike helmet padding, ensuring you ride in comfort and safety once again.
Imagine the relief of having a snug, well-fitting helmet that enhances your cycling experience. Dive in to learn how you can make this quick fix and enjoy your rides even more.
Importance Of Helmet Padding
Helmet paddingprotects the head during falls. It absorbs impact and reduces injury risk. Soft padding feels comfortable on the head. It prevents discomfort during long rides. Padding keeps the helmet snug and secure. It stops the helmet from moving around.
Padding affects how a helmet fits. Without good padding, helmets might feel loose. Loose helmets can fall off easily. Tight padding helps the helmet stay on. It makes sure the helmet fits perfectly. Always check padding for wear and tear. Replace worn padding for better fit.
Identifying Worn-out Padding
Worn-out padding can cause discomfort and reduce helmet protection. Look for flattened or torn areas in the padding. Replacing these ensures better fit and safety.
Signs Of Wear And Tear
Check for flattened or compressed padding. It should be soft and cushiony. Look for cracks or frayed edges. Discoloration can mean it’s old. Odor might signal it’s worn out. Loose padding is a sign too. Replace if it doesn’t stick well.
When To Replace
Replace padding every 1-2 years. Do it sooner if it looks bad. Accidents can damage padding. Sweat and moisture wear it out fast. If it’s uncomfortable, change it. New padding can make the helmet feel new. Safety is important, so don’t delay. Always check for damage before use.
Choosing Replacement Padding
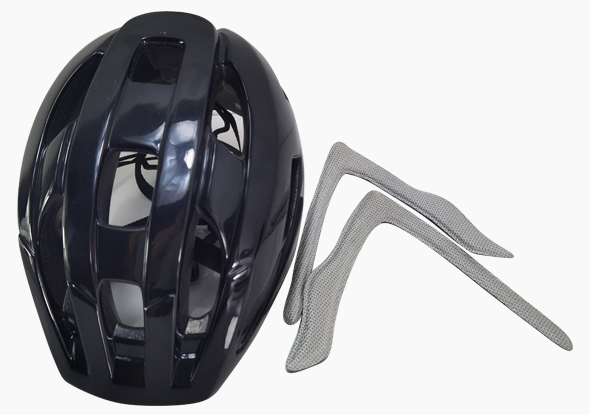
Bike helmet padding comes in various types. Foam pads are the most common. They are soft and comfortable. Gel pads offer better cushioning. They are a bit heavier. Custom pads fit specific helmet shapes. They can be more expensive. Each type has its own benefits. Choose what feels best on your head.
Padding materials vary in comfort and durability. Foam pads are lightweight and soft. Gel pads provide extra comfort but weigh more. Fabric-covered pads can be more durable. Breathable materials keep heads cool. Consider how often you ride. Frequent riders might need durable padding. Comfort is important for long rides. Choose wisely based on your needs.
Gathering Necessary Tools
Gather essential tools like scissors, adhesive, and replacement padding before starting. Ensure compatibility of new padding with your helmet. Proper preparation guarantees a smooth replacement process.
Tools Required
Gather the right tools for replacing your bike helmet padding. You need a screwdriverto remove any screws. Get a pair of scissorsfor cutting the new padding. A clean clothis helpful to wipe the helmet inside. Don’t forget adhesive stripsto attach the new padding. Ensure you have all tools before starting.
Preparing Your Workspace
Choose a clean and bright space to work. Lay a soft cloth on the table. This will protect your helmet from scratches. Organize your tools nearby for easy reach. Make sure your workspace is free from clutter. A tidy space helps you work better and faster.
Removing Old Padding
Gently remove the old padding from your bike helmet to make space for new, comfortable inserts. Ensure all adhesive residues are cleaned off to provide a smooth surface for the new padding. This simple step ensures a snug and secure fit, enhancing your biking experience.
Detaching The Padding
First, find the strapsinside your helmet. Gently pull them away. Use your fingers to removethe old padding. Look for any sticky spots. Be careful not to tear the helmet.
Cleaning The Helmet
Get a soft cloth and some warm water. Wipe the inside of the helmet. Make sure to clean all the little corners. Let it dry in a cool place. Do not use a hairdryer or heater.

Credit: www.facebook.com
Installing New Padding
Replacing bike helmet padding involves removing old liners and securing new ones for comfort and safety. Clean the interior shell before attaching fresh padding with adhesive strips or Velcro. Ensure a snug fit to maintain helmet effectiveness.
Positioning The Padding
Place the padding inside the helmet. Ensure it fits snugly. Align the padding with the helmet’s contours. Check that it covers all necessary areas. Adjust if needed for comfort.
Securing The Padding
Use Velcro or adhesive strips to secure the padding. Press firmly to attach. Double-check for any loose spots. Make sure the padding stays in place. Test the helmet on your head. Ensure it feels comfortable and secure.
Testing The Fit
Ensure a snug fit by testing helmet padding before finalizing replacements. Adjust until the helmet feels secure and comfortable. Properly fitted padding enhances safety and riding experience.
Adjusting For Comfort
Place the helmet on your head. Make sure it sits level. The front should be just above your eyebrows. This helps protect your forehead. Check the side straps. They should form a “V” under your ears. Adjust them if needed. The buckle should be snug under your chin. Not too tight, not too loose. You should fit two fingers between the strap and chin. This ensures comfort and security.
Ensuring Safety
Move your head from side to side. The helmet should not shift much. Shake your head up and down. The helmet should stay in place. If it moves too much, adjust the padding. Add or remove pads until it fits well. The helmet should feel snug but comfortable. A good fit keeps you safe while riding. Always check the fit before each ride.

Credit: www.youtube.com
Maintenance Tips
Replacing bike helmet padding improves comfort and safety. Begin by removing old padding carefully. Then, attach new padding securely using the Velcro or adhesive provided. Ensure proper alignment for maximum comfort. Regular checks keep the padding in top condition, enhancing your cycling experience.
Regular Checks
Check your helmet padding often. Look for wear and tear. Damaged padding needs replacing. Clean padding regularly with mild soap. This keeps it fresh and soft. Dry it properly after cleaning. Wet padding can smell bad. Ensure padding fits snugly inside the helmet. Loose padding won’t protect well.
Extending Padding Life
Store your helmet in a cool, dry place. Avoid direct sunlight; it can damage padding. Handle the helmet gently. Rough handling can ruin padding. Use helmet covers when storing. Covers protect from dust and dirt. Replace padding every few years. This ensures your helmet stays safe.
Credit: www.aurorahelmets.com
Frequently Asked Questions
How To Replace Helmet Pads?
Remove old pads from the helmet. Clean the interior with a damp cloth. Attach new pads using Velcro or adhesive. Ensure they fit snugly for comfort and safety. Adjust as needed for a secure fit.
What Is The 5 Year Helmet Rule?
The 5-year helmet rule suggests replacing helmets every five years. Over time, materials degrade, reducing protection. Regular replacement ensures safety standards are maintained. Always check manufacturer guidelines for specific recommendations.
What Is The 2 2 2 Rule When Fitting A Helmet On Your Head?
The 2 2 2 rule ensures proper helmet fit: two fingers above eyebrows, two fingers under chin strap, and two fingers between the strap and jaw. This simple guideline helps secure the helmet for safety, comfort, and effectiveness in protecting your head during activities.
Are Helmet Cheek Pads Universal?
Helmet cheek pads are not universal. Different brands and models have unique designs and sizes. Always check compatibility before purchasing replacement pads to ensure a proper fit and maximum comfort.
Conclusion
Replacing bike helmet padding is easy and keeps you safe. Fresh padding ensures comfort during rides. It also helps your helmet fit better. Remember to check your helmet regularly. Look for signs of wear or damage. New padding can make a big difference.
It extends the life of your helmet. You can ride with confidence and peace of mind. Follow the steps provided for best results. Enjoy your rides with a well-fitted helmet. Safety and comfort go hand in hand. Happy cycling!



