

Imagine cruising down a trail with the wind in your hair, feeling the thrill of speed and freedom. But wait—how safe are you really?
Your bike helmet is your first line of defense, but how can you be sure it’s up to the task? You might think helmet testing is a job for the experts, but there are simple ways you can test your helmet’s safety right at home.
Taking control of your own safety means peace of mind, knowing you’re protected every time you ride. Dive into this guide to discover easy, practical methods to check your helmet’s safety, ensuring you’re ready for any adventure. Your safety matters, and with just a few steps, you can ride with confidence. Keep reading to learn how you can make sure your helmet is as reliable as you need it to be.

Credit: m.facebook.com
Helmet Inspection Basics
Helmet inspection at home can ensure safety. Check for cracks or dents. Test straps for strength and adjustability.
Check For Damage
Look closely at the helmet’s surface for any cracksor dents. These can make the helmet weak. Feel the foam inside. It should be firmand not squishy. If it feels wrong, it’s not safe. The shell should not have deep scratches. If it does, it might not protect well.
Examine The Straps
Pull the straps gently. They should not feel loose. Check the stitching on the straps. It should be tightand not frayed. Make sure the straps are clean. Dirt can make them slippery. Adjust the straps to fit snugly under your chin.
Inspect The Buckle
Fasten and unfasten the buckle a few times. It should clicksecurely each time. The buckle must not pop open on its own. Check for any ruston metal parts. Rust can weaken the buckle over time. Ensure the buckle is easy to use with one hand.

Credit: riiroo.com
Fit And Comfort Testing
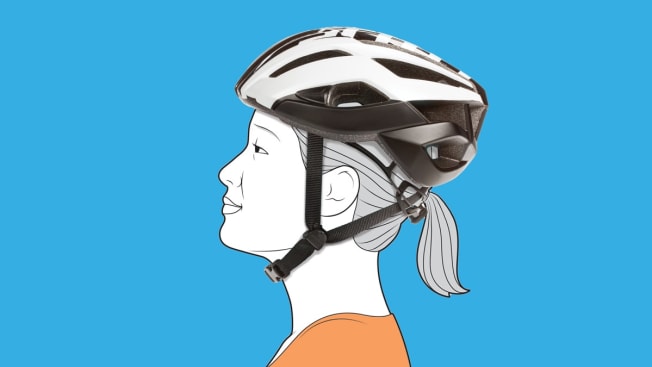
Tighten the straps until they feel snug. They should not be too tight. The straps should form a “V” under your ears. This keeps the helmet in place. Buckle the chin strap. Leave space for two fingers under it. This ensures comfort and safety.
Put the helmet on your head. It should sit level. Not too high or too low. Shake your head side to side. The helmet should not move much. The front edge should be two fingers above your eyebrows. This protects your forehead.
Wear the helmet for a few minutes. It should feel comfortable. No parts should dig into your head. Adjust the padding if needed. Some helmets have extra padding. Use it for a better fit. Comfort helps you wear it longer.
Impact Resistance Tests
Checking bike helmet safety at home is simple. Drop the helmet from a height of about three feet onto a hard surface. Inspect for cracks or dents to ensure it can withstand impact.
Drop Test Procedure
Place the helmet on a flat surface. Drop a weight from a set height. Observe any damage or deformation. Check the outer shell for cracks. Look inside for any compressed foam. This test shows how well the helmet absorbs impact.
Compression Test Method
Use two boards or flat surfaces. Place the helmet between them. Apply pressure evenly. Watch for any bending or cracking. Inspect the foam inside. Good helmets should resist compression without damage.
Simulating Real-world Impacts
Create a simple swing with a weight. Attach the weight securely. Swing it against the helmet. Check for dents or cracks. Assess the foam inside for damage. This test mimics a real-world impact.
Credit: www.consumerreports.org
Advanced Safety Features
MIPS stands for Multi-directional Impact Protection System. It helps protect your brain. The technology allows the helmet to move slightly. This reduces rotational forces during a crash. Check if your helmet has a yellow liner. This indicates it has MIPS.
A helmet should have good ventilation. This keeps your head cool. Lightweight helmetsare more comfortable. Heavier helmets may strain your neck. Look for helmets with many air vents. This makes biking more enjoyable.
Helmets with reflective elementsincrease safety. These elements make you visible at night. Check for reflective stickers or strips. This helps drivers see you better. Visibility is crucial during low light conditions.
Maintenance And Care
Testing your bike helmet’s safety at home is simple. First, inspect for cracks or dents. Then, ensure the straps and buckles are secure and fit snugly. Finally, gently press on the helmet to check for firmness.
Cleaning Techniques
Use a soft cloth and mild soap to clean the helmet. Avoid harsh chemicals that can damage the helmet. Rinse with water and let it air dry completely. Ensure all parts are clean and free from dirt. Always clean the straps and padding, as they gather sweat.
Storage Tips
Store the helmet in a cool, dry place away from sunlight. Avoid placing heavy items on top of it. Always hang it on a hook or place it on a flat surface. Never leave the helmet in a car, as heat can weaken it. Keep it away from pets and small children.
Regular Safety Checks
Inspect the helmet for cracks or dents. Check the straps and buckles. Ensure they work properly. Test the fit to make sure it sits snug on your head. Replace the helmet if it shows signs of damage. Safety is very important.
When To Replace Your Helmet
Check for cracksor dentson the helmet. Look inside for any loose padding. Scratches can weaken the helmet’s protection. If the straps are fraying, they might not hold well. The helmet should fit snugly; if it feels loose, it might be worn out.
Always inspect your helmet after a fall or crash. Even small impacts can damage it. Look for any visible damage. If it doesn’t look right, consider replacing it. Helmets are designed for one major hit. After that, they might not protect you well. Safety is more important than looks.
Read the instructions that came with your helmet. Most manufacturers suggest replacing every 3-5 years. They know when materials degrade. Following their advice keeps you safe. If you can’t find the booklet, check their website. It’s important to stay informed about your gear.
Frequently Asked Questions
How To Tell If A Bike Helmet Is Safe?
Check for safety certifications like CPSC, ASTM, or EN1078. Inspect for a snug fit and undamaged shell. Look for adjustable straps and a comfortable interior. Ensure it covers the forehead and doesn’t obstruct vision. Replace if it’s involved in an accident or shows visible wear.
What Is The 2 2 2 Rule For Helmets?
The 2 2 2 rule for helmets ensures a proper fit. Leave two fingers’ width above eyebrows, two fingers between chin strap and chin, and adjust straps to form a “V” under each ear. This ensures safety and comfort.
How To Tell If A Helmet Is Compromised?
Check for visible cracks, dents, or warping. Inspect the straps for fraying or damage. Ensure the interior padding remains intact and firm. Replace if it experienced any impact, even without visible damage. Always prioritize safety and regular maintenance.
How To Check Helmet Safety Rating?
Check the helmet label for DOT, ECE, or Snell certifications. These ratings ensure safety standards compliance. Verify the certification online using the manufacturer’s website for authenticity. Always choose helmets with recognized safety ratings to ensure protection.
Conclusion
Testing bike helmet safety at home ensures your protection. Simple steps make a big difference. Inspect your helmet for visible cracks. Check the straps for tightness. Measure the fit around your head. A well-fitted helmet offers better safety. Practice balance tests to assess stability.
Remember, a helmet is crucial for safety. Each test increases your confidence on the road. Don’t overlook these checks. They are vital for your safety. Your helmet can save your life. Make sure it’s ready for the ride. Stay safe and enjoy cycling!


