
Imagine the smooth glide of your car as you press the brake pedal, bringing your vehicle to a gentle stop. This seamless experience is largely thanks to hydraulic brake fluid, a vital component in your car’s braking system.
But what happens when this fluid starts to wear out or becomes contaminated? As a driver, you might notice your brakes feeling less responsive or hear unsettling noises. Fortunately, you have the power to restore your braking system to its optimal performance by learning how to replace hydraulic brake fluid.
In this guide, we’ll walk you through the simple steps that can make a significant difference in your driving safety and comfort. Whether you’re a seasoned mechanic or a curious beginner, understanding how to replace hydraulic brake fluid will give you peace of mind and enhance your control on the road. Plus, taking this maintenance step yourself can save you money and time, while giving you the satisfaction of knowing your car is in top condition. Keep reading to discover how you can easily tackle this task and ensure your vehicle runs smoothly and safely.

Credit: www.whocanfixmycar.com
Tools And Materials Needed
Gathering the right tools is important. Here’s a list to guide you:
- Hydraulic brake fluid – Make sure it’s the right type.
- Wrench – For loosening bolts and nuts.
- Syringe or pump – Helps in removing old fluid.
- Clean cloth – Wipe away spills and drips.
- Safety gloves – Protects hands from chemicals.
- Safety goggles – Shields eyes from splashes.
- Container – To catch old fluid safely.
Always wear safety gear. Brake fluid can harm skin and eyes. Make sure all tools are clean. This prevents dirt from entering the system.
Safety Precautions
Wear protective gloves to keep your hands safe. Put on safety goggles to protect your eyes. Ensure good ventilation in the work area. This helps avoid inhaling fumes. Keep a fire extinguisher nearby, just in case. Clean spills immediately to prevent accidents. Store brake fluid away from heat sources. It is flammable and can catch fire. Check for leaks in the system before starting work. Secure the vehicle on a flat surface. Prevent it from moving unexpectedly.
Locating The Brake Fluid Reservoir
The brake fluid reservoir is usually found near the engine. It is often a transparent plastic container. This helps you see the fluid level easily. Look for a symbol on the cap showing a circle with an exclamation point. This symbol indicates the brake system. Open the hood and search for this symbol. It’s important to check the fluid level regularly. Low levels can cause brake failure.
When checking, ensure the car is on a flat surface. This prevents inaccurate readings. If unsure, consult the car’s manual. The manual provides specific location details. Always use clean tools when handling brake fluid. Dirt can contaminate the system. Contamination reduces braking efficiency.

Credit: www.youtube.com
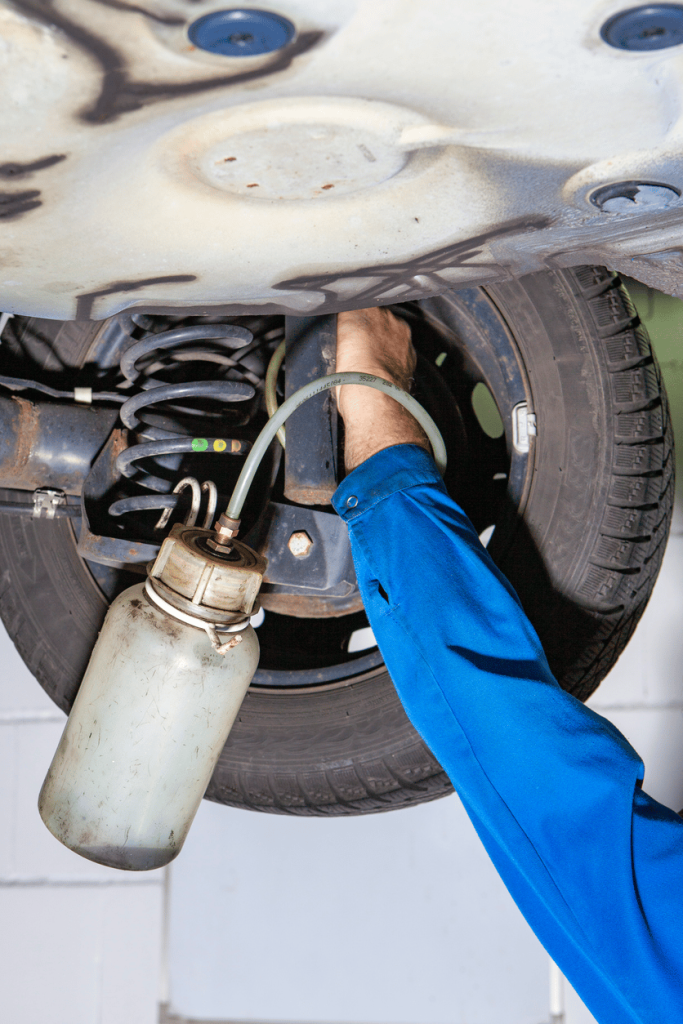
Draining Old Brake Fluid
Start by removing the cap from the brake fluid reservoir. Ensure the car is on a level surface. Use a jack to lift the vehicle if needed. Locate the brake fluid bleeder screws. These are usually found near each wheel. Have a container ready to catch old fluid.
Using A Brake Bleeder Kit
Attach the bleeder hose to the screw. Pump the brake pedal gently. This helps push out the old fluid. Keep an eye on the reservoir level. Add new fluid as needed to prevent air from entering. Ensure the fluid runs clear before closing the screw.
Alternative Methods
- Use gravity to drain fluid. Open the bleeder screw and let fluid drip.
- Ask a friend to help. They can pump the brake while you monitor.
- Use a vacuum pump to remove fluid. This can be quicker.
Cleaning The Reservoir
Start by gathering your cleaning tools. Use a clean clothor a lint-free rag. This helps in wiping the reservoir. Ensure you have a small brushready too. Open the reservoir cap gently. Be careful not to spill fluid. Look inside for any dirt or debris. Remove them using the brush. Wipe the edges with the cloth.
It is important to keep the area clean. Dirt can harm the brake system. Always handle brake fluid carefully. It’s important not to touch it with bare hands. Wear gloves for safety. Ensure no dust enters the reservoir. A clean reservoir ensures smooth brake function. After cleaning, close the cap tightly. This keeps the fluid safe and prevents leaks.
Filling With New Brake Fluid
Filling the brake system with new hydraulic fluid involves carefully removing the old fluid first. Ensure the reservoir is clean and free from debris before adding fresh brake fluid. Use the correct type for your vehicle to maintain optimal brake performance.
Choosing The Right Fluid
Pick the correct brake fluid for your vehicle. Check the owner’s manual or ask an expert. Brake fluids like DOT 3, DOT 4, or DOT 5.1 are common. Never mix different types of brake fluids. They work differently and can damage brakes.
Pouring Techniques
Use a clean funnel to pour the fluid. Pour slowly to avoid spills. Keep the bottle steady and the funnel in place. Do not overfill the reservoir. Check the fill line often. Wipe off any spills to keep things clean.
Bleeding The Brakes
Bleeding the brakes ensures smooth and safe braking by removing air from the brake lines. Replace the hydraulic brake fluid regularly to maintain optimal performance and safety. Follow proper techniques to prevent brake failure and extend your vehicle’s lifespan.
Step-by-step Bleeding Process
Start by gathering all the tools needed. You will need a wrench, brake fluid, and a clear tube. Attach the clear tube to the brake bleeder valve. The tube helps you see the fluid. Make sure the other end is in a bottle. This keeps things tidy.
Ask a friend to pump the brake pedal. They should press down and hold. Then, open the bleeder valve with the wrench. Fluid will flow out with air bubbles. Close the valve before your friend lets the pedal up. Repeat until no more bubbles come out.
Checking For Air Bubbles
Look closely at the fluid in the clear tube. Air bubbles mean there is still air inside. Keep bleeding until the fluid is clear. No bubbles should be visible. Air in the brakes makes them soft. Soft brakes are not safe. Check all four brakes for air. Do this process for each wheel.
Testing Brake Performance
Before driving, check the brakes. Press the brake pedal. Feel for any softness or sponginess. The pedal should feel firm and responsive. Listen for any unusual noises. Screeching or grinding is bad. Test the brakes on a safe road. Start with slow speeds. Gradually increase speed and apply the brakes. The car should stop smoothly and in a straight line. Keep an eye on brake fluid levels. Low fluid can affect performance. Check for any leaks under the car. Leaks can lead to brake failure. Always ensure the brake lights work. They alert other drivers when you stop. Regular brake testing keeps you safe.
Disposing Old Brake Fluid
Old brake fluid is hazardous waste. It needs careful handling. Never pour it down the drain. This can harm the environment. Take the used fluid to a recycling center. Many auto shops have disposal services. Ask them if they accept brake fluid. Store old fluid in a sealed container. Label the container clearly. This helps prevent accidents.
Wear gloves when handling old fluid. It can irritate the skin. Always wash your hands after. Make sure children and pets stay away. Keep old fluid out of reach. Follow local laws for disposal. Each place has different rules. Always follow these for safety.

Credit: www.youtube.com
Maintenance Tips
Changing hydraulic brake fluid keeps brakes working well. Always use clean tools. Dirty tools can make the fluid dirty. This can hurt the brakes. Wear gloves to keep your hands safe.
First, check the brake fluid level. Low fluid means a leak. Fix leaks before adding new fluid. Next, find the brake fluid reservoir. It’s near the brake pedal. Open it carefully. Don’t spill the fluid. It can damage car paint.
Pour the new fluid slowly. Fill it to the right level. Close the reservoir cap tightly. This stops dirt from getting in. Finally, test the brakes. Press the pedal. It should feel firm. Soft pedals may need more fluid.
Frequently Asked Questions
How Often Should I Change Hydraulic Brake Fluid?
Change hydraulic brake fluid every two years or 24,000 miles, whichever comes first. Regular maintenance ensures optimal performance and safety. Always consult your vehicle’s manual for specific recommendations. Frequent checks help prevent brake system issues and extend your vehicle’s lifespan.
Can I Replace My Brake Fluid Myself?
Yes, you can replace your brake fluid yourself. Ensure you have proper tools and knowledge. Follow your vehicle’s manual for guidance. Always prioritize safety and dispose of old fluid responsibly. If unsure, consult a professional.
How Much Does It Cost To Replace Hydraulic Brake Fluid?
Replacing hydraulic brake fluid usually costs between $70 and $120. Prices vary by location and vehicle type. Regular maintenance ensures optimal brake performance and safety. Always consult your mechanic for accurate estimates and recommended service intervals.
Can I Put Brake Fluid In My Hydraulic Brakes?
Brake fluid is not suitable for hydraulic brakes. Use mineral oil or specific hydraulic fluid recommended by the manufacturer. Mixing fluids can damage the braking system and reduce performance. Check the brake system’s manual for the correct fluid type to ensure optimal function and safety.
Conclusion
Changing hydraulic brake fluid is crucial for safety. Follow steps precisely to ensure smooth braking. Regular maintenance prevents potential issues. Always use the right fluid type for your vehicle. A clean workspace helps avoid contamination. Dispose old fluid responsibly. Check for leaks after finishing.
Proper tools make the job easier. Consult your vehicle manual for specifics. Seek professional help if unsure. Regular checks keep your brakes reliable. Stay safe and enjoy the drive.


