
Have you ever found yourself struggling with your bike’s hydraulic brake levers, unsure of how to remove them safely and efficiently? You’re not alone.
These intricate components are essential for smooth braking, but when it’s time for maintenance or upgrades, they can seem daunting to handle. Imagine the satisfaction of mastering this task on your own, feeling empowered to keep your bike in top shape.
This guide will walk you through every step of the process, ensuring you have the confidence to tackle it without hesitation. By the end, you’ll know exactly what tools to use and how to approach the task, saving you time and possibly a trip to the bike shop. Dive in, and let’s get your bike ready for the ride of a lifetime!
Tools Needed
Before you start, gather all the necessary tools. You will need a set of Allen wrenches. These help in loosening and tightening bolts. A torque wrenchis also important to ensure proper tension. Don’t forget a screwdriverfor any screws involved. A clean clothor rag is needed for cleaning parts.
Have some brake fluidready in case of spills. A drip trayis useful to catch any fluid. Keep a small containerfor removed parts. Always have some glovesto protect your hands. Finally, a bicycle standkeeps your bike steady.
Having all these tools makes the job easier. Double-check everything before you begin. This saves time and prevents mistakes.
Safety Precautions
Always wear protective gloveswhen working with hydraulic brakes. Ensure the bike is stable and won’t tip over. Double-check all tools are within easy reach. Avoid distractions and keep the area well-lit. Make sure children and pets are away from the workspace.
Ensure to release any pressurefrom the brake system. Inspect for leaks or damage before proceeding. Keep a clean cloth handy for wiping spills. Always follow the manufacturer’s guidelines for safe handling. Never rush the process; patience is key.
- Wear eye protection.
- Use a bike stand if possible.
- Check for worn parts.
- Keep the workspace tidy.
- Read instructions carefully.
Preparing The Bike
Removing hydraulic brake levers from a bike involves loosening the handlebar clamp bolt. Slide the lever off gently. Ensure the brake line is disconnected to prevent damage. It’s important to handle components carefully and store them safely for future use.
Position The Bike
Use a sturdy bike stand. This keeps the bike stable. Ensure the bike is upright. Check the ground for stability. Avoid uneven surfaces. Make sure the bike won’t tip over. This helps you work safely.
Secure The Bike
Fasten the bike tightly on the stand. Use straps if needed. Double-check the bike’s position. Ensure the wheels don’t move. Hold the bike steady while working. Confirm all parts are secure. This prevents accidents during removal.
Credit: www.mtbr.com
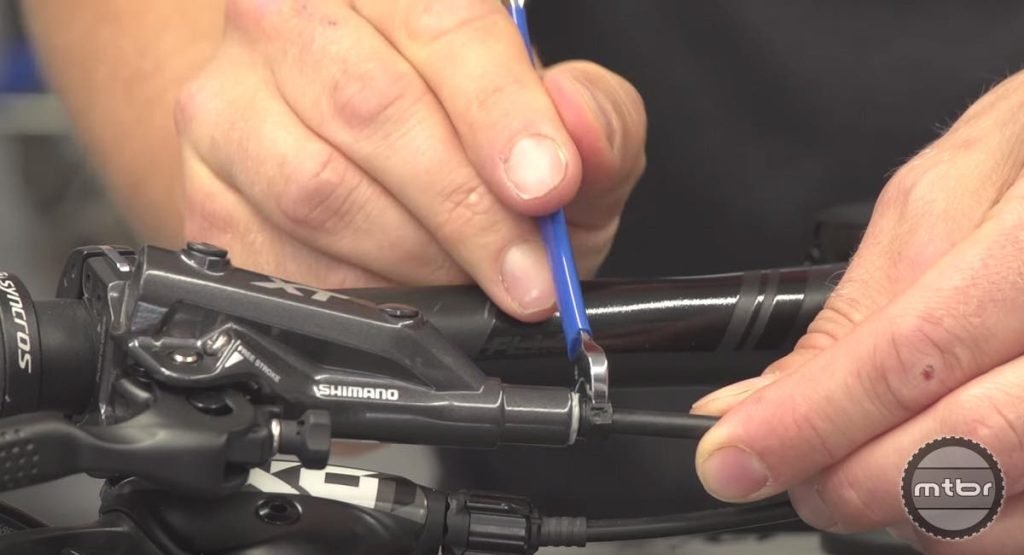
Accessing The Brake Lever
Start by taking off the handlebar grips. Twist the grip gently to loosen it. Use a flat tool if needed. Slide the grip off the handlebar. Be careful not to tear the grip. This step reveals the brake lever.
Locate the brake cable near the lever. Find the small bolt holding the cable. Use a wrench to turn the bolt. Loosen the bolt until the cable is free. Pull the cable out of the lever. Keep the cable safe for later use.
Removing The Brake Lever
First, make sure the bike is stable. Use a bike stand if possible. Loosen the screws holding the brake lever. Use the correct size wrench. Hold the lever with one hand. Gently slide the lever off the handlebar. Be careful not to damage any parts. Keep the screws safe for later use.
Look for any fluid around the lever. Use a clean cloth to wipe it. Ensure no fluid leaks from the brake line. This could mean a problem. Check the brake line for damage. If damaged, it might need fixing. Make sure the area is clean and dry before proceeding. This helps when installing a new lever.

Credit: www.youtube.com
Cleaning The Area
Cleaning the area around hydraulic brake levers is essential before removal. Wipe away dirt and debris with a clean cloth. Ensure the workspace is dry and well-lit for better visibility and safety.
Inspect Brake Components
Check all brake parts carefully. Look for cracks or leaks. Make sure the brake pads are not worn out. Look at the brake lines for any damage. Ensure everything is in good condition. Safety is important.
Wipe Excess Fluid
Use a clean cloth to wipe off extra fluid. Make sure the cloth is lint-free. Clean around the brake lever area. Do not let any fluid drip on the bike. This fluid can damage paint. Be careful and thorough. Dispose of used cloths properly.
Reinstallation Tips
Removing hydraulic brake levers requires careful handling and basic tools. Begin by loosening the brake cable and unscrewing the lever bolts. Slide the levers off the handlebar, ensuring no damage to the cables or grips.
Align New Lever
Ensure the new lever is properly aligned. It should match the handlebar curve. Check the angle to ensure comfort while riding. A small adjustment can make a big difference. Use a level to check alignment. Double-check to avoid misalignment.
Secure With Bolts
Use appropriate bolts to secure the lever. Tighten bolts firmly but not excessively. Over-tightening can damage the lever. Use a wrench for better control. Check each bolt individually. Ensure all bolts are evenly tightened. Test the lever for stability. It should not move or wobble.
Testing The System
Begin by securing the bike in a stable position. Loosen the bolts on the handlebar and gently slide the brake levers off. Carefully remove any cables attached, ensuring not to damage them during the process.
Check Lever Function
Ensure the brake lever feels smooth. Press it a few times gently. It should return to its position quickly. If it sticks, there might be dirt or an issue. Feel for any unusual resistance. Resistance can mean a problem inside. A smooth lever means it’s working properly.
Perform Brake Test
Squeeze the brake lever hard. The bike should stop quickly. If it doesn’t, the brakes might need adjusting. Listen for any strange sounds. Squeaking can mean the brake pads are worn. The bike should not roll when the lever is squeezed. Always ensure the brakes are strong and reliable.
Common Mistakes
Cross-threadingcan damage the brake lever threads. Be careful when threading bolts. Always start with hand-tightening. Feel the threads align correctly. If resistance is felt, stop immediately. Remove and reinsert the bolt. Ensure smooth threading. Misalignment leads to costly repairs.
Alignmentensures brakes work efficiently. Check lever position before tightening. Levers should align with handlebars. Misaligned levers cause discomfort. They affect braking performance. Use a level tool if necessary. Double-check alignment after tightening. Proper alignment improves safety.

Credit: www.youtube.com
Maintenance Advice
Removing hydraulic brake levers requires careful handling. Begin by loosening the clamp bolts. Gently slide the lever off the handlebars. Ensure all cables are disconnected before removal to avoid damage. Clean the area thoroughly to maintain optimal brake performance.
Regular Checks
Check hydraulic brake levers every month. Look for leaks or damage. Tighten loose screws and nuts. Clean the levers with a damp cloth. Inspect brake pads for wear. Change them if needed. Ensure the brake fluid level is correct. This keeps brakes working well.
Fluid Replacement
Replace brake fluid every year. Use recommended fluid for your brakes. Drain old fluid from the system. Refill with new brake fluid. Bleed the brakes to remove air. Check for leaks after refilling. Test brakes to ensure they work well. Proper fluid keeps brakes strong.
Frequently Asked Questions
How To Remove Brake Lever Pivot Bolt?
To remove the brake lever pivot bolt, first, use a suitable wrench or screwdriver. Loosen the bolt by turning counterclockwise. Once loose, carefully pull out the bolt. Ensure not to damage surrounding components. Reassemble the lever if needed after removing the bolt.
How To Move Shimano Brake Levers?
Loosen the clamp bolt on the Shimano brake lever using an Allen wrench. Adjust the lever’s position to your preference. Tighten the bolt securely once adjusted. Ensure the lever is easily accessible and comfortable while riding. Regularly check for proper alignment and security to maintain optimal performance.
Can You Replace Just The Brake Lever?
Yes, you can replace just the brake lever. Ensure compatibility with your bike model for proper installation. Check for quality, durability, and brand reputation when selecting a replacement lever. Regular maintenance helps prolong the lifespan of bike components.
How To Remove The Air From A Hydraulic Braking System Step By Step?
Bleed brakes to remove air from hydraulic system. Attach clear tube to bleeder valve. Open valve, pump brake pedal. Watch for bubbles. Close valve when bubbles stop. Repeat for each wheel, ensuring no air remains.
Conclusion
Removing hydraulic brake levers isn’t complex with the right steps. Start by gathering necessary tools. Follow each instruction carefully to avoid any mistakes. Keep your workspace tidy for efficiency. Safety should be your top priority. Check for leaks after installation.
Regular maintenance extends brake life. Ensure lever alignment for smooth operation. Practice patience during the process. This skill improves your bike maintenance knowledge. Share these tips with fellow cyclists. Your confidence will grow with each attempt. Feel free to ask for help if needed.
Successful removal means better biking experiences ahead.


