
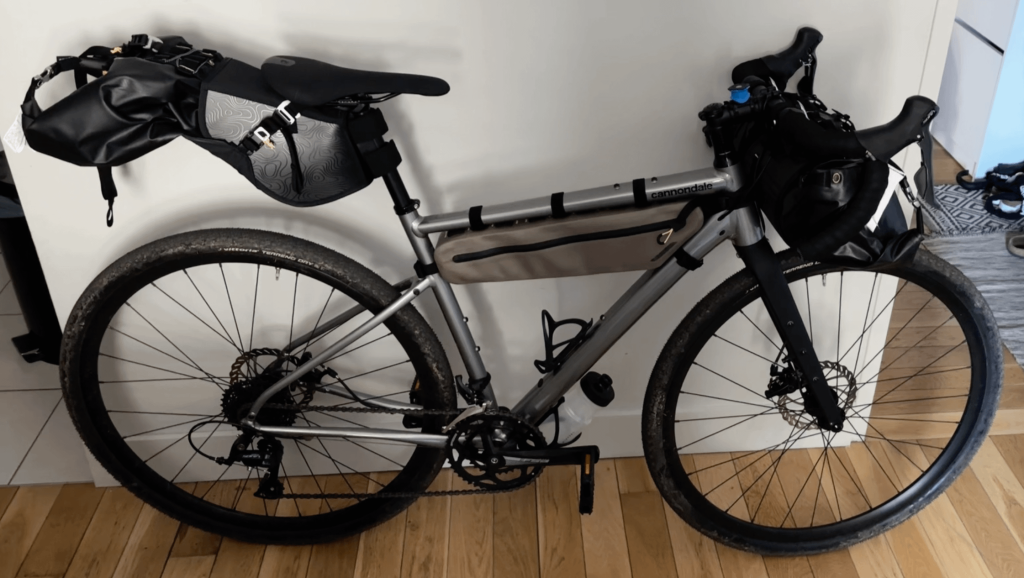
Imagine reaching for your map or snacks while on a bikepacking trip, only to fumble through a messy pile of gear. Frustrating, right?
When you organize your gear for easy access, every essential is right where you need it—saving you time, stress, and energy on the trail. In this post, you’ll discover simple, effective ways to pack smart so you can focus on the ride, not the search.
Ready to transform your bikepacking experience? Let’s get started.
Choosing The Right Bags
Organizing gear well is key for easy access during bikepacking. Choosing the right bags helps keep items in order and reach them fast.
Each bag type fits a specific bike area. Picking the best bags depends on what you carry and how often you need items.
Frame Bags
Frame bags fit inside the bike frame triangle. They hold heavy or bulky gear like tools and food.
These bags keep weight centered and low. This helps balance the bike while riding.
- Good for heavier items
- Easy to reach while riding
- Use waterproof bags to protect gear
Handlebar Packs
Handlebar packs attach in front of the bike. They are great for sleeping bags and clothes.
These bags keep bulky, light items out of the way. They free up space in other bags for essentials.
- Carry lightweight, bulky gear
- Easy to unload at camp
- Use compression straps to save space
Seat Packs
Seat packs attach behind the saddle. They are good for clothes, tools, or food you need less often.
These bags keep weight rearward and low. They help balance the bike for better control.
- Store medium-weight items
- Access at stops, not while riding
- Choose durable materials for rough roads
Top Tube Bags
Top tube bags sit just behind the handlebars. They are perfect for snacks, phones, or small tools.
These bags allow quick access without stopping. They keep essential items within easy reach.
- Carry small, frequently used items
- Easy to open while riding
- Use waterproof zippers for protection
Packing Essentials Strategically
Organizing your gear well makes bikepacking easier. It helps you find items fast and keeps your ride balanced.
Use smart packing methods to keep your essentials ready and your bike stable on the road.
Prioritize Frequently Used Items
Keep items you use often in easy-to-reach places. This saves time and avoids unpacking everything.
- Store snacks and water near the handlebars or top tube bag
- Place maps, phone, and tools in side pockets or front bags
- Keep rain gear and layers where you can grab them quickly
Distribute Weight Evenly
Balance your bike by spreading weight across all bags. Uneven loads make handling hard and tiring.
| Bag Location | Weight Type | Examples |
| Frame Bag | Medium | Tools, food, small gear |
| Handlebar Bag | Light | Sleeping bag, clothes |
| Saddle Bag | Heavy | Tent, cooking gear |
| Panniers | Balanced | Clothes, food, water |
Separate Wet And Dry Gear
Keep wet items away from dry ones to avoid damage and discomfort. Use waterproof bags or liners.
Try this packing tip:
- Use dry sacks for clothes and sleeping bags
- Store wet clothes in a separate waterproof bag
- Keep cooking gear in a different compartment
Using Packing Cubes And Organizers
Packing cubes and organizers help keep your bikepacking gear neat. They make it easy to find what you need fast.
Organizing your gear in separate cubes saves space and reduces mess inside your bags. This way, you focus on your ride.
Benefits Of Packing Cubes
Packing cubes keep items grouped and protected. They stop small things from getting lost or mixed up.
Cubes also make it easier to pack and unpack. You can quickly remove a whole cube instead of digging through your bags.
- Separate clothes, tools, and food
- Save space by compressing items
- Keep gear clean and dry
- Easier to carry gear between camps
Labeling For Quick Identification
Labels help you find things without opening every cube. Use tags or write on the cubes with a marker.
Clear labels save time and reduce stress while on the road. They help you stay organized even in low light.
- Mark cubes by type: clothes, tools, food
- Use color-coded labels for fast visual cues
- Write simple words or symbols on tags
- Place labels where they are easy to see

Credit: www.reddit.com
Securing Tools And Repair Kits
Keeping your tools and repair kits organized is key on a bikepacking trip. It saves time when you need quick fixes.
Secure gear properly to avoid losing items or causing damage during the ride.
Compact Tool Kits
Choose small, lightweight tool kits with only the essentials. This makes carrying easier and keeps your pack light.
Look for kits that include multitools, tire levers, and patch kits all in one case.
- Multitool with Allen keys and screwdrivers
- Tire levers for quick tire changes
- Patch kit for tube repairs
- Mini pump or CO2 inflator
Accessible Placement
Keep your tools where you can reach them fast. Avoid packing them deep in heavy bags.
Place repair kits in side pockets or top tube bags for easy access during stops or emergencies.
- Use frame bags with quick-access compartments
- Attach multitools to your handlebars or stem
- Store small parts in clear, labeled pouches
- Keep pumps near the water bottle cages
Optimizing Clothing Storage
Organizing your clothes well makes bikepacking easier and more comfortable. Good storage helps you find clothes fast and keeps them clean.
Choosing the right way to pack clothes saves space and prevents wrinkles. This guide compares rolling and folding clothes and using compression sacks.
Rolling Vs Folding
Rolling clothes uses less space than folding. It also reduces wrinkles and keeps items tight. Rolling works well for t-shirts, pants, and light jackets.
Folding is better for stiff or thick clothes like sweaters. It keeps them flat and easier to stack. Folding can help keep clothes neat and easy to find.
- Rolling:Saves space, reduces wrinkles, fits in small spots
- Folding:Keeps thick clothes flat, stacks well, neat appearance
- Choose rolling for soft clothes and folding for stiff ones
Compression Sacks
Compression sacks shrink bulky clothes to save space. They use straps or air valves to push air out. These sacks protect clothes from dirt and moisture.
Use compression sacks for sleeping bags, jackets, or extra layers. Label sacks to find what you need quickly. Avoid overfilling to keep clothes from getting wrinkled.
- Reduce volume of bulky clothes
- Protect items from dirt and water
- Keep gear organized and easy to access
- Label sacks for quick identification

Credit: www.reddit.com
Incorporating Hydration Systems
Staying hydrated is key during bikepacking trips. Organizing your hydration system well helps you drink easily while riding.
There are different ways to carry water. Choosing the right method depends on your bike setup and personal preference.
Water Bottle Placement
Water bottles are simple and easy to reach. Placing them correctly on your bike frame keeps them secure and accessible.
- Use standard bottle cages on the frame’s main triangle.
- Consider adding cages to your fork or seat tube for extra bottles.
- Keep bottles within easy reach to avoid stopping.
- Secure bottles tightly to prevent rattling on rough trails.
- Choose bottles with wide mouths for quick refills.
Hydration Bladders
Hydration bladders offer hands-free drinking. They store water in a flexible bag with a hose for easy sipping.
| Feature | Benefit |
| Placement | Fits in frame bag or backpack |
| Capacity | Usually 1.5 to 3 liters |
| Drinking | Drink without stopping or using hands |
| Cleaning | Needs regular cleaning to avoid mold |
| Weight | Lighter than multiple bottles |
Maximizing Accessibility On The Trail
Organizing your gear well helps you find things fast while bikepacking. Easy access saves time and energy.
Planning where to keep each item lets you focus on the trail. You stay ready for any situation.
Quick-grab Items
Keep small, important items within easy reach. These include snacks, maps, and tools you may need fast.
Use handlebar bags, top tube bags, or small pockets to store these items. Avoid packing them deep in your bags.
- Energy bars and snacks for quick fuel
- Phone or GPS for navigation
- Multi-tool and tire levers for repairs
- Small first aid kit for emergencies
- Water bottle for easy hydration
Adjusting Setup Based On Terrain
Change your gear setup depending on the trail type. Different terrain needs different items handy.
For rocky or technical trails, keep repair tools and protective gear easy to reach. On smooth roads, focus on hydration and snacks.
- Rough trails: pack tire pump and patch kit upfront
- Mountain paths: keep gloves and first aid close
- Long road rides: place water and snacks in top tube bag
- Wet conditions: carry rain gear near the top
Maintaining Gear Organization
Keeping your bikepacking gear organized helps you find items quickly. It also prevents clutter and saves space.
Good organization makes your trip smoother and less stressful. You spend less time searching and more time riding.
Regular Gear Checks
Check your gear before and after every ride. Make sure everything is in its place and nothing is missing.
Look for any damage or wear that needs fixing. Replace or repair items to keep your gear reliable.
- Inspect bags and straps for tears or loose threads
- Confirm all zippers and buckles work properly
- Check if your tools and spare parts are complete
- Repack items neatly to keep weight balanced
Cleaning And Drying Tips
Clean your gear after every trip to avoid dirt buildup. Dirt can damage materials and make packing hard.
Dry all items fully before storing them. Moisture can cause mold, bad smells, and damage.
- Use a soft brush or cloth to remove dirt
- Spot clean with mild soap and water if needed
- Air dry gear in a shaded, ventilated area
- Do not use direct heat or sunlight to dry
- Store gear in dry, cool places to keep it fresh

Credit: bikepacking.com
Frequently Asked Questions
How Do I Pack Bikepacking Gear For Quick Access?
Organize gear by frequency of use. Place essential items like snacks and maps in easily reachable pockets. Use waterproof bags for protection and label compartments to save time while riding.
What Are The Best Bags For Bikepacking Organization?
Frame bags, handlebar rolls, and seat packs are ideal. They offer different storage zones and keep gear balanced. Choose bags with multiple compartments for better organization and quick access.
How Can I Keep Gear Dry And Accessible During Bikepacking?
Use waterproof dry bags inside your packs. Store electronics and clothes in separate dry compartments. This protects gear from rain while keeping it organized and easy to retrieve.
Should I Pack Heavy Items Near The Bike Center?
Yes, place heavy gear close to the bike’s center. This improves balance and stability. Distribute weight evenly between front and rear bags for a smoother ride.
Conclusion
Organizing your bikepacking gear well saves time and stress. Keep items you use often within easy reach. Use bags and pockets to separate gear by type. Pack heavier things low and close to the bike frame. Label bags or use color coding to find stuff fast.
A tidy setup helps you enjoy the ride more. It also keeps you ready for any situation. Practice packing before your trip to find what works best. Simple habits make your adventure smoother and safer. Stay organized, stay confident on the trail.



