

Are you tired of your bike taking up too much space in your garage or hallway? Do you wish there was a simple solution to keep it organized and easily accessible?
You’re not alone. Many bike owners struggle with finding the perfect storage solution that is both practical and affordable. Luckily, you don’t need to spend a fortune on commercial bike racks. You can create your own DIY bike rack with just a few tools and materials you might already have at home.
Imagine walking into your space and seeing your bike neatly stored, ready for your next adventure. In this guide, you’ll discover step-by-step instructions on how to build your own bike rack that is tailored to your needs, ensuring both functionality and style. Keep reading to learn how you can transform your cluttered space into a well-organized haven for your bike.

Credit: www.youtube.com
Choosing The Right Materials
Picking the right materials is very important. Wood is strong and easy to cut. Metal is sturdy and lasts long. PVC pipes are light and cheap. Check what you already have at home. Use old shelves or leftover pipes. This saves money and is good for the environment.
Measureyour bike first. This helps choose materials that fit. Don’t use soft wood. It can break easily. Pick materials that are strong. They should hold your bike well. Always think about where you will put the rack. Inside or outside, this matters.
Tools You Will Need
Building a bike rack requires some basic tools. A measuring tapehelps measure the wood or metal. A sawis needed to cut pieces to the right length. A drillwill be useful for making holes. You will need screwsand a screwdriverfor assembly. Sandpaper makes the surfaces smooth. Finally, use a levelto ensure the rack stands straight.
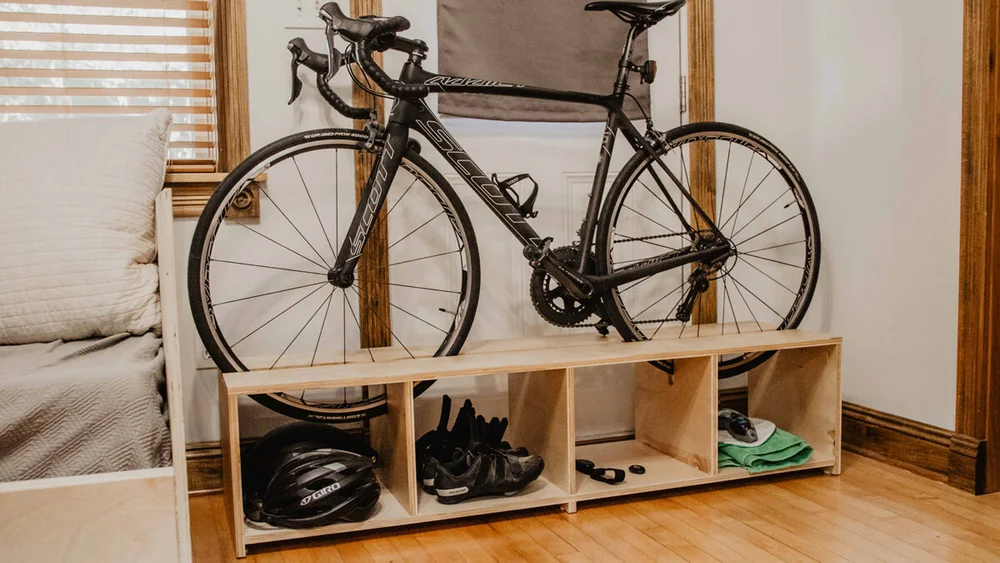
Designing Your Bike Rack
Check the area where you want the bike rack. Make sure there’s enough room for bikes. Measure the width and height of your space. Think about other things nearby, like cars or walls. You need to know how many bikes you plan to store. Leave some extra space for safety. Choose a spot that’s easy to reach. Avoid places with lots of foot traffic. Your space should be safe from rain and sun. This keeps your bikes in good shape.
Pick a style that fits your space and needs. Wall racks save floor space. Floor racks are easy to use. Ceiling racks hold bikes up high. Choose a strong material like wood or metal. Make sure the rack can hold the bike’s weight. Think about how often you use your bike. Easy access is key. A good rack keeps your bike safe and secure. Match the rack style with your room’s look. This makes it blend in nicely.
Credit: www.woodbrew.tv
Step-by-step Construction
Creating a DIY bike rack involves gathering materials like wood and screws. Cut the wood to size, then assemble using simple tools. Securely mount the rack for a sturdy and space-saving solution.
Cutting And Preparing Materials
Gather all the materialsneeded for the bike rack. Use a saw to cut woodinto the right sizes. Sand the edges to make them smooth and safe. Measure twice to make sure everything is right. Safety goggles are important. Keep the work area clean and tidy.
Assembling The Frame
Lay out the wood pieces on the floor. Follow the design plancarefully. Use screws or nails to join them together. Make sure the frame is stable. Check corners for square angles. Tighten all connections firmly. Test the frame by gently pushing.
Attaching Wall Mounts
Find a strong spot on the wall. Use a level to align the mounts. Drill holes into the wall for screws. Attach the mounts securely. Hang the bike rack on the wall. Check that it holds weight. Adjust if it’s not level. Always use the right tools.
Finishing Touches
Add hooks or loops for extra storage options on your DIY bike rack. Secure the structure with protective paint. Ensure all components are tightly fixed for durability and safety.
Sanding And Smoothing
Make sure the bike rack is smooth. Use sandpaper to remove rough spots. Sand every corner carefully. A smooth surface is safer for bikes. It also looks better. Check for splinters and rough edges. Sand until everything feels smooth. This makes the rack ready for painting.
Painting Or Staining
Choose paint or stain for the rack. Paint adds bright color. Stain shows wood texture. Both protect the wood. Apply a thin coat first. Let it dry before adding more. Use a brush for even coverage. Be careful not to spill. Paint or stain makes the rack look nice.
Installation Tips
Creating a DIY bike rack requires careful planning and sturdy materials. Ensure a solid base for stability and choose weather-resistant materials for durability. Measure your bike dimensions accurately to fit the rack perfectly.
Securing To The Wall
Choose a strong wall for your bike rack. Use a stud finder to locate the studs. Mark the spots where you will drill. Drill holes and insert heavy-duty anchors. Align the rack with the drilled holes. Screw the rack tightly into the wall. Make sure all screws are secure. Check if the rack is firmly attached. Test with a light pull.
Ensuring Stability
Ensure the rack is level using a spirit level. This keeps bikes from sliding off. Adjust if the rack is tilting. Tighten all bolts and screws. This prevents any wobbling. Use additional brackets if needed. These can add extra support. Hang a bike to test stability. If it holds, your rack is ready.
Safety Considerations
Ensure sturdy materials and secure mounting for your DIY bike rack. Check weight capacity and stability to prevent accidents. Proper installation is crucial for safety and functionality.
Weight Capacity
Knowing the weight capacityof your bike rack is crucial. Each rack has a limit. Ensure your bike doesn’t exceed this limit. This prevents damage to the rack. It also keeps the bike secure. Check your rack’s manual for details. If unsure, consult with a bike store.
Proper Usage
Use the bike rack properly to avoid accidents. Secure the bike with strapsor hooks. Check for loose parts before riding. Make sure the bike is balanced. This helps in safe transport. Regularly inspect the rack for wear and tear. Proper usage extends the rack’s life.
Cost-saving Tips
Creating a DIY bike rack can save money and keep bikes organized. Use materials like wood or PVC pipes. Follow simple guides online to construct a sturdy rack at home.
Sourcing Affordable Materials
Finding cheap materials can save money. Look for discount storesor thrift shops. You might find wood, metal, or nails at lower prices. Ask friends or neighbors for any spare materials. Often, they have extra they don’t need. Check online marketplaces for second-hand items. Many people sell unused building supplies. Visiting garage sales is another option. People often sell items for very low prices.
Repurposing Old Items
Old items can become new treasures. An old ladder can hold bikes. Wooden pallets make excellent bike stands. Look around your home for unused furniture. A bookshelf can be a sturdy bike rack. Paint or modify items to fit your style. Using old items is both creative and eco-friendly. It reduces waste and saves money. Plus, it gives your bike rack a unique look.
Maintenance And Care
Regularly inspect the DIY bike rack for rust or damage. Clean it with a damp cloth to remove dirt. Ensure all bolts and screws are tight for safety.
Inspecting For Wear
Check your bike rack regularly for any signs of wear. Look for loose screws and bolts. Tighten them to ensure safety. Examine the wood or metal parts. Cracks or rust can weaken the structure. Replace damaged parts to prevent accidents. Inspect the joints and hinges. Make sure they move smoothly. If they stick, apply some oil.
Cleaning And Upkeep
Keep your bike rack clean to maintain its look. Use a damp cloth to wipe away dust. Avoid harsh chemicals that can damage surfaces. Mild soap and water work best. Rinse and dry thoroughly. Protect metal racks with a coat of paint or sealant. This prevents rust and prolongs life. Store the rack in a dry place. Moisture can lead to damage over time.

Credit: www.familyhandyman.com
Frequently Asked Questions
How To Make A Home Made Bike Rack?
Build a homemade bike rack using PVC pipes, connectors, and glue. Cut pipes to desired length. Assemble using connectors, ensuring stability. Glue joints for durability. Customize for multiple bikes. This easy DIY project keeps bikes organized and accessible. Perfect for garages or outdoor spaces.
Is It Better To Hang A Bike By Wheel Or Frame?
Hanging a bike by its wheel can strain the rim, while hanging by the frame distributes weight evenly, reducing damage. Choose sturdy hooks and avoid pressure on sensitive parts. Hanging by the frame is generally safer and more balanced for long-term storage.
Always ensure your bike is secure.
How To Build A Vertical Bike Rack Out Of 2×4?
To build a vertical bike rack from 2x4s, cut and assemble the wood into a sturdy frame. Attach hooks or brackets for securing bikes. Ensure the base is stable and secure the structure to a wall for extra support. Sand and finish for durability and aesthetics.
What Is The Best Material For A Bike Rack?
Aluminum is the best material for bike racks. It is lightweight, durable, and resistant to rust. Steel is also popular due to its strength and affordability. Choose stainless steel for extra corrosion resistance. Both materials provide reliable support for bikes, ensuring safety and longevity.
Conclusion
Creating your own bike rack can be a fun project. It’s practical and saves money. Choose sturdy materials to ensure safety. Measure carefully for the perfect fit. Customize the design to suit your style. Simple steps lead to a useful rack.
Share your creation with friends and family. Encourage them to try making one too. A DIY bike rack keeps bikes organized. It’s a rewarding task that brings satisfaction. Enjoy using your handmade bike rack daily. Remember, every project adds value to your space.
Keep exploring DIY ideas for more fun.


