
Ready to take your cycling experience to the next level? Installing clipless pedals on your road bike could be just the upgrade you need.
Imagine the thrill of more efficient pedaling and greater control over your ride. It’s like unlocking a new level of cycling prowess. But here’s the catch: if you’ve never done it before, the process might seem a bit daunting. Don’t worry, though.
This guide is here to simplify things for you. Whether you’re a seasoned cyclist or just starting out, you’ll find that installing clipless pedals is easier than you think. Stick with us, and by the end of this article, you’ll be ready to hit the road with newfound confidence and speed. Curious? Let’s dive right in.
Benefits Of Clipless Pedals
Clipless pedals offer improved efficiencywhen cycling. Feet stay attached to pedals. Less energy is wasted during rides. This results in a smoother cycling experience. Riders can increase their speedeasily. This helps during races or long rides.
With clipless pedals, better controlis achieved. Riders feel more stable on their bikes. This is especially helpful on uneven surfaces. Riders can tackle hills with ease. Clipless pedals also help in reducing fatigue. The even distribution of effort reduces strain.
Using clipless pedals allows for safer rides. Feet do not slip off pedals. This prevents accidents and injuries. Riders feel secure even on wet roads. Overall, clipless pedals bring a better biking experience.

Credit: www.bicycling.com
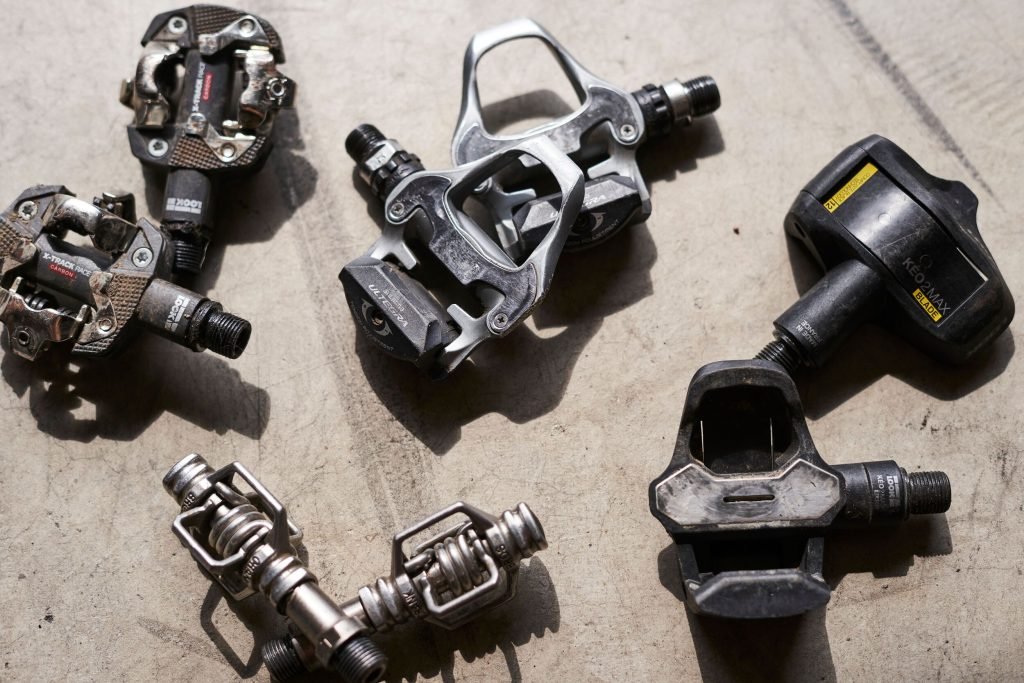
Choosing The Right Pedals
Different types of clipless pedals exist. Popular ones are SPD, SPD-SL, and Look. SPD pedals are for mountain bikes but work on roads. SPD-SL pedals offer better power transfer. Look pedals are lightweight and great for long rides.
Ensure shoes fit the pedals. Check for cleat compatibility. SPD shoes fit SPD pedals. Road cycling shoes fit SPD-SL and Look. Choose a comfortable shoe size. Tight shoes cause discomfort.
Tools Needed For Installation
Gathering the right tools is essential for installing clipless pedals. You will need a pedal wrenchor an Allen key. These tools help in tightening and securing the pedals. A greaseis also necessary. It prevents rust and makes future removal easier. Have a clean clothhandy. It helps in wiping off excess grease. A torque wrenchis optional but useful. It ensures the pedals are not too tight or too loose.
Make sure all tools are in good condition. This ensures a smooth installation process. Keep them within reach to save time. Using the right tools makes the job easier and safer. Always follow the instructions provided with the pedals. This ensures correct installation and safety.
Preparing The Bike For Pedal Installation
Ensure the bike is stable before starting pedal installation. Clean the threads on the crank arms thoroughly. This prevents any debris from affecting the fitting of the clipless pedals.
Inspecting The Crank
Check the crank arms for any signs of damage. Look for cracks or bends. A damaged crank can cause problems later. Ensure the crank is clean and free from debris. This helps with a smooth pedal installation.
Cleaning The Threads
Wipe the threads with a clean, dry cloth. Remove any dirt or grease. A clean thread ensures a snug fit for pedals. Use a brush to reach tight spots if needed. Consider applying a small amount of grease. This prevents rust and makes future removal easier.
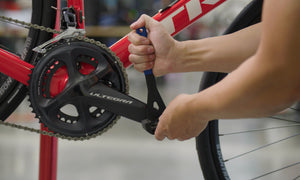
Step-by-step Pedal Installation
Learn how to install clipless pedals on a road bike with this simple guide. Align the pedal threads and turn clockwise to tighten. Ensure pedals are secure before riding.
Attaching The Left Pedal
Turn the bike upside down or use a bike stand. Find the left pedal marked with an “L”. Align the pedal with the crank arm. Turn the pedal counterclockwiseto attach it. Use your fingers at first for easy turning. Once snug, grab a pedal wrench. Tighten the pedal firmly but not too tight.
Attaching The Right Pedal
Locate the right pedal marked with an “R”. Align it with the crank arm. Turn the pedal clockwiseto attach it. Start with your fingers to prevent cross-threading. Use a pedal wrench to finish tightening. Make sure it feels secure.
Ensuring Proper Tightness
Check both pedals for tightness. Use the wrench for a final check. Pedals should not wiggle or feel loose. Tighten more if needed but avoid over-tightening. Proper tightness ensures safe rides.

Credit: roadcyclinguk.com
Adjusting Pedal Tension
Before riding, ensure the pedal tension is right. Check the tension screw on the pedal. Turn it to adjust the tension. Clockwisemakes it tighter. Counterclockwisemakes it looser. Try different settings to find comfort.
Start with a medium tension. This helps in learning. If it’s too tight, it is hard to unclip. Too loose, and your foot might slip. It’s important to feel safe. Test the tension by clipping in and out. Practice this a few times.
Make sure both pedals have the same tension. Unequal tension can confuse you. After adjusting, go for a short ride. Notice how the pedals feel. Adjust again if necessary. Finding the right tension takes time. So be patient and keep practicing.
Safety Tips For Using Clipless Pedals
Install clipless pedals with care to ensure a secure fit. Begin by removing existing pedals using a wrench. Align the new pedals with the crank arms, then tighten them clockwise. Make sure they are firmly secured for safe riding. Check the tension settings to match your comfort and skill level.
Practicing Clip-in And Clip-out
Start by practicing on grass. This soft surface is safer for falls. Try clipping in and out while holding onto a wall. This helps to balance. Repeat until it feels easy. Avoid rushing. Slow practice leads to better control.
Riding Techniques
Keep your feet parallel to the ground. This helps with balance. Push with one foot, pull with the other. It’s like a circle motion. Use your whole leg for power. Avoid using just your ankles. Stay relaxed for better riding control. Look ahead, not down, to keep balance.
Maintenance And Care For Clipless Pedals
Proper installation begins with ensuring compatibility between pedals and shoes. Align and tighten pedals carefully using a pedal wrench. Regular cleaning and lubrication extend pedal lifespan and improve performance.
Regular Cleaning
Clipless pedals need regular cleaning. Dirt can make pedals sticky. Use a damp cloth to wipe away mud and dust. A toothbrush can help clean small spaces. Make sure pedals are dry before using them. Water can cause rust. Clean pedals help them work smoothly.
Checking For Wear And Tear
Pedals can wear out over time. Check the pedals for cracks or damage. Look for loose screws and parts. Tighten them if needed. Worn-out pedals can be unsafe. Replace broken pedals quickly. This keeps your bike safe and fun to ride.
Credit: www.theproscloset.com
Frequently Asked Questions
How To Install Clipless Bike Pedals?
Align the pedal with the crank arm threads. Turn clockwise to tighten on the right side and counterclockwise for the left. Use a wrench to ensure secure fitting. Adjust tension settings as needed for comfort. Check alignment and stability before riding.
What Is The Disadvantage Of Clipless Pedals?
Clipless pedals can be challenging for beginners due to their learning curve. They require practice to clip in and out smoothly. Riders may struggle during sudden stops, leading to falls. Costs are higher compared to standard pedals, and specialized cycling shoes are necessary, adding extra expense.
How To Attach Pedals To A Road Bike?
Attach pedals by aligning the threads and turning clockwise. Tighten with a pedal wrench. Ensure pedals are correctly labeled for left and right sides. Check for secure fit by testing the pedals with your foot. Regularly inspect for wear and tear.
What Is The Correct Position Of Spd Cleats?
Position SPD cleats directly under the ball of your foot. Align them parallel to the shoe for a neutral stance. Adjust to ensure comfort and efficiency while pedaling. Proper alignment helps prevent knee pain and improves power transfer. Experiment with slight adjustments for a personalized fit.
Conclusion
Installing clipless pedals on your road bike becomes easy with practice. Start by gathering tools and understanding your pedal type. Follow each step carefully to ensure proper installation. Check the pedals for tightness and alignment before riding. Safety is important, so wear appropriate gear.
Remember, clipless pedals offer better control and efficiency. Take your time learning to clip in and out. Soon, you will ride confidently with clipless pedals. Enjoy the improved cycling experience. Now, it’s your turn to hit the road and feel the difference.
Happy pedaling!


