
Are your bike’s disc brakes making strange noises or not stopping as they should? If so, you’re not alone.
Many cyclists experience this issue, and often, the solution is simpler than you might think. Dirty disc brakes can compromise your safety and performance on the road. But don’t worry; cleaning them is a straightforward process that you can easily do at home.
By learning how to clean your disc brakes properly, you’ll not only enhance your bike’s stopping power but also extend the life of your brake components. Imagine the peace of mind you’ll have, knowing your brakes are in top condition, ready to tackle any journey. Stick around, and we’ll guide you through each step, ensuring your bike rides are smooth and safe.
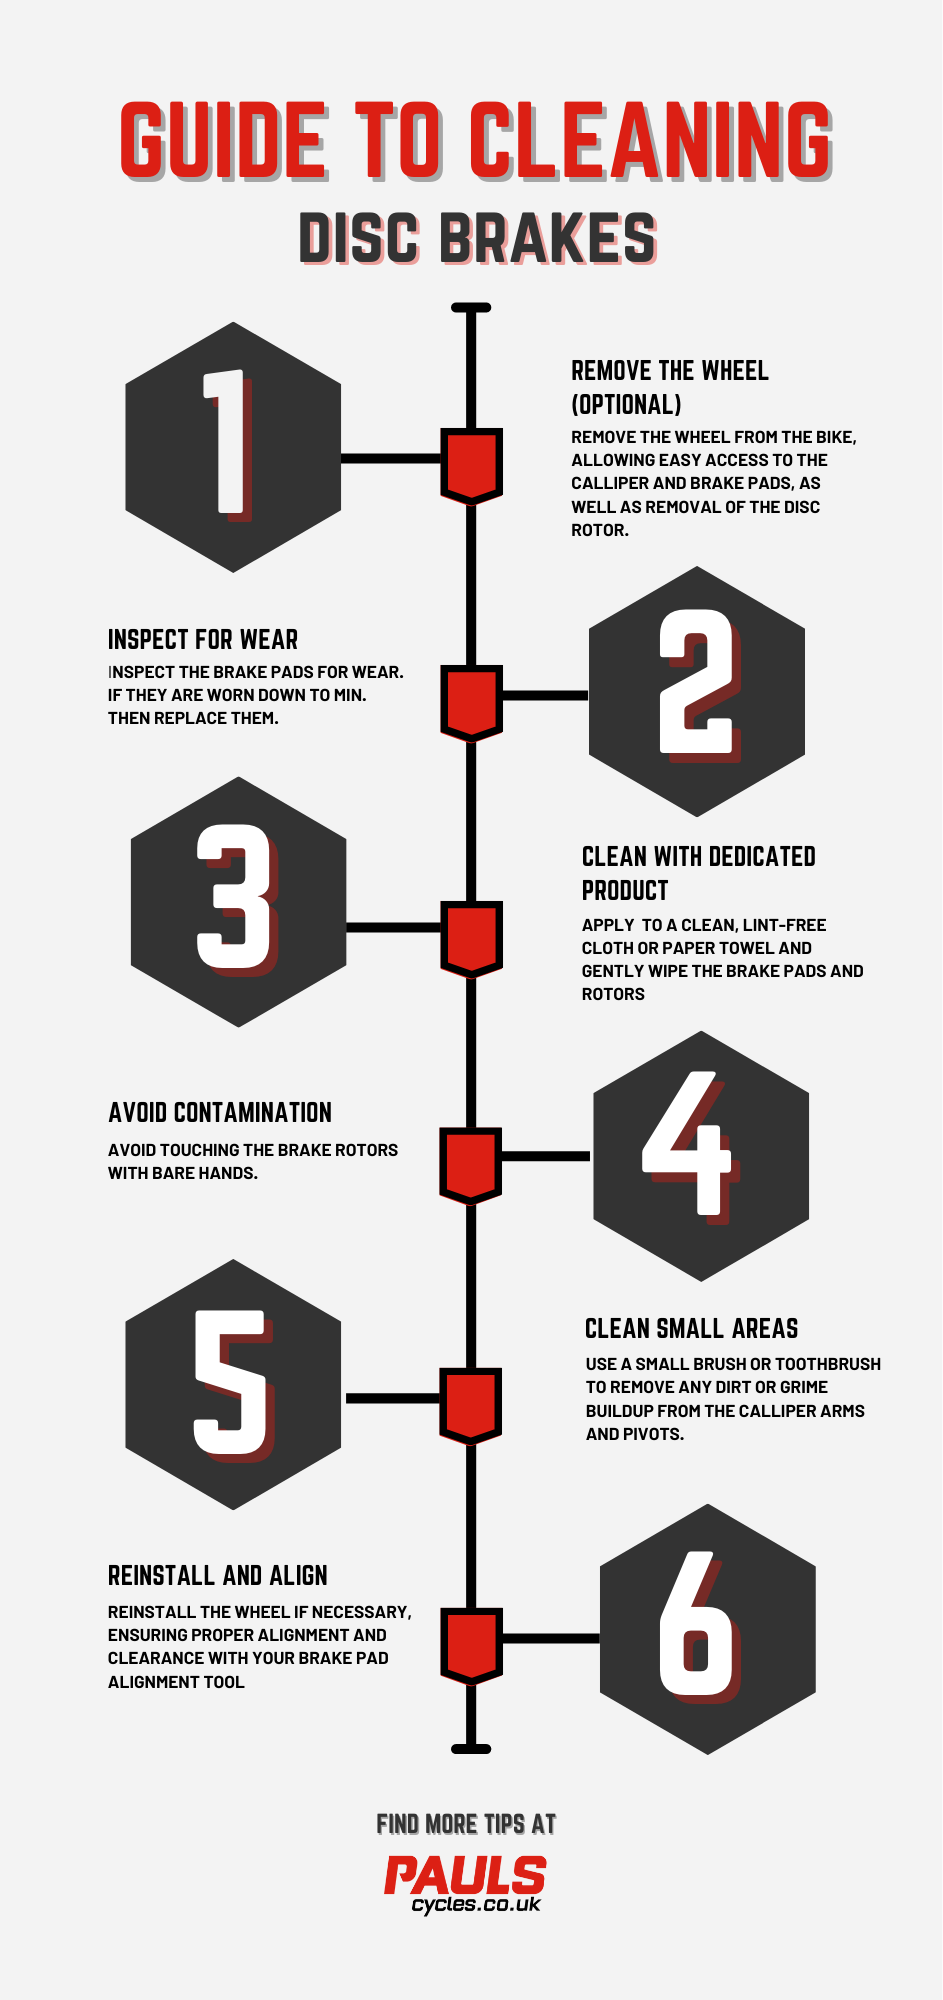
Credit: www.paulscycles.co.uk
Tools And Materials Needed
A clean rag or cloth is very important. It wipes dirt away. Brake cleaner spray helps remove oil. You need water to rinse the parts. A soft brush cleans hard-to-reach spots. Gloves protect your hands from dirt. Screwdriver helps take parts off the bike. Bucket holds water while you clean.
You need a bike stand to keep the bike steady. Sandpaper smooths rough surfaces. Allen keys are useful to tighten screws. Lubricant stops squeaking sounds. A cleaning mat keeps your floor clean. Safety glasses protect your eyes from cleaner spray. Mask helps you breathe safely.

Credit: www.youtube.com
Safety Precautions
Always wear glovesto protect your hands. Use goggles to keep your eyes safe. Make sure the bike is stable. A stand or support is good. Avoid touching the brake disc. It can be sharpand dangerous. Keep children and pets away. They might get hurt.
Ensure you have proper lighting. You need to see all parts clearly. Use tools correctly. Incorrect use can cause accidents. Always follow instructions on cleaning products. Some can be harmful. Dispose of waste properly. Protect the environment.
Removing The Wheel
Use a wrench to loosen lug nuts. Do not remove them yet. Make sure the car is on a flat surface. This keeps it safe and steady. Turn the wrench in the right direction. Follow the arrows on the wrench. Loosen each lug nut a little bit. Do this for all lug nuts. This makes it easier to remove them later.
Use a jack to lift the car. Place the jack under the car’s frame. Make sure it’s in the right spot. Pump the jack until the wheel is off the ground. Keep the car steady. Use a jack stand for extra safety. Check that the car is stable. Now the wheel can be removed easily.
Accessing The Brake Components
Start by loosening the wheel nuts slightly. Jack up the vehicle safely. Remove the wheel to see the brake components. Locate the caliper which is the big part holding the brake pads. Use a wrench to take out the caliper bolts. Be careful not to drop the caliper. It can damage the brake line. Hang the caliper with a wire or rope. This keeps it safe while you work.
Look at the rotor for scratches or rust. A smooth rotor is important for good braking. Gently feel the surface with your hand. It should be even without bumps. Use a cloth to wipe any dust or dirt. Check for cracks or deep grooves. These can be dangerous. If the rotor looks bad, think about replacing it.
Cleaning The Disc Brakes
First, ensure the bike is stable. Use a bike stand if possible. Spray brake cleaner on a clean cloth. Wipe the rotor surface gently. Dirt and grime can cause noise or damage. Make sure to clean both sides of the rotor. Check for any rust or marks. Rotors need to be smooth for best performance. If rust is present, use a light sandpaper. Gently rub the rusted area. Be careful not to scratch the rotor.
Remove the brake pads carefully. Check for any dust or oil on them. Use a clean cloth to wipe the pads. Avoid touching the pad surface with fingers. Oils from skin can affect braking. If pads are glazed, sand them lightly. Ensure pads are even and clean. Reinstall them properly after cleaning. Check for wear and tear. Replace if worn out.
Reassembling The Brake System
Cleaning disc brakes is essential for maintaining performance. Start by removing the wheels to access the brake system. Use brake cleaner spray to remove dirt and grease from the disc. Wipe with a clean cloth until surfaces are spotless. Ensure all components are dry before reassembling the brake system.
Reinstalling The Caliper
Place the caliperback onto the disc. Make sure it fits well. Tighten the boltswith your hands first. Use a wrench to make them tight. Be careful not to over-tighten. Check that the caliper is in the right spot. This helps the brakes work well. Ensure the padsare aligned with the disc.
Securing The Wheel
Lift the wheel and place it on the hub. Ensure it sits right. Insert the lug nutsby hand at first. Use a wrench to tighten them more. Do not make them too tight. This keeps the wheel safe. Spin the wheel to check it moves freely. If it does not, check the nuts again.
Testing The Brakes
First, make sure the brakes work well. Press the brake lever. Feel if it is tight or loose. A tight lever is good. A loose one may mean trouble. Listen for any strange noises. Squeaks or grinding sounds are bad. These noises can mean the brakes are dirty.
If the brakes feel weak, clean them. Dirt can make brakes weak. Clean with a soft cloth. Use a special brake cleaner if needed. Check the brake pads. Worn pads need replacing. Clean them if they are dirty. Always ensure the brakes are dry before use.

Credit: nexcha.co.jp
Maintenance Tips
Clean disc brakes keep your bike safe. Dust and dirt cause noise. Use a clean cloth to wipe them. Avoid using oil or grease. It makes them slippery. Check brake pads for wear. Replace them if needed. Worn pads damage discs. Tighten loose bolts and parts. Loose parts affect braking. Use a brush for hard-to-reach spots. Keep your bike in good shape. Regular cleaning helps brakes last longer.
Frequently Asked Questions
What Can You Use To Clean Disc Brakes?
Use isopropyl alcohol or a designated disc brake cleaner for cleaning disc brakes. Avoid using oil-based products. Ensure surfaces are dry before reassembly to maintain optimal brake performance. Regular cleaning prevents dirt buildup, enhancing safety and efficiency. Always follow manufacturer guidelines for the best results.
What Can I Use Instead Of Brake Disc Cleaner?
Use rubbing alcohol or a degreaser as an alternative to brake disc cleaner. Ensure proper ventilation during use. Avoid using water or oils, which can damage brake components. Always follow safety precautions and manufacturer’s guidelines for the best results.
Can You Use Rubbing Alcohol To Clean Disk Brakes?
Yes, rubbing alcohol effectively cleans disk brakes. It removes grease, grime, and contaminants. Ensure surfaces are dry before using. Always apply gently to avoid damage.
How To Remove Brake Dust From Disc Brakes?
Clean disc brakes by spraying them with a brake cleaner. Use a soft brush to scrub off brake dust. Rinse thoroughly with water. Dry with a clean microfiber cloth to prevent rust. Regular cleaning maintains brake performance and appearance.
Conclusion
Keeping disc brakes clean improves performance and safety. Regular cleaning prevents wear and damage. Use the right tools and techniques for best results. Don’t rush through the process. Pay attention to each step. Clean components carefully and thoroughly. Check for any signs of wear or damage.
Fix minor issues promptly to avoid bigger problems. A little effort goes a long way. Enjoy smooth, safe rides with well-maintained brakes. Remember, clean brakes mean a safer journey. Keep up with regular maintenance for peace of mind. Happy cycling!


