
Imagine hitting the road with your bike, feeling the wind rush past as you pedal through scenic trails. But as the sun climbs higher, you crave a cold drink or a refreshing snack.
Here’s where the magic happens. By learning how to attach a cooler to your bike rack, you unlock a world of convenience and comfort on your ride. This guide will show you the simple steps to seamlessly integrate a cooler with your bike, ensuring that your adventures are not only thrilling but also refreshingly satisfying.
You’re about to discover how easy it is to transform your biking experience, making every trip a delightful journey with your favorite refreshments just an arm’s reach away. Keep reading, and you’ll find out how to make this game-changing upgrade with minimal hassle and maximum impact on your ride!

Credit: www.rambobikes.com
Choosing The Right Cooler
Coolers come in different sizes. Small coolers are easy to carry. Big coolers hold more food and drinks. Check the cooler fits your bike rack. Measure the bike rack space. Ensure the cooler fits snugly. Don’t pick a cooler too heavy. It makes biking hard. Choose a cooler that fits your needs.
Coolers are made from various materials. Some are plastic, others are metal. Plastic coolers are lightweight. Metal coolers last longer. Ensure the cooler is strong. It should handle bumps and shakes. A strong cooler protects your food. Don’t pick a cooler that breaks easily. Choose one that is tough.
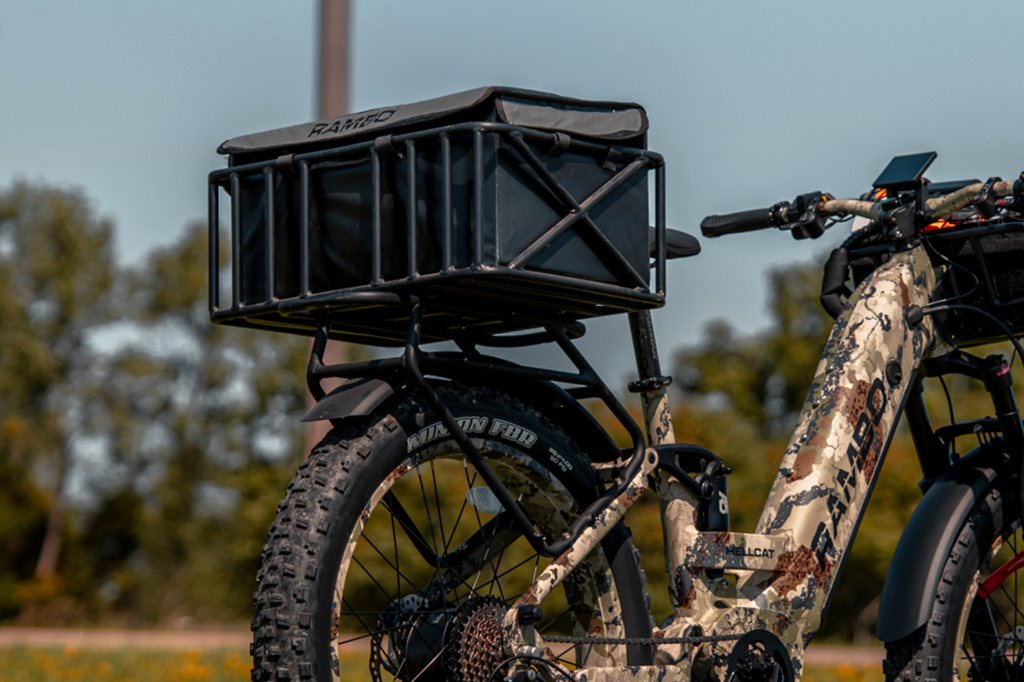
Credit: www.archerytalk.com
Selecting The Appropriate Bike Rack
Attaching a cooler to a bike rack requires secure straps and a stable rack. Ensure the cooler fits snugly. Use bungee cords or adjustable straps for added stability during your ride.
Types Of Bike Racks
- Trunk racksare easy to install. They fit most cars.
- Roof rackshold more gear. They need a strong roof.
- Hitch racksattach to the back. They are sturdy.
- Bike racksmust be strong and secure.
Compatibility With Coolers
Coolerscome in different sizes. Choose one that fits the rack. Make sure the cooler is secure. Use straps or bungee cords. Check the weight limit of the rack. Ensure the cooler is not too heavy. A heavy cooler can damage the rack. Always test the setup before a trip. Safety is important. A well-secured cooler prevents accidents.
Necessary Tools And Accessories
Strong strapskeep the cooler safe. Choose straps that are adjustable. They should be durable and easy to use. Bungee cordsprovide extra hold. They stretch and keep things tight. Make sure they don’t snap easily. Double-check the cords before starting your trip.
Mounting hardwareincludes bolts and brackets. These secure the cooler to the rack. Use stainless steel bolts for strength. Brackets should fit the cooler size. Check all parts for rust. Ensure they are tight and won’t come loose. Always carry a few spare bolts.
Preparing The Cooler And Bike Rack
Check the cooler for cracks or damage. Ensure the bike rack is sturdy. Look for loose bolts or parts on the rack. It’s important that both items are in good condition. A broken rack can cause problems. A damaged cooler might spill liquids.
Place the cooler on the rack carefully. Center it for balance and safety. Make sure it doesn’t shift or move. Use straps or bungee cords to secure the cooler. Tighten all straps firmly. This prevents the cooler from falling. Double-check that it’s stable before riding.
Securing The Cooler On The Bike Rack
Attaching a cooler to a bike rack requires secure straps. Ensure the cooler is balanced and tightly fastened. Use bungee cords or heavy-duty straps for extra stability during the ride.
Using Straps Effectively
Strapsare great to keep the cooler safe. First, place the cooler on the rack. Make sure it sits flat. Then, take a strong strap. Loop it around the cooler tightly. Pull it snug, but not too tight. Use more than one strap for best results. Cross the straps to make an ‘X’ shape. This adds extra hold. Check if the cooler moves. If it does, adjust the straps.
Testing Stability
Once the cooler is strapped, give it a gentle shake. It should stay in place. Ride the bike slowly first. This helps in seeing if the cooler wobbles. If it feels shaky, stop and adjust the straps. Repeat the shake test until the cooler is secure. Always check the cooler before long rides. Keeping it stable ensures your drinks stay inside.
Tips For Safe Transport
Secure your cooler by using sturdy bungee cords or straps. Ensure it sits evenly on the bike rack. Check for stability before riding to prevent accidents.
Balancing Weight
Ensure the cooler is balanced on the bike rack. Check that it’s not too heavy on one side. Use straps to secure the cooler firmly. Keep the cooler centered for safe rides. Distribute weight evenly across the rack. Avoid overloading the cooler with items. Confirm the rack can handle the cooler’s weight.
Monitoring Road Conditions
Watch for bumps and potholes on the road. Slow down when the road is rough. Keep an eye out for sharp turns. Adjust speed for windy conditions. Stay alert and focused on the road. Regularly check the cooler’s position. Stop and re-secure if the cooler shifts. Ensure visibility with lights or reflectors.
Maintenance And Care
Secure the cooler with strong bungee cords to the bike rack. Ensure it is balanced for safe transport. Regularly check the straps and positioning to prevent any movement during the ride.
Regular Checks
Regularly check the bike rack and cooler for any damage. Ensure the straps are tight and secure. Look for wear and tear on all parts. Replace any damaged parts immediately. Inspect bolts and screws for tightness. This keeps everything safe and secure.
Cleaning And Storage
Clean the cooler and rack after each use. Remove any dirt or debris from surfaces. Use a soft cloth to wipe them clean. Store the cooler in a dry place. This prevents mold and rust. Keep the bike rack in a covered area. Protect it from rain and sunlight. This keeps it in good condition for a long time.
Credit: www.coloradofans.com
Frequently Asked Questions
How To Attach An Insulated Bag To A Bike?
Use adjustable straps or bungee cords to secure the insulated bag to your bike’s rear rack. Ensure it’s tightly fastened for stability. Position the bag to avoid interfering with wheels or pedals. Regularly check the attachment to maintain safety during rides.
How To Attach Cooler To Paddle Board?
Secure the cooler using bungee cords or straps on the paddle board’s tie-down points. Ensure it’s stable and balanced. Attach any extra gear or accessories to prevent shifting during paddling. Check for tightness and adjust if necessary for a safe, enjoyable paddleboarding experience.
How To Attach A Bike Basket To A Rack?
Secure the bike basket to the rack using adjustable straps or clamps. Ensure the basket is centered and balanced. Tighten all connections to prevent wobbling. Confirm the basket is stable by gently shaking it. Follow the manufacturer’s instructions for specific attachment details.
How To Attach A Duffle Bag To A Bike Rack?
Secure the duffle bag with sturdy bungee cords or straps to the bike rack. Ensure it’s tightly fastened and balanced. Check the bag’s weight and stability before riding. Avoid obstructing visibility or causing imbalance for safe travel. Use waterproof bags for added protection from weather conditions.
Conclusion
Attaching a cooler to your bike rack is simple. Follow the steps carefully. Use straps to secure the cooler tightly. Check for stability before riding. Avoid overloading your bike. Practice riding with the cooler attached. This ensures safe travels. Enjoy your outdoor adventures with ease.
Remember, preparation is key. A well-attached cooler makes your journey pleasant. Keep your bike balanced. This prevents tipping and ensures safety. Always inspect the cooler’s attachment. Regular checks maintain security during rides. Now, you’re ready to explore with refreshments close by.
Happy biking and stay safe!


