

Imagine driving at night on a winding road, your headlights illuminating the path ahead with precision. The secret to this clarity lies not just in the bulb’s brightness but in the angle of your reflector.
If your reflector angles aren’t adjusted correctly, you might find yourself struggling to see or worse, blinding oncoming drivers. But worry not, because mastering this simple yet crucial task can transform your driving experience. With your safety and comfort in mind, we will guide you step-by-step on how to adjust reflector angles effectively.
By the end of this article, you’ll have the confidence to tweak your reflector settings, ensuring optimal visibility and enhancing your driving safety. Let’s unlock the secrets to perfect illumination that every driver needs to know.
Choosing The Right Reflector
Adjusting reflector angles enhances lighting efficiency and focus. Rotate the reflector gently to direct light precisely. Ensure it covers the desired area without causing glare.
Types Of Reflectors
Reflectors come in many types. The most common are umbrellaand softboxreflectors. Umbrella reflectors are easy to use. They spread light over a wide area. Softbox reflectors create soft and even light. They are great for close-up photos. Each type has its special use. Choose the right one for your needs.
Materials And Sizes
Reflectors are made from various materials. Common ones include silver, gold, and white. Silver reflectors make light brighter. Gold reflectors add warmth. White reflectors soften the light. Reflectors also come in different sizes. Small ones are easy to handle. Large ones cover more area. The material and size affect the light. Choose them based on the scene and mood you want.
Credit: support.xtool.com
Understanding Light Dynamics
Adjusting reflector angles is key to managing light effectively. Proper alignment ensures optimal brightness and reduces glare, enhancing visibility.
Angle Of Incidence
The angle of incidenceis how light hits a surface. Light comes from a source like the sun or a lamp. It travels in a straight line. When it hits an object, it can bounce off. This bounce is called reflection. The angle at which it hits and bounces is key. It affects how bright or dim the light appears. Adjusting this angle can change what you see. It helps in focusing light better. This is important for activities like reading or drawing.
Diffusion And Reflection
Light can also spread out or diffuse. This happens when it hits rough surfaces. Diffusion makes light spread in many directions. It is softer and less bright. Reflection, on the other hand, is when light bounces back. Smooth surfaces like mirrors cause reflection. Both diffusion and reflection affect how we see light. Adjusting surfaces can change the light effect. This is useful for creating a cozy room feel.
Assessing The Environment
Indoor settingsoften have controlled lighting. Walls and ceilings affect reflections. Light bounces in different ways. Outdoor settingshave natural light. Sunlight changes angle and intensity. Weather also impacts light. Reflectors need adjusting often. The environment affects how light behaves.
Natural light comes from the sun. It is bright and warm. Artificial light comes from bulbs. It can be soft or harsh. Light sources affect reflector angles. Different sources need different setups. Mix of both sources can be tricky. Balance is key for best results.

Credit: www.sharegrid.com
Tools And Equipment
Adjusting reflector angles requires precision and the right tools. Use a wrench to loosen the reflector’s bolts. Carefully tilt the reflector to the desired angle, ensuring it aligns perfectly with the target area.
Essential Gear
Using the right tools makes adjusting reflectors easy. First, a sturdy screwdriveris essential. It helps in loosening and tightening screws. Next, a levelis needed. It ensures the reflector is straight. Don’t forget a measuring tape. It helps in measuring distances accurately. Lastly, a markeris useful. It helps in marking spots for adjustments.
Advanced Tools
For advanced adjustments, consider using a torque wrench. This tool ensures screws are tight enough. A laser levelcan also be helpful. It projects a straight line for better alignment. Some people use a protractor. It measures angles precisely. Finally, a digital inclinometercan measure tilt angles accurately. These tools make adjustments more precise.
Techniques For Adjusting Angles
Adjusting reflector angles can improve light distribution and energy efficiency. Begin by loosening the reflector’s mounting screws. Tilt the reflector to your desired angle, ensuring even coverage. Tighten screws to secure the new position.
Positioning The Reflector
Place the reflector in a stable spot. This helps in getting good light. Make sure it is steady and won’t fall. Hold it at an angle. This can help light up dark areas. Check the light on the subject. The light should be soft and even. Adjust the reflector’s angle as needed. Keep changing the angle until it’s perfect. This way, the light looks natural.
Modifying Angles
Tilt the reflector slightly. This changes where the light goes. Watch how the light moves. You can see how shadows change. Turn the reflector left and right. Different angles create different effects. Keep the reflector close to the subject. This makes the light brighter. Step back to make light softer. Try moving the reflector up and down. Different positions give new results.
Experimenting With Angles
Experimenting with reflector angles can improve light distribution in any space. Adjusting the tilt and direction of reflectors helps control the focus and intensity of light beams. Proper alignment enhances illumination, reducing shadows and glare effectively.
Trial And Error
Adjusting reflector angles involves trying different positions. Each angle changes how light hits your subject. Small changes can make a big difference. Start by moving the reflector slightly. Observe how shadows and light change. Keep adjusting until you find the best angle. Patience is key. Every subject may need a different angle. Practice helps you learn faster.
Capturing The Perfect Shot
Angles are vital for a great photo. Reflectors help control light. Use them to highlight your subject. Experiment with angles to see effects. Move the reflector around your subject. Notice how the light changes. Find the angle that makes the subject shine. Bright light can enhance details. Shadows add depth and drama. Capture the shot when it looks best.
Common Mistakes To Avoid
Incorrect angle adjustments can lead to poor lighting results. Ensure the reflector is not too tilted or too flat. Adjust steadily to find the optimal angle for maximum light reflection.
Overexposure Issues
Too much light can ruin your photo. The subject looks too bright. Reflectors bounce light to brighten areas. Use them carefully to avoid overexposure. Place reflectors at a proper angle. This helps control the light. Move them until the light looks even. Adjust until the subject looks natural.
Ignoring Background Elements
Reflectors can change how backgrounds appear. A bright background can distract from the subject. Check the background before you start. Make sure it matches your photo’s mood. Use reflectors to adjust light on the background, too. This keeps the focus on the subject. Balance light for both subject and background.
Practical Tips And Tricks
Adjusting reflector angles enhances light distribution effectively. Start by loosening the screws on the reflector base. Then, gently shift the reflector to find the optimal angle. Secure the screws once the desired angle is achieved. Proper adjustment ensures balanced lighting and energy efficiency.
Always check alignment regularly to maintain performance.
Quick Adjustments
Adjusting reflector angles can be simple. First, find a flat area. This helps ensure even light distribution. Next, use a small level tool. Place it on the reflector’s surface. Check if it’s balanced. Make small changes if needed. Test the light by turning it on. Notice any shadows or bright spots. Adjust until the light spreads evenly. Remember to be gentle. Reflectors can be fragile. Avoid using too much force.
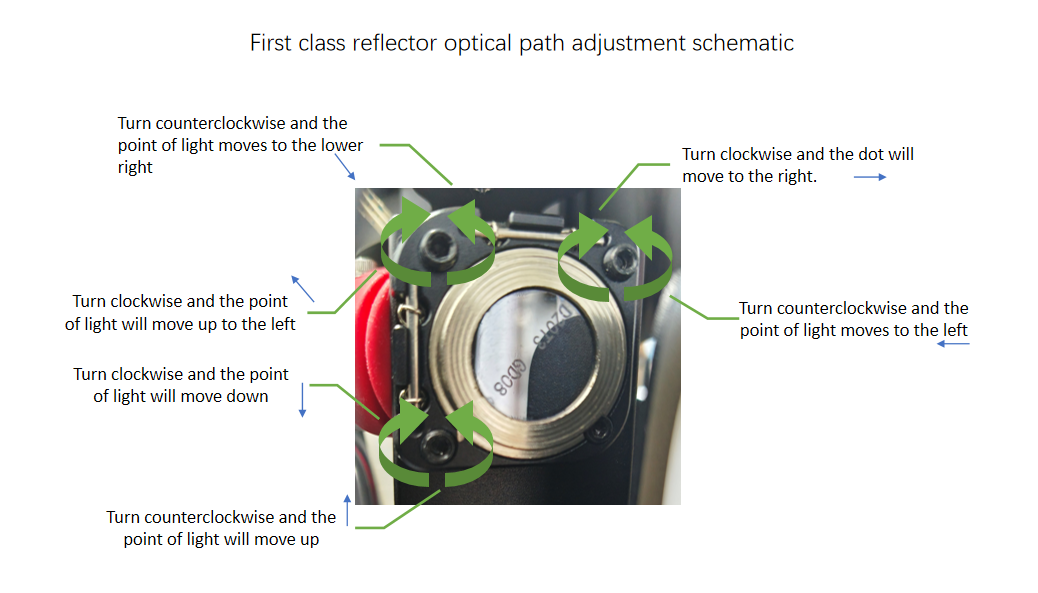
Professional Insights
Professionals often use special tools. A protractor can measure angles accurately. This ensures the best light reflection. Also, they prefer durable materials. Quality reflectors last longer. They resist weather damage. Professionals also recommend regular checks. This ensures the reflector stays in good shape. Clean reflectors with a soft cloth. Dust can block light. Keep them clear for the best results.
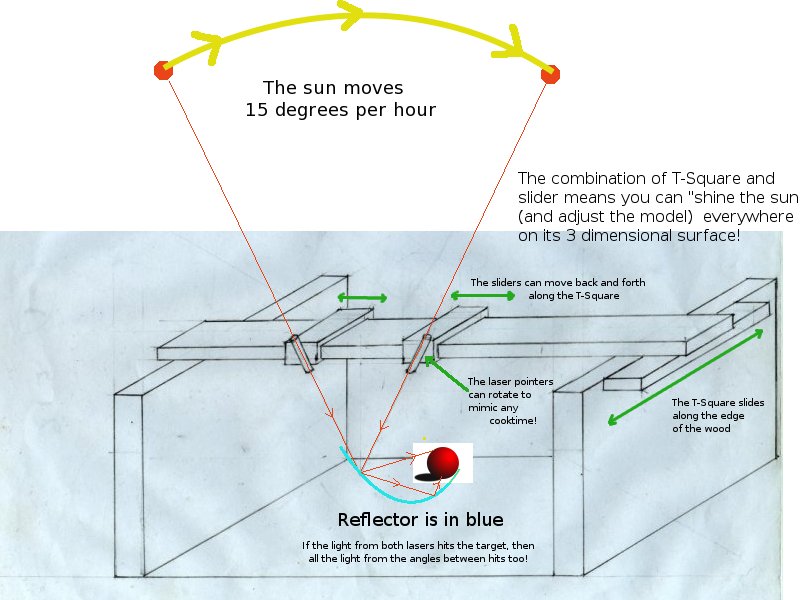
Credit: solarcooking.fandom.com
Frequently Asked Questions
How Do I Adjust A Reflector Telescope?
Adjust a reflector telescope by aligning the primary and secondary mirrors. Use a collimation tool for precision. Rotate the knobs to center the mirrors and ensure clear focus. Regularly check alignment for optimal performance. Remember to handle mirrors gently to avoid damage.
How To Position A Reflector?
Position the reflector opposite the main light source for optimal lighting. Adjust the angle to minimize shadows and enhance brightness. Ensure it’s close enough to reflect light effectively, but not obstructing the subject. Experiment with distances and angles for the best results.
How Do You Set Up Reflector Lighting?
To set up reflector lighting, position the reflector opposite the light source. Adjust angles for optimal light bounce. Experiment with different positions to achieve desired effects. Ensure the reflector’s surface is clean for maximum reflection. Use clamps or stands for stability and precise positioning.
How To Align The Secondary Mirror?
Align the secondary mirror by loosening its screws slightly. Adjust the mirror to reflect the primary mirror’s center. Use a collimation cap or laser collimator for precision. Tighten screws gently, ensuring alignment remains. Regularly check alignment for optimal telescope performance.
Conclusion
Adjusting reflector angles improves lighting efficiency. Your space becomes brighter and more welcoming. Correct angles reduce shadows and dark spots. Safety increases in well-lit areas. A simple adjustment can transform your environment. Reflectors enhance visibility and focus. Try different angles to find the best setup.
Experimenting helps optimize your lighting. Remember, small changes make a big difference. You gain better control over your lighting. Adjusting reflector angles offers practical benefits. Improved lighting boosts productivity and mood. Enjoy the comfort of a well-lit space. Keep exploring to perfect your lighting experience.


