
Imagine you’re cycling down a dimly lit street, the wind in your hair, when suddenly, an obstacle appears out of nowhere. A properly adjusted bike light can be the difference between a smooth ride and a sudden stop.
If you’ve ever struggled with finding the perfect beam angle for your bike light, you’re not alone. Getting it right not only enhances your visibility but also ensures you’re seen by others—keeping you safe during your nighttime adventures. In this guide, you’ll discover simple yet effective steps to adjust your bike light beam angle for optimal performance.
Keep reading, because your next ride could be safer and more enjoyable with just a few tweaks.

Credit: www.youtube.com
Importance Of Proper Bike Light Beam
Proper bike light beamis essential for safety. It helps you see the road clearly. A well-adjusted light keeps you visible to others. This reduces the risk of accidents. Light beams that are too low or high can be dangerous. Low beams won’t show obstacles well. High beams can blind oncoming traffic. Finding the right angle is crucial.
Adjust your bike light carefully. Test it in different conditions. Ensure the beam lights the path ahead. It should not point directly in others’ eyes. A balanced beam angle makes night riding safer. It gives you confidence on the road. Keep your light clean and check it often.
Tools Needed For Adjustment
Adjusting a bike light beam angle requires some basic tools. You will need a screwdriverto loosen and tighten screws. A wrenchmight be useful for certain types of lights. Make sure to have a measuring tapefor precise adjustments.
A level toolcan help ensure the light is straight. A flashlightis handy for checking the beam in the dark. Finally, keep a clean clothto wipe any dust or dirt from the light.
Having these tools ready will make the adjustment process easier. Always check your light after adjusting to ensure it’s correct.
Assessing Current Beam Position
First, check if your bike light is secure. It shouldn’t move or wobble. Next, turn on the light in a dim place. Look at the beam patternon a wall or ground. It should be even and not tilted. If it points too high, it might blind others. If it points too low, it won’t help you see. Adjust the angle by loosening the mount slightly. Tilt the light and tighten it back. Make sure the beamcovers a good distance ahead. Test the light by riding a short distance. Ensure you feel safe and can see clearly. Repeat adjustments if needed.
Credit: www.walmart.ca
Adjusting Vertical Beam Angle
Ensure your bike light illuminates the road without blinding others. Adjust the vertical beam angle by loosening the light mount and tilting the light to the desired position. Secure the mount once the beam properly highlights the path ahead.
Choosing The Right Height
Start by measuring the height from the ground to your bike light. Make sure the bike is on a flat surface. The light should be at the same height as the handlebars. This helps in seeing the road clearly. It also prevents blinding others. Use a measuring tape for accuracy. Double-check the height before final adjustments.
Avoiding Blind Spots
Adjust the light so it points slightly downwards. This helps avoid blind spots for oncoming traffic. Ensure the beam covers the road ahead. Keep the beam wide enough to see the sides. This ensures safety and better visibility. Adjust the angle if it is too high or low. Check the beam angle by riding around.
Fine-tuning Horizontal Beam Angle
Position the bike on a flat surface. Stand in front of it. Check the light beam’s direction. Ensure it aligns with the road. The beam should not point too high. It should not point too low. Adjust the light carefully. Twist the light to the right angle. Keep the beam focused ahead. Ensure safety for other road users.
Peripheral vision helps see surroundings. A well-adjusted light helps this. Keep the beam wide but focused. It should brighten the sides slightly. Riders can spot obstacles easily. This helps in avoiding accidents. A balanced beam ensures better safety. Adjust it for clear side views too.
Testing Adjustments In Real Conditions
Adjusting the bike light beam angle ensures optimal visibility. Test adjustments in real conditions by riding in various environments. Observe the light spread and adjust accordingly for a balanced, safe ride.
Daylight Testing
First, check the light beam angle during the day. Place your bike in a safe open area. Ensure the surface is flat and clear. Turn on the bike light. Observe the light beam’s reach and direction. Make small adjustments to the light angle. Ensure it covers the desired path. The beam shouldn’t point too high or low. Adjust it until you feel comfortable.
Night-time Testing
Night testing is crucial for safety. Find a dark area to test your light. Make sure there are no obstacles. Turn on the bike light. Check how far the light reaches. Adjust the beam to cover the road ahead. Ensure it doesn’t blind oncoming traffic. Fine-tune the angle for best visibility. Repeat testing until satisfied with the light’s performance.
Safety Tips For Beam Adjustment
Always wear a helmetwhen adjusting your bike light. It keeps your head safe. Ensure your bike is on a flat surface. This helps in proper alignment. Use a stable standto hold your bike steady. You don’t want it to fall. Turn on the light to see its direction. Make sure it’s not too high or low. The light should point slightly down. This helps you see the road. Keep your hands dryand clean. This prevents slipping while adjusting. Use a screwdriverif needed. It helps in tightening the bolts. Adjust during the day. Natural light helps you see better. Tell someone you are adjusting the light. It’s safer to have help nearby.
Common Mistakes To Avoid
Setting the bike light too high can blind oncoming traffic. Too low, and the path ahead remains dark. Ensure the beam is parallel to the ground for optimal visibility.
Incorrect Light Height
Setting the bike light too high can blind others. A light set too low does not light up the path well. Ensure the light is at the right height.
Ignoring Light Spread
A narrow beam misses side obstacles. A wide beam lights more but can distract others. Balance the light spread for safety.
Forgetting To Test The Light
Always test the light after adjustments. Ensure it covers the path well. Make adjustments if needed. Safety comes first.
Expert Recommendations For Different Terrains
Adjusting your bike light beam angle enhances visibility on various terrains. For downhill rides, point the beam downward to illuminate obstacles. On flat surfaces, a slightly upward angle helps spot distant objects without blinding oncoming traffic.
Urban Roads
Bike lights should point slightly downward on urban roads. This helps to avoid blinding other road users. Adjust the beam to illuminate the path just ahead. Streetlights often provide enough light, so a dimmer setting may be good. Ensure your light is visible to oncoming traffic.
Off-road Trails
Off-road trails need brighter lights. Point the beam straight ahead to see obstacles. Rocks and branches can be dangerous without good lighting. Adjust the angle to cover a wide area. A wider beam helps see the sides of the trail. Keep your speed in mind when setting the light.
Credit: www.contec-parts.com
Frequently Asked Questions
How To Angle A Bike Headlight?
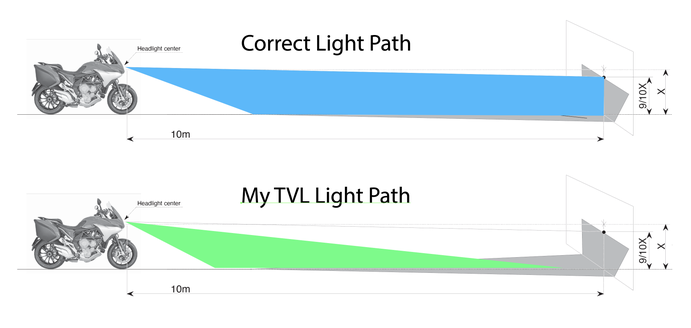
To angle a bike headlight, position it slightly downward to illuminate the road ahead. Ensure it doesn’t blind oncoming traffic. Adjust the beam to cover a distance of 10-20 meters. Securely tighten the light to maintain its position during rides.
Regularly check alignment for optimal visibility.
How Do I Adjust The Headlight Angle?
To adjust headlight angle, park on level ground facing a wall. Turn adjustment screws until beams align with manufacturer specifications. Check owner’s manual for guidance. Ensure headlights are aimed correctly for optimal visibility and safety.
How To Adjust Headlight Beam In Bike?
Park your bike on a level surface facing a wall. Turn on the headlights. Adjust the beam height using the adjustment screws until the beam centers on the wall at the correct height. Ensure the beam is not too high or low for safe riding.
How High Should Headlights Be At 25 Feet?
Headlights should be centered at or below the height of the headlight bulb itself when tested at 25 feet. This ensures optimal visibility and safety for drivers. Adjust for slight downward angle for best performance. Regular checks help maintain proper alignment.
Conclusion
Adjusting your bike light beam angle is essential for safe rides. Proper alignment enhances visibility and ensures a safer journey. Follow the steps to adjust your light correctly. Remember to check the angle regularly, especially after rides on bumpy roads.
A well-aimed light helps you see and be seen. This small adjustment makes a big difference. Your safety depends on it. Always prioritize clear vision during your rides. With these tips, ride confidently and safely, day or night. Stay safe and enjoy the journey!


