
Are your hydraulic brake hoses too long and causing a cluttered look or hindrance in performance? You might be surprised by how easy it is to fix this issue yourself.
Shortening hydraulic brake hoses can seem daunting at first, but with the right guidance, you can achieve a cleaner setup and enhance your bike’s functionality. Imagine riding with confidence, knowing your brake hoses are perfectly tailored to your needs. This guide will walk you through each step, ensuring you feel empowered to tackle this task on your own.
Let’s dive in and streamline your ride!
Credit: www.parktool.com
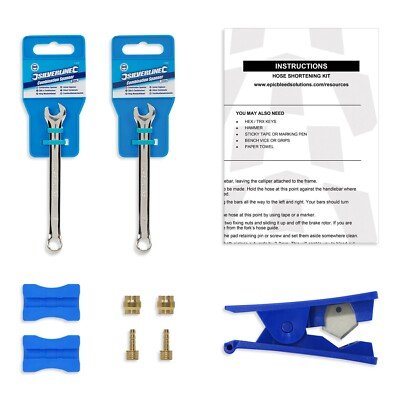
Tools Needed For Brake Hose Shortening
- Cutter: A sharp cutter trims the brake hose.
- Wrench: Use to loosen and tighten connections.
- Hydraulic Fluid: Keeps the brakes working smoothly.
- Measuring Tape: Ensures accurate hose length.
- Funnel: Helps pour fluid without spills.
- Safety Glasses: Protects eyes from debris.
Always work carefully with these tools. Safety is very important. Wear your glasses to keep eyes safe. Use the cutter only for the hose. Measure twice to cut once. Tighten connections well with the wrench. Pour fluid slowly with the funnel. This prevents spills and mess.

Credit: www.facebook.com
Preparing The Work Area
Find a clean and flat surface to work on. Keep your tools nearby for easy access. Make sure the area is bright with good lighting. Remove any clutter around your workspace. Lay down a sheet or mat to catch small parts. This keeps the area tidy and organized.
Have a container to hold small bolts and nuts. This prevents them from getting lost. Clean the work surface with a cloth. A clean surface helps prevent contamination. Ensure no dust or dirt is present. Make sure your tools are in good condition. Inspect them for wear and tear.
Wear gloves to protect your hands. Safety is important during this process. Make sure you are comfortable while working. A comfortable position helps you focus better. Keep a towel handy for wiping off any spills. This keeps the area clean and safe.
Removing The Brake Hose
First, locate the hydraulic brake hose on your bike. It connects the brake lever to the caliper. Use a wrench to loosen the fitting at the brake lever. Be careful to avoid stripping the threads. Once loose, gently pull the hose free from the lever.
Next, move to the brake caliper. Again, use the wrench to loosen the fitting. Make sure to hold the hose firmly while doing this. Slowly pull the hose away from the caliper. Keep a towel handy to catch any brake fluid spills.
After removing the hose, inspect it for wear or damage. Replace it if needed. Keep the removed hose safe for measurement purposes. This ensures you cut the new hose to the correct length.

Credit: road.cc
Measuring The Correct Length
First, gather a measuring tapeand a marker. Put the bike on a stand to keep it stable. Find the current brake hose and follow its path. Use the measuring tape to check the length from the lever to the caliper. Be sure the tape follows the same path as the hose. Mark the length on the tape with a marker.
Check the length twice to avoid mistakes. Add a little extra length for smooth turnsand bends. Too short hoses can be dangerous.
Write down the final length on paper. This length is your guide for cutting. Double-check your work for safety.
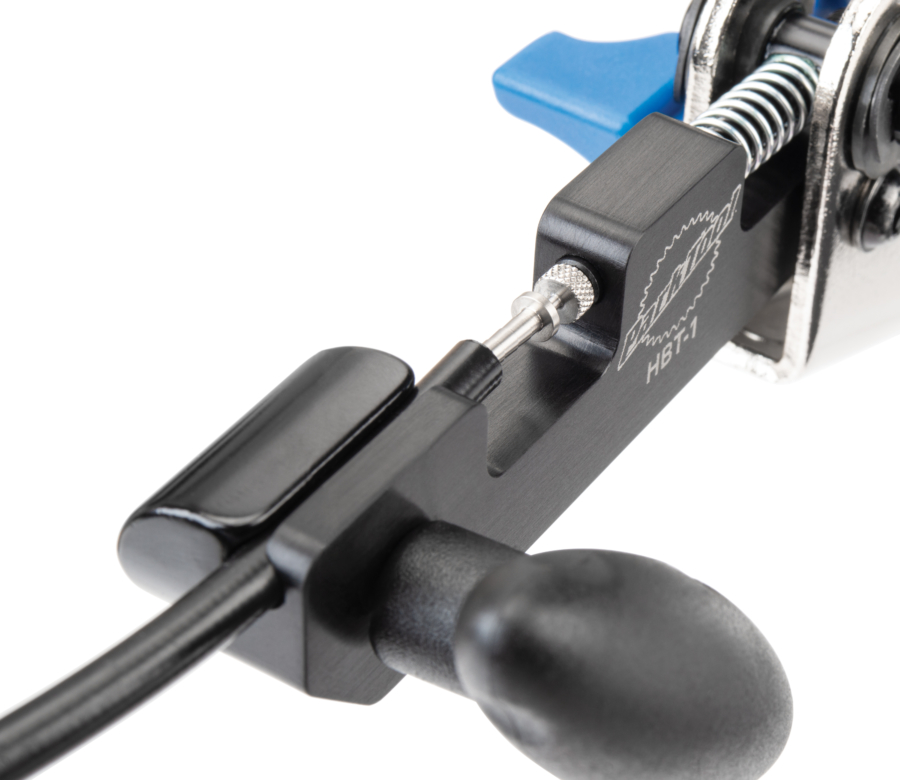
Cutting Techniques For Hydraulic Hoses
Always ensure the hose is clean before cutting. Dirt can cause problems. Use a sharp cutting tool for a clean cut. Dull tools can crush the hose. Place the hose securely on a flat surface. This prevents slipping while cutting.
Measure the hose carefully. Mark the desired length with a marker. Align the cutting tool with the mark. Apply even pressure while cutting. This ensures a straight cut. Check the cut end for any debris.
Trim any small pieces left after cutting. A neat cut ensures proper function. Reassemble the hose carefully. Double-check connections for safety. Properly shortened hoses work efficiently.
Reinstalling The Brake Hose
First, get the clean brake hose ready. Make sure it is not dirty. Put the brake hose in the brake lever. Tighten it with a wrench. Do not make it too tight. It should fit snugly.
Next, attach the other end to the caliper. Use your fingers first. Then, use a wrench to make it tight. Check if it is secure.
Fill the system with brake fluid. Be careful not to spill it. Squeeze the brake lever gently. This helps remove air bubbles.
Check for leaks. Use a paper towel to wipe around the hose. If there is fluid, tighten more. Ensure everything is tight and secure.
Finally, test the brakes. Push the bike and squeeze the brake. It should stop smoothly. If not, check all connections again. Make sure everything is in place.
Testing The Brake System
Ensure the brake lever is firm. Check for any leaks in the system. Listen for unusual sounds. Test brakes on a flat surface. Make sure the bike stops smoothly.
Inspect the brake pads. Look for wear and tear. Replace if worn out. Check fluid levels in the reservoir. Top it up if needed.
Test the brake lines. Ensure there are no kinks or blocks. Adjust if necessary. Check the rotor for damage. Replace if it’s bent or cracked.
Verify brake performance. Do a short ride. See if the brakes respond quickly. Ensure the bike stops safely.
Common Mistakes To Avoid
Cutting hoses too shortcan cause issues. Measure twice before cutting. Always leave some extra length. This helps in future adjustments. Using wrong toolscan damage the hose. Use tools made for hydraulic hoses. It ensures clean cuts.
Ignoring hose compatibilityleads to leaks. Check if the hose fits the system. Always use recommended hoses for your brakes. Skipping safety checksis risky. Check for leaks after installation. Ensure all connections are tight.
Not following guidelinescan void warranties. Read the manual before starting. Follow steps as instructed. Rushing the processis a bad idea. Take your time to ensure accuracy. Mistakes can be costly.
Maintaining Brake System Efficiency
Shortening hydraulic brake hoses ensures your bike stops safely. Start by gathering necessary tools. You will need a hose cutter, a wrench, and a bleed kit. Begin by removing the brake caliper. It makes accessing the hoses easier.
Measure the existing hose length carefully. Ensure to check twice for accuracy. Cut the hose using a sharp cutter. This prevents fraying and ensures a clean edge. Attach the new hose length securely. Use a wrench to tighten connections. Make sure there are no leaks.
Finally, bleed the brake system. This removes air bubbles from the hose. Ensure brake fluid levels are adequate. Check brake function before riding. Proper maintenance keeps your bike safe. Regular checks prevent unexpected failures.
Frequently Asked Questions
Can You Cut A Hydraulic Brake Hose?
Yes, you can cut a hydraulic brake hose. Use a sharp cutter for a clean, precise cut. Ensure proper length and compatibility. After cutting, securely attach the fittings and bleed the brake system to remove air bubbles for optimal performance.
Always follow manufacturer guidelines for safety.
How To Cut A Hydraulic Hose?
To cut a hydraulic hose, use a sharp hose cutter. Ensure the cut is clean and straight. Avoid using saws, as they can damage the hose. Measure accurately before cutting to prevent waste. Always wear protective gear to ensure safety during the process.
How To Trim A Brake Line?
To trim a brake line, first secure it with a line clamp. Use a tubing cutter to cut the line cleanly. Deburr the cut end gently with a file. Ensure the new fitting slides on smoothly. Finally, flare the end using a flaring tool for a proper fit.
How To Shorten Brake Lever Travel?
Adjust the brake cable tension using the barrel adjuster near the lever. Tighten it slightly to reduce lever travel. Ensure the brake pads are correctly aligned and not worn out. Check for air in hydraulic systems and bleed if necessary.
Regular maintenance ensures optimal brake performance.
Conclusion
Shortening hydraulic brake hoses is easier than it seems. Follow each step carefully. Gather all necessary tools beforehand. Measure twice, cut once for precision. Ensuring perfect hose length improves bike performance. It also enhances safety during rides. Secure fittings tightly to avoid leaks.
Check brakes after adjustments for smooth operation. Regular maintenance extends brake life. With practice, this task becomes simple. Enjoy better control on your biking adventures. Keep these tips in mind for future adjustments. Happy cycling and stay safe!


