
Are you ready to enhance your bike’s performance and safety with new brake rotors? Installing bike brake rotors might sound like a daunting task, but with the right guidance, you can do it yourself.
Imagine feeling confident every time you squeeze those brakes, knowing you’ve installed them perfectly. This guide will walk you through each step, ensuring you avoid common mistakes and achieve optimal braking efficiency. You’ll find easy-to-follow instructions that make the process simple and straightforward.
Let’s dive in and empower you with the skills to transform your biking experience.
Tools And Materials Needed
Gathering the right tools is essential for installing brake rotors. First, you’ll need a torque wrench. This ensures bolts are tightened correctly. A hex key setis necessary for removing and attaching rotor bolts. Don’t forget a Phillips screwdriver. It’s useful for adjusting brake pads. Have a clean clothhandy. It helps to wipe rotors before installation.
A bike standis very helpful. It keeps the bike steady during work. Keep some greasenearby. Grease prevents parts from rusting. Gather a set of rotors. Make sure they match your bike’s specifications. Prepare some zip ties. They help manage cables neatly. Finally, ensure you have enough light. Good lighting is crucial to see all parts clearly.

Credit: www.reddit.com
Removing The Wheel
Start by loosening the bolts on the wheel. Make sure to use the right tool. A wrench works well for this task. Once loose, remove the bolts carefully. Keep them in a safe spot. Next, lift the wheel gently. Ensure it doesn’t damage the bike frame. Pay attention to the brake pads. They might be in the way. Pull the wheel out slowly and steadily. Check the axle for any dirt or damage. Clean the area if necessary. Inspect the wheel for wear and tear. Make sure everything is in good condition.
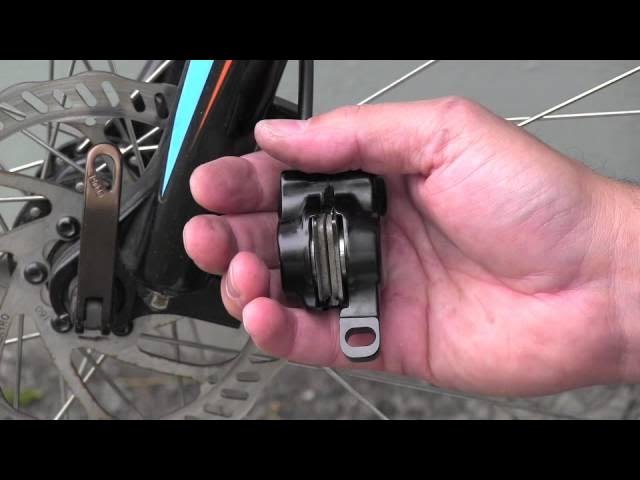
Detaching The Old Rotor
Make sure the bike is steady before starting. Use a wrench to loosen the bolts. These bolts hold the rotor to the wheel. Keep them safe for later use. If the rotor is stuck, tap it gently. This helps to free it from the wheel. Avoid damaging the wheel or rotor.
Check the rotor size before removing it. This ensures the new one fits. Use a clean cloth to wipe the wheel area. This removes dirt and grease. Keep your hands clean to avoid slipping. Be patient and take your time. Proper removal is important. Store the old rotor in a safe place.
Preparing The New Rotor
Ensure the rotor’s surface is clean and smooth before installation. Align the rotor with the hub and secure it using bolts. Tighten bolts in a star pattern for balanced pressure and optimal function.
Inspecting The Rotor
Check the new rotor carefully. Look for any scratchesor bends. Hold the rotor at eye level. Ensure it is flatand smooth. A damaged rotor can cause issueswhen braking. It is important to have a perfect rotor.
Cleaning The Rotor Surface
Use a clean cloth or paper towel. Wipe the rotor surface gently. Remove any dustor grease. You can use rubbing alcohol for better cleaning. This ensures the rotor works efficiently. A clean rotor stops the bike well.
Installing The New Rotor
Installing the new rotor requires precision. Begin by loosening the bolts on the old rotor. Remove it carefully, and position the new rotor securely. Align it with the hub and tighten the bolts evenly to ensure stability.
Aligning The Rotor
The rotor must fit snugly on the wheel hub. Make sure it sits flat. Check if the rotor holes line up with the hub. This step is crucial for smooth braking. If not aligned, brakes might squeak or fail. Always double-check the alignment before proceeding.
Securing With Bolts
Use the right bolts to secure the rotor. Tighten each bolt evenly. Start by finger-tightening all bolts. Then, use a wrench to tighten them in a star pattern. This keeps the rotor even on the hub. Over-tightening might damage the rotor or hub. Ensure all bolts are snug but not overly tight.
Reattaching The Wheel
First, ensure the brake rotor is securely attached. Check for any loose screws or bolts. The wheel should be free of dirt and debris. This ensures smooth rotation.
Align the wheel with the fork or frame. Make sure it fits snugly into place. The rotor must not touch the brake pads. This prevents unwanted noise and wear.
Secure the wheel with the axle or quick-release skewer. Tighten it well to keep the wheel stable. Check if the wheel spins freely. Adjust if necessary.
- Double-check the alignment.
- Ensure the rotor is not rubbing.
- Test the brakes before riding.
Test by lifting the bike and spinning the wheel. Listen for any scraping sounds. Adjust if you hear any noises. Ensure the wheel spins smoothly.
Adjusting The Brake Caliper
Start by loosening the bolts on the brake caliper. Make sure they are not too loose. Spin the wheel to see if the rotor wobbles. If it does, you need to align it. Squeeze the brake lever gently. This helps center the caliper over the rotor. Tighten the bolts gradually while holding the brake lever. Check the rotor again for any wobbling. If it’s still wobbling, adjust the caliper’s position. Ensure the rotor spins freely without rubbing. Test the brakes by squeezing the lever several times. The brakes should feel firm and responsive. Make any final adjustments if needed. Always ensure the rotor is not touching the brake pads when not in use. This ensures smooth riding and effective braking.
Testing The Brakes
Testing the brakes ensures safety after installing bike brake rotors. Gently apply pressure to check smooth operation. Adjust as needed for optimal performance.
Checking For Noise
Spin the bike wheel gently. Listen closely for any strange sounds. A squeaking noisemeans the rotor might rub. Adjust the rotor to stop this. If there’s a grinding noise, check for debris. Clean the rotor with a soft cloth. Ensure it’s freefrom dirt or oil. A quiet ride means proper installation.
Ensuring Proper Function
Press the brake lever softly. The wheel should stop quickly. If not, the rotor might be loose. Tighten the screws on the rotor. Check the brake padsfor wear. Replace them if they’re thin. Brakes must work smoothly without effort. A well-installed rotor keeps you safe.
Maintenance Tips
Installing bike brake rotors requires careful attention and the right tools. Begin by securing the bike and removing the wheel. Align the new rotor with the hub, ensuring it fits snugly. Tighten the bolts in a star pattern for even pressure.
Test the brakes to ensure proper function.
Regular Inspections
Check your bike brake rotors often. Look for any signs of wear. Cracks and bends are not good. Loose bolts can cause problems too. Make sure they are tight. Spin the wheel and listen. Any weird sounds need attention. Keep your bike safe by checking brakes regularly.
Cleaning And Care
Clean your rotors to keep them working well. Use a soft cloth and mild soap. Wipe gently to remove dirt. Avoid oil near the rotors. Oil can make them slippery. Water is safe but dry them after cleaning. Store your bike in a dry place. This keeps the brakes rust-free.

Credit: road.cc

Credit: www.youtube.com
Frequently Asked Questions
Can You Install Brake Rotors Yourself?
Yes, you can install brake rotors yourself. Ensure you have the proper tools and follow the manufacturer’s instructions. Always prioritize safety and double-check your work. If unsure, consult a professional mechanic for assistance.
Which Way Do Brake Rotors Go?
Brake rotors should be installed with the directional vanes pointing forward. This ensures proper airflow and cooling. Check the rotor’s label or instructions for specific guidance. Cross-drilled or slotted rotors may have directional patterns that need alignment. Always consult your vehicle’s manual or a professional mechanic for precise installation.
How To Center A Bike Brake Rotor?
Align the brake caliper over the rotor. Loosen caliper bolts slightly, squeeze brake lever, and tighten bolts evenly. Ensure rotor spins freely. Adjust caliper position if needed to eliminate rubbing. Use a rotor truing tool for minor adjustments. Regular checks ensure optimal performance and safety.
How To Secure A Rotor?
Secure a rotor using appropriate mounting bolts and ensure they are torqued to manufacturer specifications. Regularly check for wear or damage. Use safety guards to prevent debris and maintain a balanced rotor to avoid vibrations. Ensure proper alignment and lubrication for optimal performance.
Conclusion
Installing bike brake rotors is not difficult. With the right tools, anyone can do it. Start by gathering the necessary items. Follow the steps carefully. Tighten the bolts properly. Remember, safety is crucial. Check your brakes regularly. Make sure they work well.
This ensures a smooth ride. Enjoy biking with confidence. Always prioritize safety and maintenance. Your bike will thank you. Keep your rides enjoyable and safe. Happy cycling!


