
Are your bike brakes not working as well as they used to? You might need to replace your brake pads.
Imagine gliding down a hill with confidence, knowing your brakes will respond perfectly when you need them most. That’s the kind of ride you deserve, and getting there is easier than you think. Whether you’re a seasoned cyclist or just starting out, understanding how to replace bike brake pads can save you time, money, and ensure a safer ride.
By following these straightforward steps, you can enhance your biking experience and keep your rides smooth and secure. Ready to dive into the details and give your bike the care it needs? Let’s get started!
Types Of Bike Brake Pads
Rim brake pads are common on many bikes. They press against the wheel rim to stop the bike. These pads can be made from rubber or leather. Rubber pads are more popular. They offer better grip and durability. Leather pads are softer and quieter. They might wear out faster. Regular checks are important for safety. Replace them when they are worn. Worn pads make braking less effective. Always keep an eye on their condition.
Disc brake pads are found on modern bikes. They grip the disc attached to the wheel. These pads are often made from metal or resin. Metal pads are durable and work well in wet conditions. They might be noisier. Resin pads are quieter and provide smooth braking. They can wear faster in bad weather. Regularly check these pads for wear. Good pads ensure safe rides. Replace them when they are thin. Thin pads can be dangerous.
Tools Needed For Replacement
For replacing bike brake pads, have a few tools ready. A wrench helps with bolts. Use an Allen key for tight spots. A screwdriver is essential for adjustments. Keep a clean cloth handy. It will help wipe dirt away.
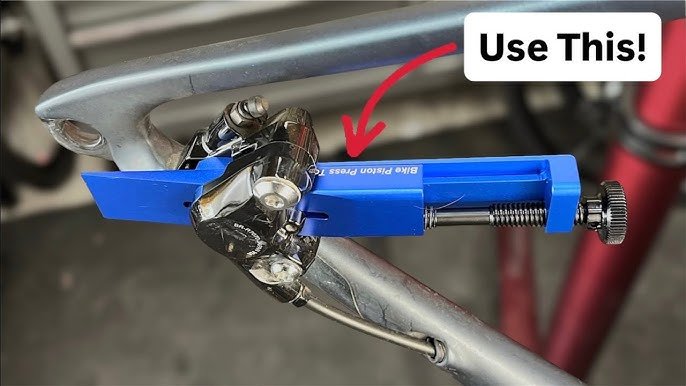
Some special tools make the job easier. Brake pad spreaders help move pistons back. Torque wrenches ensure correct tightness. Piston reset tools are useful for hydraulic brakes. These tools make the task quicker and safer.
Preparation Steps
Wear a helmet to protect your head. Use gloves to keep hands safe. Ensure the bike is stable using a bike stand. Never work on an unstable bike. Check the area for sharp objects. Clear any debris around the bike. Keep a first-aid kitnearby. Be aware of moving parts to avoid injury. Always work in a well-lit space. Ensure tools are within reach but not scattered. Double-check the brake system before starting. Safety firstin all tasks.
Inspect the pads carefully. Look for signs of wear. Check if pads are thin or cracked. Feel the surface for rough spots. Ensure pads are not too smooth. Compare pad thickness to new pads. Measure the thicknesswith a ruler. Make sure they are not below 3mm. Check for uneven wear patterns. Replace worn padsimmediately. Listen for unusual sounds while braking. Squeaks may indicate wear. Regular checksensure safe rides.
Removing Old Brake Pads
First, loosen the brake pad’s retaining boltusing an Allen key. Slide the brake pad out of the brake holder. Make sure to keep the small parts in a safe place. Check the brake pad for wear. If it’s worn down, it’s time to replace it. Use a clean cloth to wipe away any dirt. Make sure the brake holder is clean before installing new pads.
Begin by removing the wheelto access the brake caliper. Use a screwdriver to gently remove the retaining pin. Pull the old brake pads out of the caliper carefully. Inspect the pads for damage or wear. If they are thin or damaged, replace them. Clean the caliper with a soft brush. Avoid touching the brake rotor with greasy fingers.
Installing New Brake Pads
Replacing bike brake pads is simple. First, remove the wheel and old brake pads. Then, insert new pads and ensure they align properly. Finally, test the brakes for effective stopping.
Positioning Pads Correctly
Align the brake pads with the bike’s rim. Ensure each pad is at the same height. Both pads should touch the rim’s side. Leave a small gap from the tire. This prevents rubbing. Adjust the angle slightly upward. This helps in efficient braking.
Securing Pads In Place
Tighten the bolts using a wrench. Make sure the pads do not move. Check the alignment again. Press the brake lever. Ensure the pads contact the rim evenly. Test the brakes while riding. They should stop smoothly without noise.

Credit: www.velotricbike.com
Adjusting Brake Pad Alignment
Ensure the brake pads align with the wheel rim to avoid uneven wear. Loosen mounting bolts, adjust pads, and retighten bolts. Proper alignment enhances braking efficiency and prolongs pad life.
Ensuring Proper Contact
Brake pads must touch the rim evenly. This ensures good stopping power. Use a wrench to adjust the pad position. It should not touch the tire. Keep the pad aligned with the rim’s curve. This prevents damage and ensures safe rides. Tighten the nuts once aligned correctly. This keeps the pads in place.
Testing Alignment
Spin the wheel to check alignment. The pads should not rub. Squeeze the brake lever gently. The pads must touch the rim smoothly. Listen for any strange noises. If you hear squeaks, adjust again. Repeat the process for both wheels. This ensures both brakes work well. Safety is key on every ride.
Testing Brake Performance
Replacing bike brake pads ensures optimal performance. Remove the wheel, then loosen the old pads. Slide new pads into place, aligning them correctly. Test the brakes to confirm proper function and safety. Regular maintenance keeps your bike safe and reliable.
Initial Brake Test
To test your bike brakes, start slowly. Pull the brake lever gently. Feel how the bike slows down. Listen for any strange noises. Make sure the bike stops smoothly. If the bike wobbles, check the pads.
Fine-tuning Adjustments
Adjust brake pads if needed. Check the alignment first. Pads should touch the rim evenly. Use a wrench to adjust the screws. Tighten them carefully. Test the brakes again. Ensure they work perfectly. Repeat until satisfied.

Credit: www.youtube.com
Maintenance Tips
Replacing bike brake pads involves checking the pad wear, removing the wheel, and loosening the caliper. Carefully slide out the old pads and insert the new ones, ensuring they align properly. Test the brakes to confirm proper installation before hitting the road.
Regular Checks
Check your bike brake pads every month. Look for cracks or wearon the pads. Make sure the brakes are not too thin. If they are, it’s time to replace them. Use a flashlight to see clearly. Spin the wheel and listen for any noise. If you hear a squeak, the pads might be worn out. Keep your bike clean to avoid dirt. Dirt can cause brakes to wear faster.
Signs Of Wear
Worn brake pads can be dangerous. The first sign is noise. Squeaking or grinding means the pads are thin. Check for uneven wear on the pads. If one side is thinner, there’s a problem. Brakes should feel smooth. If they feel spongy or soft, inspect the pads. Look for deep grooves or cracks. This means it’s time to change them. Always ensure your brakes work well. Safety is key when riding.

Credit: www.youtube.com
Frequently Asked Questions
Can You Replace Bike Brake Pads Yourself?
Yes, you can replace bike brake pads yourself. It’s a simple task with basic tools. Ensure you have the correct replacement pads and follow your bike’s manual. Regular maintenance ensures safety and performance. Always test the brakes after installation for proper function.
Can You Replace Bike Brake Pads Without Removing The Wheel?
Yes, you can replace bike brake pads without removing the wheel. Loosen the brake pad retention bolt and slide the pad out. Insert the new pad, tighten the bolt, and ensure alignment with the rim. Always check brake function after replacement to ensure safety.
What Is The Rule Of Thumb When Replacing Brake Pads?
Replace brake pads every 20,000 to 70,000 miles based on driving habits and conditions. Regularly inspect for wear. Listen for squeaking or grinding noises, indicating replacement is necessary. Ensure brake fluid levels are adequate. Always consult your vehicle’s manual for specific guidelines.
Safety should be the priority in maintenance.
How Often Should Brake Pads Be Replaced On A Bike?
Replace bike brake pads every 500 to 1000 miles. Check regularly for wear and reduced braking performance. Frequent use in wet or muddy conditions may require more frequent replacements. Always prioritize safety and inspect pads often to ensure optimal function.
Consult your bike’s manual for specific recommendations.
Conclusion
Replacing bike brake pads is simpler than you might think. Just follow the steps carefully. Gather the right tools. Ensure safety while working. Use quality brake pads for best results. Regular maintenance keeps your bike running smoothly. Check brakes often to avoid surprises.
Remember, a well-maintained bike is safe to ride. Enjoy a smoother, safer biking experience. Your bike deserves the best care. Share this knowledge with fellow riders. Keep cycling fun and safe for everyone. Ride with confidence. Happy cycling!


