
Are you ready to transform your bike’s braking performance and elevate your riding experience? Switching from rim brakes to disc brakes could be the upgrade you need.
This change isn’t just about aesthetics; it offers enhanced stopping power, better control in wet conditions, and improved longevity. Imagine confidently navigating through various terrains, knowing your bike can handle sudden stops with precision. Intrigued? You’re not alone. Many cyclists are making the switch, seeking the reliability and efficiency that disc brakes offer.
In this guide, we’ll walk you through the steps to swap out your old rim brakes for modern disc brakes, ensuring you have the knowledge and tools to make this transition seamless. Keep reading to discover how you can enhance your bike’s performance and enjoy a safer ride.
Benefits Of Disc Brakes
Upgrading from rim brakes to disc brakes offers better stopping power and performance. Disc brakes work well in wet conditions, making rides safer. They provide consistent braking and require less maintenance over time, enhancing the cycling experience.
Improved Braking Performance
Disc brakes stop your bike faster. They work well on steep hills. No more slipping when you need to stop. They give more control over your bike. You feel safer with disc brakes.Weather Resistance
Disc brakes work in rain and mud. They do not stop when they get wet. You can ride on rainy days. No more slipping in the wet. Feel safe and steady.Maintenance Advantages
Disc brakes need less care. They last longer than rim brakes. Parts are easy to change. You spend less time fixing them. Save money on repairs. Enjoy more time riding. `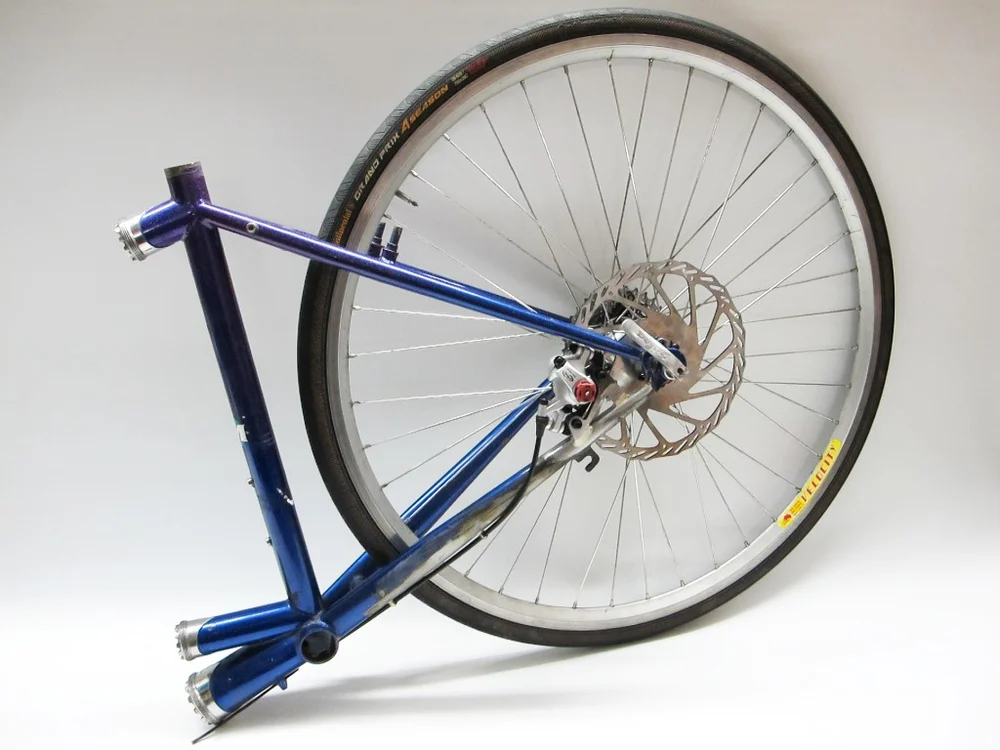
Credit: www.ticycles.com
Tools And Materials Needed
Switching from rim brakes to disc brakes requires specific tools and materials. You’ll need a disc brake kit, compatible wheels, and a set of Allen wrenches. Ensure you have a torque wrench for precise installation and a bleed kit to handle hydraulic systems if necessary.
Essential Tools
- Allen wrenchesare vital for removing bolts.
- Screwdrivershelp in loosening screws.
- Torque wrenchensures bolts are tightened correctly.
Brake Components
- Disc brake calipersreplace rim brake calipers.
- Brake rotorsattach to the wheel hub.
- Brake padsfit into the calipers.
Additional Equipment
- New wheelswith disc brake hubs are needed.
- Brake cablesconnect levers to calipers.
- Mounting boltssecure the new brake setup.
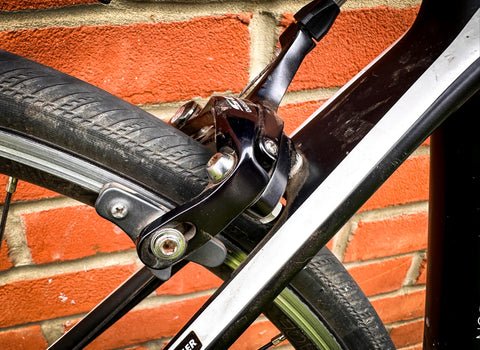
Preparing Your Bicycle
Swapping rim brakes for disc brakes on a bicycle enhances stopping power. Remove the wheels and old brake system first. Install disc brakes, ensuring alignment and securing components tightly.
Inspection And Assessment
Check your bicycle frame and fork. They must be compatible with disc brakes. Look for mounting points for the disc brake calipers. Confirm the wheels can hold disc brake rotors. Examine the hubs if they support disc brakes. Ensure the bike’s cables and housingare in good shape. They should be long enough for the new setup.
Removing Old Components
Take off the rim brakescarefully. Start by removing the brake pads. Loosen the bolts to detach the brake arms. Unclip the brake cables from the levers. Remove the old brake levers if necessary. Keep all screws and small parts safe. They might be useful later.
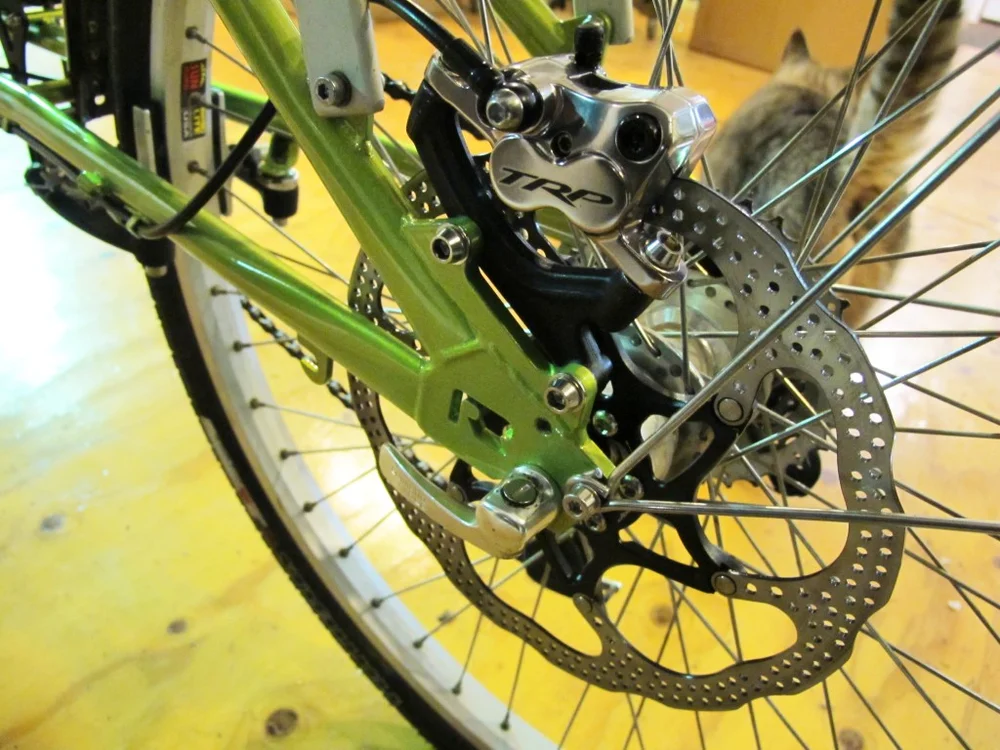
Installing Disc Brakes
Place the rotor on the wheel hub. Use bolts to secure it tightly. Make sure it is centered and not wobbly. Spin the wheel to check alignment. The rotor should spin smoothly.
Align the calipers with the rotor. Use mounting brackets to hold them. Ensure they are secure and straight. Adjust until there is no friction. Test by squeezing the brake lever.
Run the cables from levers to calipers. Keep them straight and tight. Clip them in place using cable ties. Ensure there are no kinks or bends. Test by pulling the brake lever firmly.
Adjusting And Testing
Adjusting and testing the new disc brakes ensures optimal performance. Check alignment and tighten bolts securely. Test the brakes on different terrains to confirm efficiency.
Caliper Alignment
Aligning the caliper is crucial for smooth braking. First, loosen the caliper bolts. Squeeze the brake lever to center the caliper. Hold it tightly. Tighten the bolts while holding the lever. Check if the rotor spins freely. The caliper should not rub against it.
Brake Lever Adjustment
Ensure the brake lever is at a comfortable distance. Loosen the lever clamp bolt. Move the lever to your preferred position. Tighten the bolt to secure it. Test the lever pull. It should feel smooth and firm. Repeat adjustments if needed.
Performance Testing
Test your brakes in a safe area. Start by riding slowly. Apply the brakes gently. Feel the bike’s response. Increase speed gradually. Test harder stops. Ensure the bike stops quickly and smoothly. Listen for unusual noises. Adjust if anything feels off.
Credit: www.ticycles.com
Troubleshooting Common Issues
Swapping rim brakes for disc brakes can enhance bike performance. Ensure compatibility with your bike frame and fork. Gather tools like Allen wrenches and a torque wrench for precise installation. Adjust brake calipers and ensure proper alignment for effective stopping power.
Test the brakes for safety before riding.
Brake Noise Solutions
Brake noise can be annoying. Use a clean cloth to wipe the rotors. Make sure the rotors are clean and dry. Check if the brake pads are aligned properly. Tighten any loose bolts you find. Apply a little brake fluid if needed. This helps reduce noise.
Fixing Brake Drag
Brake drag slows your bike. First, lift the bike’s wheel. Spin it to see if it drags. Adjust the brake caliper screws. Make sure they are not too tight. Check the rotor for bends or damage. A bent rotor can cause drag. Align the rotor if needed.
Addressing Uneven Wear
Uneven wear shortens brake life. Check both brake pads. They should wear evenly. If not, adjust the calipers. Ensure the pads are centered on the rotor. Replace worn or damaged pads. Uneven wear means something is off. Fix it early.
Maintenance Tips
Swapping rim brakes for disc brakes involves a few key steps. First, gather necessary tools and components. Remove the old brakes and install new disc brake mounts. Finally, attach the disc brake calipers and rotors, ensuring proper alignment and function for safe riding.
Regular Checks
Always check your brakesbefore riding. Look for any loose parts. Make sure everything is tight and secure. Check the disc rotorsfor bends or cracks. Ensure the brake padsare not worn out. This keeps your bike safe.
Cleaning And Lubrication
Clean the brakesregularly. Use a soft cloth and some cleaner. Avoid oil on the disc rotors. Oil can make them slippery. Lubricate the moving parts. This keeps everything working smoothly.
Replacing Worn Parts
Worn parts can be dangerous. Replace old brake padswhen they are thin. Check the cablesfor fraying. Replace them if needed. Always use the correct parts for your bike. This keeps your ride safe and smooth.

Credit: www.reddit.com
Frequently Asked Questions
Can You Swap Rim Brakes For Disc Brakes?
Swapping rim brakes for disc brakes is challenging. Your frame and fork need disc brake mounts. You may also need new wheels compatible with disc brakes. Assess compatibility before making changes.
How To Convert Normal Brake To Disc Brake?
To convert normal brakes to disc brakes, replace drum components with disc brake parts. Use compatible rotors, calipers, and pads. Ensure proper alignment and fitment. Upgrade the brake lines if needed. Test thoroughly for safety.
How Hard Is It To Swap Drum Brakes To Disc Brakes?
Swapping drum brakes to disc brakes can be challenging. It requires mechanical skill, proper tools, and parts. Disc brakes improve performance, but installation involves removing drums, adjusting the brake system, and ensuring compatibility. Professional assistance is recommended for optimal safety and efficiency.
Do You Have To Change The Master Cylinder When Converting To Disc Brakes?
Changing the master cylinder is often necessary when converting to disc brakes. Disc brakes require different pressure than drum brakes. Upgrading ensures optimal performance and safety. Consult a professional for specific vehicle requirements. Always prioritize compatible parts to maintain braking efficiency.
Conclusion
Switching from rim brakes to disc brakes is simpler than it seems. Follow the steps carefully, and your bike will perform better. Disc brakes offer improved stopping power and reliability. This upgrade enhances safety, especially in wet conditions. With patience and the right tools, anyone can make the switch.
Remember to test your brakes after installation. Enjoy a smoother ride with enhanced control. Consider seeking help if unsure, but don’t hesitate to try it yourself. Your bike deserves the best. Happy cycling!


