
Are you ready to transform your biking experience with a lowrider rack? Whether you’re a seasoned cyclist or new to the world of biking, installing a lowrider rack can be a game changer.
Imagine cruising down the road with your gear securely in place, enjoying the freedom and convenience that comes with it. You might be wondering how to get started or if it’s worth the effort. Well, you’re in the right place! In this guide, we’ll walk you through the step-by-step process of installing a lowrider rack on your bike.
By the end of this article, you’ll not only know how to do it yourself but also understand why it’s a must-have for any cycling enthusiast. Get ready to unlock a new level of biking potential!

Credit: www.reddit.com
Tools And Materials Needed
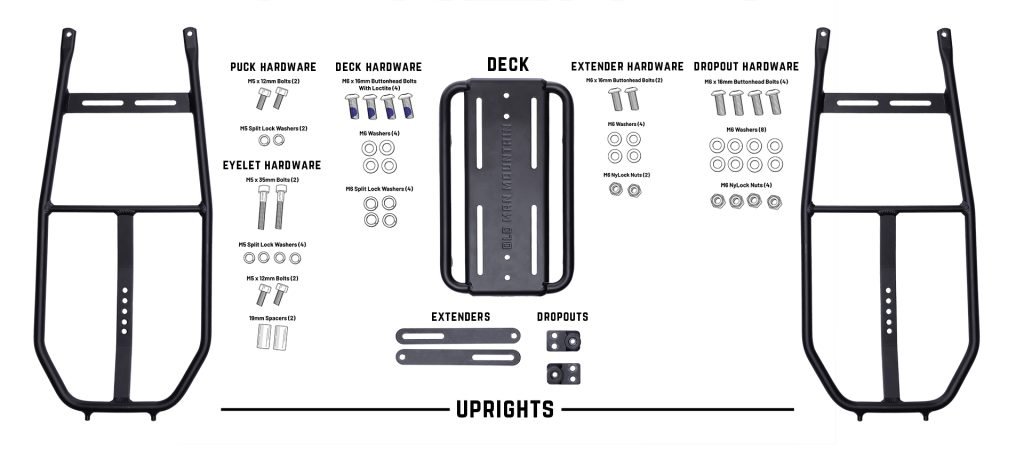
To install the lowrider rack, gather essential toolsand materials. You’ll need a wrench, screwdriver, and measuring tape. These tools help secure the rack properly.
Don’t forget your bike rack. It should fit your bicycle size and style. Make sure to have a set of boltsand washers. They keep the rack stable and strong.
A drillmight be necessary for some installations. It helps make holes if needed. Lastly, safety gear like gloves and goggles is important. Protect yourself while working.
Check all items before starting. This ensures a smooth installation process. Missing tools can cause delays. Gather everything and begin with confidence.

Credit: www.tiktok.com
Preparing Your Bicycle
Installing a lowrider rack can enhance your bicycle’s functionality. Begin by positioning the rack on the fork eyelets. Secure it using bolts, ensuring a snug fit. Double-check alignment for balance and stability. This setup supports carrying extra gear efficiently, making your rides more versatile.
Cleaning The Frame
Start by cleaning the frameof your bicycle. Use a soft cloth and some warm, soapy water. Gently wipe down all parts of the frame. Remove any dirt or dust. Pay special attention to the corners and hidden spots. Dry the frame with a clean towel. This will help you see any damage or rust. A clean frame will make installation easier.
Inspecting Mounting Points
Check the mounting pointson your bike. These are where the rack will attach. Make sure they are free from rust. Look for any cracks or damage. All screws should be in good condition. Tighten any loose screws. If any are missing, replace them before starting. This ensures the rack is safe and secure.
Choosing The Right Lowrider Rack
Installing a lowrider rack requires selecting one that fits your bike frame. Ensure the rack is compatible with your front fork and has sturdy mounting points. Follow the instructions for a secure fit, keeping tools handy for adjustments.
Material Options
Lowrider rackscome in different materials. Each material has its pros and cons. Steel racks are strong and durable. They are heavier than other types. Aluminum racks are lighter. They might not be as strong as steel. Titanium racks are light and strong. They are usually more expensive. Choose the material that fits your needs best. Think about how you will use the rack.Weight Capacity Considerations
Check the weight capacity before buying a lowrider rack. Some racks hold more weight than others. Make sure your rack can carry your gear. If you carry heavy items, choose a rack with a higher capacity. Always follow the weight limit to stay safe. Overloading can damage the rack and your bike. `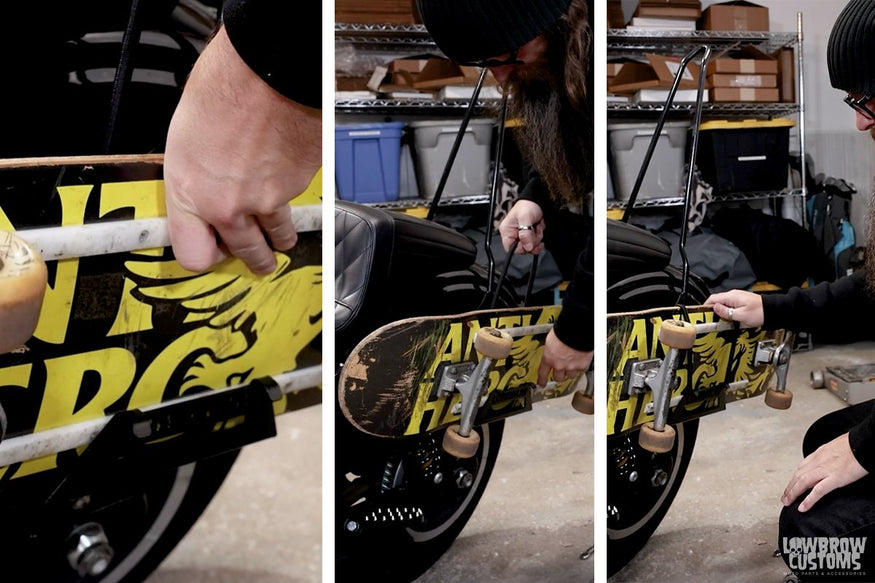
Credit: www.lowbrowcustoms.com
Aligning The Rack
Aligning the rack ensures stability during installation. Begin by positioning the lowrider rack parallel to the bike frame. Secure each mounting point firmly to prevent movement.
Positioning The Rack
Place the rack in the center of the bike. Ensure it’s not tilted. Use your hands to check the balance. The rack should be equal on both sides. Tighten the screws gently.
Adjusting Height And Angle
Make sure the rack is not too high. Check the angle to avoid touching wheels. Adjust the screws for a secure fit. Test the rack by pressing down lightly. Confirm it stays firm and steady.
Securing The Rack
Installing a lowrider rack enhances bike storage and utility. Begin by attaching the rack’s brackets to the bike frame. Ensure all screws are tightly secured for stability and safety.
Attaching To Mounting Points
First, find the mounting points on your bike. These are usually small holes. Align the rack’s arms with these points. Insert the bolts through the holes. Hold the rack steady with one hand. Use the other hand to turn the bolts. Ensure the rack is level and straight.Tightening Bolts And Screws
Use a wrench to tighten the bolts. Turn each bolt evenly. This keeps the rack stable. Check if the rack wobbles. If it does, tighten the screws more. Avoid over-tightening. This can damage the threads. Double-check all bolts and screws. Make sure they are all tight. `Testing Stability
Secure the lowrider rack by attaching it to the bike fork mounts. Ensure all bolts are tightly fastened. Adjust the rack to maintain balance and stability, preventing any wobbling during rides.
Checking For Wobble
Ensure the rack is firmly attached. Push the rack gently. Notice any wobbleor shake. If it moves, adjustments are needed. Secureall bolts tightly. Confirm the rack doesn’t sway. A stable rack is safe. Double-check each connection point. Proper stability prevents accidents.
Adjusting Tightness
Examine all screws and bolts. Make sure they are tight. Use a wrench for adjustments. Tighten each bolt evenly. Avoid over-tightening to prevent damage. Test the rack after adjustments. It should be solidand secure. Regular checks keep the rack safe. Tight bolts ensure no movement.
Maintenance Tips
Secure your bike’s front fork with the lowrider rack. Ensure bolts are tightly fastened to prevent wobbling. Check alignment and adjust for even weight distribution.
Regular Inspections
Check the lowrider rack for any loose bolts. Tighten them if needed. Look for rust spots and remove them gently. Inspect the mounting points for any damage. Ensure the rack sits securely. Make sure the weight is balanced. This helps in smooth rides.
Cleaning And Lubrication
Use a soft cloth to clean the rack. Remove any dirt or debris. Apply bike-safe lubricant to the moving parts. This keeps the rack working smoothly. Avoid using harsh chemicals. They can damage the rack. Clean and lubricate once a month. This makes the rack last longer.
Frequently Asked Questions
How To Install An Easy Rack?
To install an easy rack, first gather all necessary tools. Securely attach the brackets to the wall. Slide the rack into place on the brackets. Ensure it is level and tight. Follow the manufacturer’s instructions for any specific adjustments or requirements.
Enjoy your newly installed rack.
How To Install Rack Hardware?
Begin by assembling necessary tools and hardware. Secure rack rails using screws. Attach brackets to align components. Confirm stability and alignment. Install equipment and cables. Double-check for secure fittings.
How To Bolt A Bike Rack To The Ground?
Secure a bike rack by drilling holes into the ground. Use anchor bolts for stability. Ensure alignment with the rack’s base. Tighten bolts firmly with a wrench. Confirm the rack is immovable and level for safety. Regularly check the bolts for wear to maintain security.
How To Install A Hitch Rack?
Install a hitch rack by inserting the rack into the hitch receiver. Secure it with the hitch pin and clip. Tighten any bolts or knobs. Ensure the rack is stable before loading bikes. Follow manufacturer instructions for specific models. Regularly check for wear and secure all connections.
Conclusion
Installing a lowrider rack can enhance your bike’s versatility. Follow the steps carefully. Ensure all tools are ready before beginning. Double-check each bolt and screw. Safety is crucial. A well-installed rack carries your load efficiently. Enjoy smoother rides. Remember to maintain your bike regularly.
Inspect the rack for any damage. Secure your belongings tightly. This installation boosts your biking experience. Feel more comfortable on longer journeys. With patience and attention, your rack will serve you well. Happy cycling and safe travels.


