
Have you ever struggled to carry everything you need while biking? If you’re looking for a way to make your rides more convenient, installing pannier hooks might be your solution.
Imagine having the freedom to pack all your essentials without the hassle of balancing bulky bags on your handlebars. With pannier hooks, you can effortlessly attach bags to your bike, transforming your cycling experience into a smooth and enjoyable journey.
Installing pannier hooks is easier than you might think, and you’ll wonder why you didn’t do it sooner. This article will guide you step-by-step through the installation process, ensuring you can confidently set up your bike with these handy accessories. By the end, you’ll be ready to hit the road with more storage and less stress. Keep reading to unlock the secrets of seamless bike storage and elevate your cycling adventures to a whole new level.
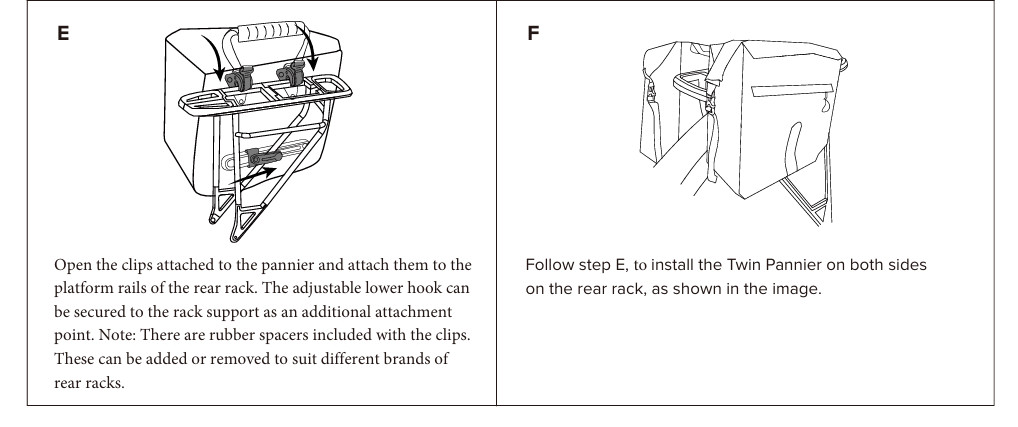
Pannier Hooks Overview
Pannier hooks help carry bags on bikes. They attach to the bike’s rack. The hooks hold the bag firmly in place. It’s important to know how to install them right. This ensures safety during rides.
Some pannier hooks are adjustable. This means you can change their position. Others are fixed and stay in one spot. Always check your bike rack size. It must fit the hooks properly.
Materials for pannier hooks vary. Some are made of plastic. Others use metal for durability. Read the instructions carefully. This helps with correct installation. Tools may be needed like a screwdriver.
Choosing the right hook depends on your bike’s design. It also depends on the type of trips you take. Ensure your pannier bags have the right hooks. This makes your biking experience better and safer.

Credit: pannierhooks.com
Tools And Materials Needed
You will need a few important tools and materials. Start with a screwdriver for securing the hooks. A wrench is also important for tightening nuts. You will need drill bits if you must make new holes. Get a measuring tape to ensure correct spacing. A marker can help you mark where to drill. Don’t forget the pannier hooks themselves.
Make sure to have bolts and nuts matching the hooks. A rag can help clean the area. Finally, have a level to keep everything straight. With these tools, you can start the installation.
Preparing The Bicycle Rack
Ensure the bicycle rack is clean and sturdy. Check for any loose parts. Tighten all screws and bolts securely. This prevents the rack from wobbling. Stability is crucial for safe rides. Measure the rack’s width. It should fit your pannier hooks. If it’s too wide, adjust the hooks. Some racks have adjustable width settings. Use these settings if available. For racks without adjustments, consider using spacers. Spacers help fit the hooks snugly. Avoid using worn-out racks. They might break during the ride. Always have a quick check before installing the panniers. This saves time and ensures safety.
Credit: twowheelgear.com
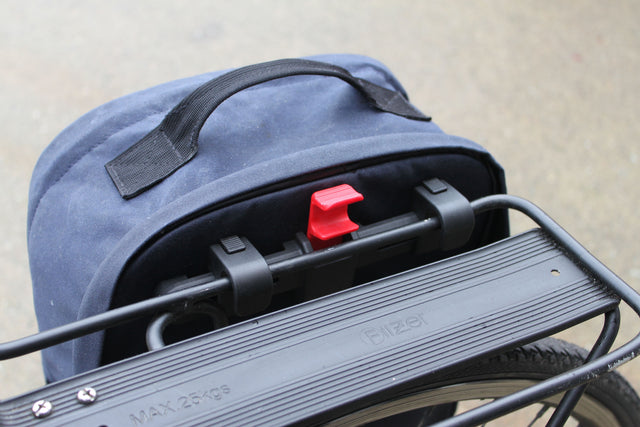
Positioning The Pannier Hooks
Place the pannier hooks on the rack. Ensure they are secure. Adjust the hooks so they align with the rack bars. This prevents slipping. Check that the hooks grip tightly. Loose hooks can cause problems. Use your hands to test the strength. Make sure they are not too tight. Tight hooks can damage the rack. Find a balance in tension. This helps in smooth riding. Keep the hooks straight and aligned. This ensures stability. Do not force the hooks into place. Make adjustments gently. Avoid using tools unless necessary. Listen for any unusual sounds when riding. Reposition if necessary for comfort.
Securing The Hooks
First, make sure the pannier hooks are aligned with the bike rack. This helps them stay secure. Check if the hooks are tightly fastened. Loose hooks can cause problems.
Next, use a strong strapto hold the pannier. Wrap the strap around the rack. Then, fasten it securely. This will keep the pannier stable.
Finally, test the pannier’s stability. Give it a gentle shake. It should not wobble. If it does, tighten the hooks and straps again. A secure fit is important for safety.
Adjusting For Stability
Proper adjustmentis key for stable pannier hooks. First, check your bike rack. Make sure it’s secure and tight. This helps keep the panniers from wobbling. Next, look at the pannier hooks. They should fit the rack tightly. If they are loose, adjust them. Some hooks have screws. Tighten them with a tool. Others have clips. Snap them until they fit well. Always test the hooks before riding. Gently shake the panniers. If they move, adjust again.
Remember, good stability means safer rides. You don’t want your bags to fall. Also, keep the weight balanced. Heavy items should go at the bottom. This helps in keeping your bike steady. And don’t overload the panniers. Too much weight can cause imbalance. Keep your ride safe and your hooks tight. Enjoy your biking adventures!
Testing And Final Checks
Ensure the pannier hooks are tightly secured. Check if they wobble or shift. Tighten them if they are loose. Use hands to apply gentle pressure. Test the hooks with a loaded pannier. Observe if the load stays balanced. Adjust the hooks if needed. Make sure the pannier does not touch the wheel. Verify the hooks are not bent or broken. Inspect all parts for signs of wear. Replace damaged parts immediately. Make sure the pannier can be easily removed. Practice removing and attaching the pannier. Ensure the hooks click into place securely.
Troubleshooting Common Issues
Installing pannier hooks can be straightforward with the right guidance. Ensure the hooks align with your bike rack. Secure each hook firmly to prevent movement during rides.
Important
Aligning the pannier hooks might be tricky. Check if they are secure. Loose hooks can cause wobbling. Ensure the hooks fit snugly on the rack. If the hook is too tight, adjust it carefully. Sometimes, the pannier strap might be twisted. Untwist it for a better fit. Check for any damaged parts. Replace them if needed. Clean the hooks regularly. Dust can cause slipping. If the pannier keeps sliding, check the rack compatibility. Not all racks fit every pannier. Always double-check the installation instructions. Make sure all parts are in place. If problems persist, seek professional help.

Credit: www.reddit.com
Frequently Asked Questions
How Do Panniers Attach?
Panniers attach to bicycles using hooks, clips, or straps on racks. Some feature quick-release systems for easy removal. Ensure compatibility with your bike’s rack for secure attachment. Always check the stability after mounting to prevent shifting during rides.
Can You Attach Panniers To Any Bike?
You can attach panniers to most bikes with a rear rack. Check if your bike has mounting points. Some bikes may require additional attachments or adapters. Ensure the panniers fit securely for safe riding. Always verify compatibility with your specific bike model before purchasing.
How To Install Bike Storage Hooks?
Find wall studs using a stud finder. Mark locations for hooks, ensuring proper spacing. Drill pilot holes into studs. Screw hooks into holes securely. Hang bike carefully on installed hooks.
How To Attach A Rear Pannier Rack?
To attach a rear pannier rack, align it with your bike’s frame. Secure the rack using bolts at the designated mounting points. Tighten the bolts with a wrench for stability. Adjust the rack for even balance. Ensure the rack is firmly attached before loading.
Conclusion
Now you know how to install pannier hooks. It’s easier than it seems. Follow steps carefully for a secure fit. Ensure hooks are compatible with your bike. Check your tools before starting. Make adjustments for comfort and safety. Practice installing hooks a few times.
You’ll get better each try. Enjoy the convenience of your new panniers. Store essentials securely on your bike. Your rides will be more enjoyable. Share your experience with others. Encourage friends to try panniers too. Happy cycling!


