
Picture this: you’re cycling down a winding road at dusk, the sky painted with hues of purple and orange. Suddenly, it gets darker, and visibility becomes a challenge.
This is where bike helmet lights come into play, transforming your ride into a safer, more enjoyable experience. But how exactly do you go about installing these essential lights? If you’ve ever felt hesitant about navigating the world of bike helmet lights, you’re not alone.
Many cyclists are unsure of where to start, but the good news is, it’s simpler than you might think. By the end of this guide, you’ll not only know how to install bike helmet lights with ease but also understand why it’s a game-changer for your safety and peace of mind. Ready to enhance your cycling adventures with a touch of brilliance? Let’s dive in and illuminate your path to better biking safety.
Credit: www.outboundlighting.com
Choosing The Right Helmet Lights
Helmet lights come in various types. Some are clip-on, others are strap-on. Clip-on lights are easy to attach. Strap-on lights fit snugly and stay secure. Both types have pros and cons. Clip-ons are quick to install. Strap-ons might be more stable. Choose based on your helmet and needs.
Brightness is key for night riding. Some lights are very bright, some less so. Check the lumens rating. The higher, the brighter. Beam patterns matter too. A wide beam shows more area. A narrow beam focuses on one spot. Pick what suits your ride best.
Battery life affects how long lights last. Some batteries last hours, others less. Rechargeable batteries are eco-friendly. Non-rechargeable ones need replacing. Consider your riding time. Longer rides need longer-lasting batteries. Always carry a spare, just in case.
Preparing Your Helmet
Check your helmet for any cracks or damage. Ensure the structure is strong and stable. The straps should be secure and not frayed. Look inside the helmet. Make sure the padding is intact and comfortable. A damaged helmet won’t protect your head well. Safety first!
Use a soft cloth to wipe your helmet. Remove any dust or dirt. A clean surface helps lights stick better. Avoid using harsh chemicals. They can harm the helmet’s material. Ensure the surface is dry before attaching lights. A little time now can make your ride safer.
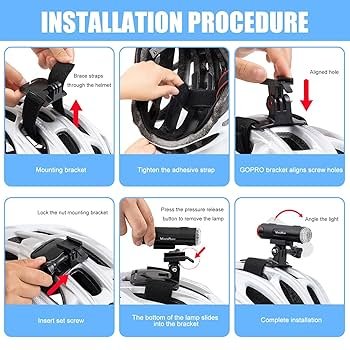
Installation Process
Find the right spot on your helmet. The lights should face forward. Use strong adhesive or mounting brackets. Make sure the lights are secure. Adjust the angle for better visibility.
Keep wires neat and tidy. Use clips or ties to hold them. Avoid tangles that might cause problems. Ensure wires do not block your view. Check for loose connections frequently.
Turn on the helmet lights. Check if they shine brightly. Move your head to test the stability. Ensure lights stay in place while biking. Adjust if needed for better performance.

Credit: completeeq.com
Adjusting Light Position
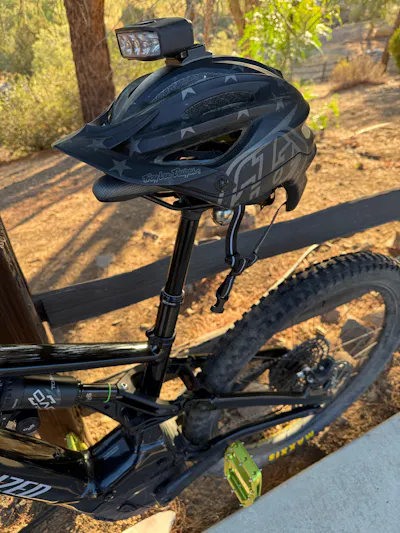
Ensure the bike helmet lights are positioned for optimal visibility. Adjust them to point forward, illuminating the path ahead. Secure the lights firmly to prevent movement during your ride.
Optimal Angles For Visibility
Place the helmet light at a 45-degree angle. This helps others see you easily. Ensure the light is not too high. It should not point directly at the sky. Check from a distance to see how visible it is. Adjust until it shines clearly ahead.Avoiding Glare And Distraction
Glare can make it hard for others to see. To avoid this, adjust the light direction. It should not shine in the eyes of people. Keep the light focused on the road. This helps avoid distractions. Always test the light before riding. Make sure it’s comfortable and safe for everyone. `Maintenance Tips
Installing bike helmet lights is simple and enhances safety. Choose lights that fit your helmet snugly. Secure them using straps or clips, ensuring they face forward for visibility.
Regular Cleaning Routine
Keep the helmet lights clean to make them last longer. Use a soft cloth to wipe off dirt and dust. Avoid harsh chemicals; they can damage the light. Check for any cracks or loose parts during cleaning. Make sure the light cover is clear for maximum brightness. Keep the lights dry to prevent rust and damage.
Battery Replacement Guide
Replace the batteries when the light gets dim. Always use the correct battery type for your light. Remove old batteries carefully to avoid damage. Dispose of old batteries in a safe way. Keep spare batteries handy for emergencies. Check battery contacts for corrosion and clean them if needed.

Credit: nutsrvph.com
Safety Benefits
Installing bike helmet lights enhances visibility and safety during night rides. Proper placement ensures other road users can see you clearly. Choose lights with adjustable settings for varying conditions and secure them firmly to prevent detachment while cycling.
Improved Night Riding
Bike helmet lights make night rides safer. They shine bright in the dark. This helps riders see better on roads. Lights show up obstacles ahead clearly. They prevent sudden surprises on the path. Riders feel secure and confident. Night rides become enjoyable with clear vision.
Increased Visibility To Drivers
Helmet lights make riders visible to cars. Drivers notice the bright lights easily. This reduces the risk of accidents. Bright lights alert drivers from a distance. Riders become a clear part of traffic. Safety increases for everyone on the road. Helmet lights are a smart choice for safety.
Frequently Asked Questions
How To Attach A Light To A Bike Helmet?
Use helmet mounts or adhesive strips to attach a light securely. Ensure it’s positioned for optimal visibility. Adjust the angle for best illumination. Always check compatibility with your helmet type.
What Is The 2 2 2 Rule When Fitting A Helmet On Your Head?
The 2-2-2 rule ensures a proper helmet fit. Keep two fingers above eyebrows, straps form a V under ears, and two fingers fit between chin and strap. This method provides a secure and comfortable fit, enhancing safety.
Are Helmet Lights Worth It?
Helmet lights enhance visibility and safety for cyclists and motorcyclists. They are worth the investment. These lights improve night riding and alert others to your presence. With various styles available, helmet lights offer flexibility and convenience. Investing in a quality helmet light can prevent accidents and increase ride confidence.
Where To Mount A Helmet Light Mtb?
Mount a helmet light on top or sides of the helmet. Ensure it’s secure and doesn’t obstruct vision. Use adjustable straps or mounts designed for helmets. Position the light to illuminate the trail ahead clearly. Make sure it’s easy to operate while riding.
Conclusion
Installing bike helmet lights enhances your visibility and safety at night. Follow the steps carefully for a secure fit. Check lights often to ensure they work properly. Choose lights that suit your cycling needs. Remember, brighter lights make you more visible to drivers.
Keep your helmet clean and free from obstructions. Regularly inspect the lights for any damages. Proper installation and maintenance ensure lasting performance. Enjoy safer rides with your illuminated helmet. Share your new setup with fellow cyclists. Encourage friends to prioritize their safety too.
Riding with helmet lights is simple, effective, and smart.


