

This guide walks you through the complete process of how to tie down a dirt bike in a truck bed safely and securely. You’ll learn the right equipment, proper techniques, and common mistakes to avoid for stress-free transport.
Key Takeaways
- Use high-quality ratchet straps: Always choose straps with a minimum 1,000 lb working load limit to ensure strength and reliability.
- Secure both front and rear wheels: Locking down only one wheel can cause the bike to shift or tip during transit.
- Protect your bike’s suspension: Avoid over-tightening straps on the forks to prevent damage to seals and components.
- Use soft loops or handlebar straps: These prevent metal hooks from scratching your bike’s frame or handlebars.
- Check straps during long trips: Stop every few hours to ensure everything remains tight and secure.
- Never rely on just one strap: Use at least four straps—two for the front and two for the rear—for maximum stability.
- Park on level ground when loading: This reduces strain on your body and makes securing the bike easier and safer.
How to Tie Down Dirt Bike in Truck Bed: A Complete Safety Guide
Transporting your dirt bike doesn’t have to be stressful—or dangerous. Whether you’re heading to the trails, a race, or just storing your bike for the season, knowing how to tie down a dirt bike in a truck bed properly is essential. A poorly secured bike can shift, fall, or even cause an accident on the road. But with the right tools and techniques, you can transport your bike safely and confidently.
In this guide, we’ll walk you through every step—from choosing the right gear to tightening straps correctly—and share expert tips to keep your bike (and your truck) in top shape. We’ll also cover common mistakes, troubleshooting, and how to check your setup mid-trip.
What You’ll Need
Visual guide about How to Tie Down Dirt Bike in Truck Bed
Image source: m.media-amazon.com
Before you even lift your bike into the truck, make sure you have the right equipment. Using the wrong gear is one of the most common causes of bike damage during transport.
Essential Gear Checklist
- Ratchet straps (4 recommended): Look for straps with a working load limit of at least 1,000 lbs. Avoid cheap cam buckle straps—they can slip under vibration.
- Soft loops or handlebar straps: These wrap around the handlebars or frame without metal hooks touching the bike, preventing scratches and dents.
- Wheel chocks (optional but helpful): A front wheel chock keeps the bike upright and centered, making it easier to strap down.
- Moving blankets or foam padding: Protect your truck bed and bike from scratches, especially if you’re loading multiple bikes.
- Tie-down anchors in the truck bed: Most trucks have built-in tie-down points. If yours don’t, consider installing aftermarket anchors.
Step-by-Step: How to Tie Down Your Dirt Bike
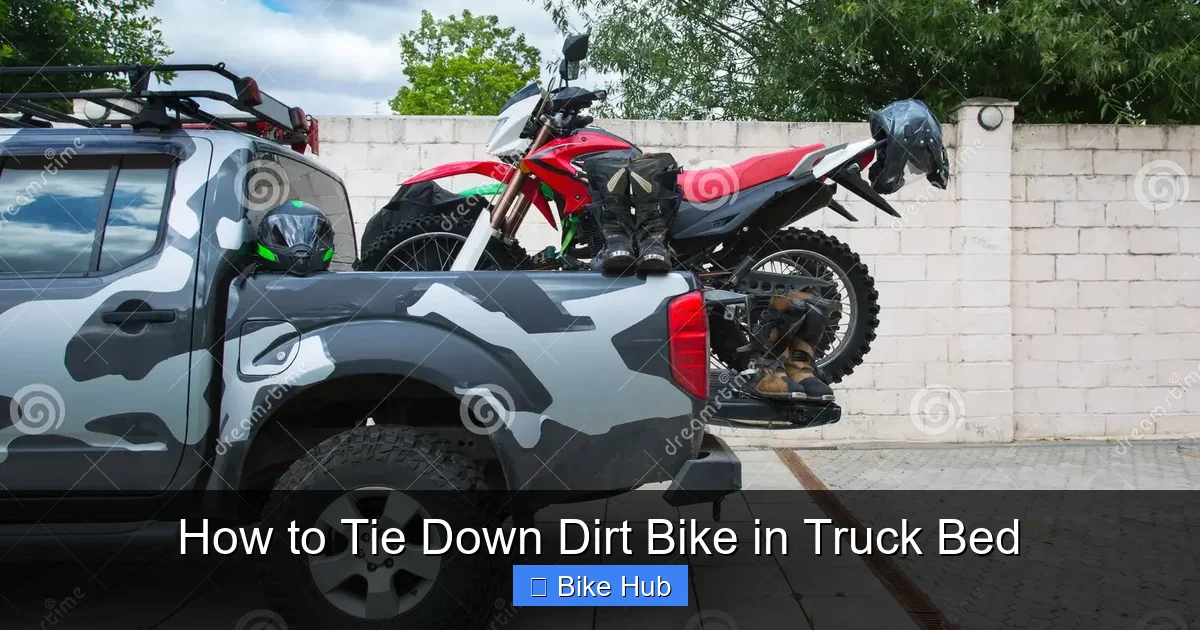
Visual guide about How to Tie Down Dirt Bike in Truck Bed
Image source: thumbs.dreamstime.com
Follow these steps carefully to ensure your bike stays put during transport.
Step 1: Prepare the Truck Bed
Clear out any loose items from the truck bed. Lay down a moving blanket or rubber mat to protect both your bike and the truck. If you’re using a wheel chock, position it near the front of the bed so the front tire fits snugly.
Make sure the truck is parked on level ground. This prevents the bike from rolling while you load it and reduces strain on your back.
Step 2: Load the Bike Safely
Use a sturdy ramp to roll the bike into the truck. Have a friend help if possible—dirt bikes can be heavy and awkward to maneuver. Once inside, position the bike so it’s centered and upright. If you have a chock, slide the front wheel into it.
Tip: If your bike has a center stand, use it. If not, you may need to lean it slightly against the side of the truck bed—but never rely on leaning alone for stability.
Step 3: Secure the Front End
This is the most critical part of the process. The front suspension is delicate, so you must strap it correctly to avoid damage.
Start by attaching soft loops to the handlebars. Wrap the loop around the bar, then pass the strap hook through the loop—not directly onto the bar. This prevents metal-on-metal contact.
Connect the strap to a front anchor point in the truck bed. Pull the strap tight, but do not over-tighten. You want to compress the front suspension slightly—about 1 to 2 inches—but not so much that it bottoms out. Over-tightening can damage fork seals and other components.
Repeat with a second strap on the other side for balance.
Step 4: Secure the Rear End
Now it’s time to anchor the rear of the bike. Use two more straps, attaching them to the rear subframe or passenger footpeg mounts—avoid the rear wheel axle unless absolutely necessary, as it can stress the swingarm.
Pull the straps tight to prevent side-to-side movement. The rear should feel stable but not overly compressed. Unlike the front, the rear suspension doesn’t need to be compressed—just held firmly in place.
Step 5: Double-Check Everything
Give the bike a firm shake. It shouldn’t move more than an inch in any direction. Check that all straps are tight and hooks are securely attached. Make sure no straps are rubbing against moving parts like wheels or levers.
If you’re carrying gear, store it around the bike to prevent shifting—but never place heavy items on top of the bike.
Pro Tips for Safe Transport
Even with perfect technique, small mistakes can lead to big problems. Here are some expert tips to keep in mind:
- Use soft loops every time: They’re inexpensive and prevent costly damage. Learn more about protecting your bike’s finish in our guide on how to protect a bike frame from rust.
- Avoid tying down by the wheels: Strapping directly to the front or rear wheel can bend rims or damage hubs. Always anchor to the frame or handlebars.
- Check straps during long trips: Vibration and road bumps can loosen straps over time. Stop every 2–3 hours to re-tighten if needed.
- Don’t forget the kill switch: Turn off the ignition and engage the kill switch to prevent accidental starts.
- Cover your bike if traveling long distances: A breathable bike cover protects against road debris and weather.
Troubleshooting Common Issues
Even experienced riders run into problems. Here’s how to fix the most common ones:
Bike Shifts During Transit
If your bike moves while driving, your straps aren’t tight enough or you’re using the wrong anchor points. Re-secure the bike using all four straps and ensure each is pulled taut. Consider adding a fifth strap across the seat or frame for extra stability.
Straps Keep Slipping
This usually happens with cam buckle straps. Switch to ratchet straps, which provide more consistent tension. Also, make sure your truck’s anchor points are strong and not rusted or loose.
Forks Are Over-Compressed
If you notice oil leaking from the forks or the bike feels stiff after transport, you likely tightened the front straps too much. In the future, compress the suspension only slightly—just enough to prevent bouncing.
Bike Tips Over While Loading
Use a wheel chock or have someone hold the bike upright. If you’re alone, consider a portable bike stand or loading ramp with side guards.
Conclusion
Knowing how to tie down a dirt bike in a truck bed is a must-have skill for any dirt bike owner. With the right gear, proper technique, and a little attention to detail, you can transport your bike safely—without damage or stress.
Remember: always use four high-quality ratchet straps, protect your bike’s finish with soft loops, and never over-tighten the front suspension. Take a few extra minutes to double-check your setup before hitting the road. Your bike (and your peace of mind) will thank you.
For more bike care tips, check out our guide on how to store bike lubricant or learn how to check bike tire pressure before your next adventure.
Safe riding—and safe transporting!


