
Measuring for a bike helmet correctly ensures maximum safety and comfort. This guide walks you through simple steps to find your exact head size and choose the best-fitting helmet for any cycling adventure.
Key Takeaways
- Measure your head circumference: Use a soft tape measure around the widest part of your head, just above your ears and eyebrows.
- Check manufacturer sizing charts: Helmet sizes vary by brand, so always compare your measurement to the specific brand’s size guide.
- Try before you buy when possible: A proper fit should feel snug but not tight, with no pressure points.
- Adjust the fit system: Most helmets have a dial-fit system at the back to fine-tune the fit for a secure, comfortable feel.
- Test the helmet’s stability: Shake your head gently—if the helmet moves more than an inch, it’s too loose.
- Replace old or damaged helmets: Even if it looks fine, a helmet older than 5 years or one that’s been in a crash should be replaced.
- Consider shape and style: Some helmets are designed for oval heads, others for round—pick one that matches your head shape.
How to Measure for Bike Helmet: A Complete Step-by-Step Guide
Whether you’re commuting to work, hitting the trails, or enjoying a weekend ride, wearing a properly fitted bike helmet is one of the most important safety habits you can develop. But here’s the catch: a helmet only protects you if it fits correctly. That’s why knowing how to measure for a bike helmet is essential—before you even think about buying one.
In this guide, you’ll learn exactly how to measure your head, interpret sizing charts, and ensure your helmet offers the best possible protection. We’ll also cover common mistakes, troubleshooting tips, and how to maintain your helmet over time. By the end, you’ll be confident in choosing a helmet that’s safe, comfortable, and built to last.
Why Proper Helmet Fit Matters
A poorly fitted helmet can be almost as dangerous as no helmet at all. If it’s too loose, it can shift or fall off during a crash. If it’s too tight, it can cause headaches and discomfort, making you less likely to wear it. According to the National Highway Traffic Safety Administration, helmets reduce the risk of head injury by nearly 50%—but only when worn correctly.
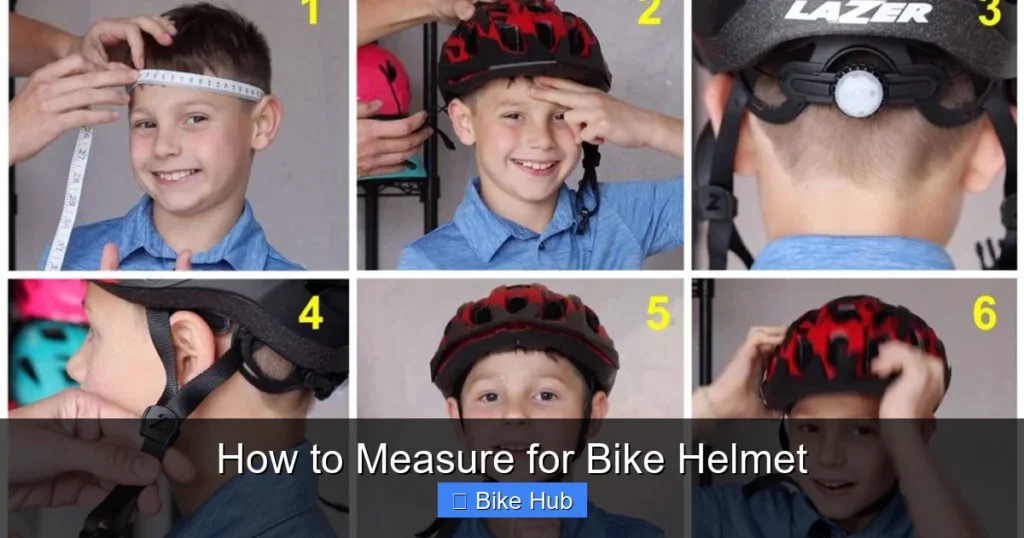
Visual guide about How to Measure for Bike Helmet
Image source: bikebesties.com
That’s why taking the time to measure your head and find the right helmet isn’t just a suggestion—it’s a safety essential. Whether you’re shopping online or in-store, knowing your exact head size helps you avoid guesswork and ensures a secure, comfortable fit every time you ride.
Step 1: Gather the Right Tools
Before you start measuring, make sure you have the right tools on hand. You’ll need:
Visual guide about How to Measure for Bike Helmet
Image source: cdn.shopify.com
- A soft, flexible measuring tape (like a tailor’s tape)
- A mirror (to help see what you’re doing)
- A pen and paper to record your measurement
- A friend to help (optional, but helpful for accuracy)
If you don’t have a soft tape measure, you can use a piece of string and a ruler. Just mark the string where it wraps around your head, then measure the length with the ruler.
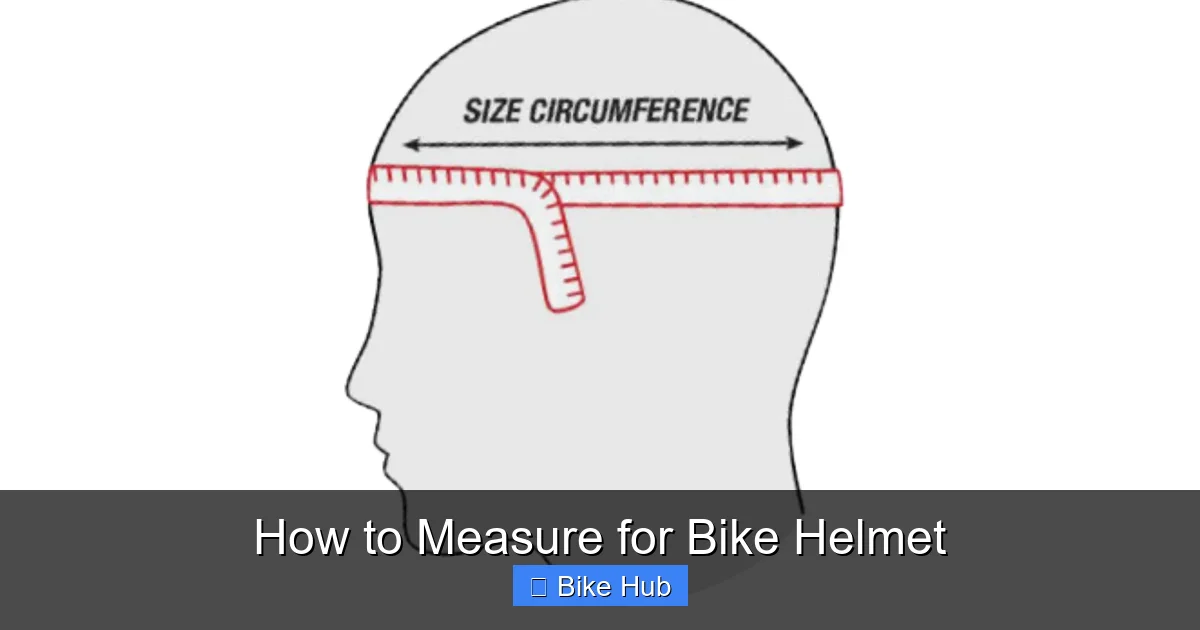
Step 2: Find the Correct Measuring Point
The key to accurate measurement is knowing where to place the tape. You want to measure the circumference of your head at its widest point. This is typically:
- About 1 inch (2.5 cm) above your eyebrows
- Just above your ears
- At the back of your head, where it curves upward
Imagine wearing a headband—this is roughly the same position. Avoid measuring too high (on top of your head) or too low (around your neck). The goal is to capture the fullest part of your skull.
Pro Tip: Use a Mirror
Stand in front of a mirror while measuring. This helps you keep the tape level and ensures you’re not tilting it forward or backward, which can give a false reading.
Step 3: Take the Measurement
Now it’s time to measure. Follow these steps:
- Wrap the soft tape measure around your head, following the path described above.
- Make sure the tape is snug but not tight. It should lie flat against your skin without digging in.
- Read the measurement where the tape meets the zero mark. Record this number in centimeters or inches.
- Take the measurement two or three times to ensure consistency. If the numbers vary, use the largest one.
For example, if your measurement is 56 cm, that’s your head circumference. Most adult helmets range from 52 cm to 63 cm, so this would likely fall into a medium or large size, depending on the brand.
What If You’re Between Sizes?
If your measurement falls between two sizes (e.g., 57 cm when sizes are 55–56 and 57–58), go with the larger size. Most helmets come with removable padding that can be adjusted for a tighter fit. It’s easier to make a helmet smaller than to stretch a too-small one.
Step 4: Check the Manufacturer’s Sizing Chart
Once you have your measurement, it’s time to match it to a helmet size. But here’s the important part: sizing varies by brand and model. A medium in one brand might be a large in another.
Always check the specific sizing chart provided by the helmet manufacturer. These are usually available on the product page or the brand’s website. For example:
- Brand A: Small = 52–56 cm, Medium = 56–58 cm
- Brand B: Small = 54–57 cm, Medium = 57–60 cm
Even if you’ve worn the same size for years, don’t assume it will be the same across brands. Take the time to compare your measurement to each chart.
Step 5: Try It On (If Possible)
If you’re shopping in person, always try on the helmet before buying. Here’s what to look for:
- Snug fit: The helmet should feel firm around your head, with no gaps between your head and the padding.
- No pressure points: It shouldn’t pinch your temples or squeeze the top of your head.
- Level position: The front edge should sit about 1 inch above your eyebrows.
- Stable when shaken: Gently shake your head side to side and up and down. The helmet should move with your head, not shift independently.
If the helmet feels loose, check if it has an adjustable fit system (a dial at the back). Turn the dial to tighten it. If it’s still not secure, try a smaller size or a different model.
Step 6: Adjust the Straps and Fit System
Even with the right size, you’ll need to fine-tune the fit using the straps and fit system. Here’s how:
Adjust the Side Straps
The Y-shaped straps should meet just below your ears. Adjust the sliders so the straps form a “V” shape around your ears. They should be snug but not tight.
Secure the Chin Strap
Buckle the chin strap and tighten it so you can fit only one or two fingers between the strap and your chin. It should be secure enough to keep the helmet in place during a fall, but not so tight it’s uncomfortable.
Use the Fit Dial
Most modern helmets have a dial at the back that tightens or loosens the internal fit system. Turn it clockwise to tighten, counterclockwise to loosen. This helps the helmet hug your head evenly.
For more details on adjusting straps, check out our guide on how to adjust bike helmet straps.
Step 7: Test the Fit
After adjusting, do a final fit test:
- The “Shake Test”: Shake your head vigorously. If the helmet moves more than 1 inch in any direction, it’s too loose.
- The “Roll-Off Test”: Tilt your head forward. The helmet should stay in place and not slide down over your eyes.
- The “Comfort Test”: Wear the helmet for 5–10 minutes. It should feel comfortable, not pinch or cause pressure.
If it passes all three tests, you’re good to go!
Troubleshooting Common Fit Issues
Even with careful measuring, you might run into fit problems. Here’s how to fix them:
Helmet Feels Too Tight
If the helmet is uncomfortable or causes headaches, try removing some of the internal padding. Most helmets come with multiple thickness options. You can also look for a model with a more oval shape if you have a longer head.
Helmet Feels Too Loose
First, make sure you’ve tightened the fit dial and chin strap. If it’s still loose, check if the helmet is the right size. If you’re between sizes, consider adding extra padding or trying a different brand.
Helmet Sits Too High or Too Low
Adjust the position by loosening the straps and sliding the helmet forward or backward. The front should be level and about 1 inch above your eyebrows.
Pressure on the Temples
This often means the helmet is too narrow. Look for a model designed for wider heads or one with adjustable side padding.
For more tips on achieving the perfect fit, visit our guide on how to properly fit a bike helmet.
When to Replace Your Helmet
Even the best-fitting helmet won’t protect you forever. Helmets degrade over time due to UV exposure, sweat, and general wear. Most manufacturers recommend replacing your helmet every 3 to 5 years.
You should also replace your helmet immediately if:
- It’s been in a crash (even a minor one)
- The shell is cracked or dented
- The straps are frayed or damaged
- The buckle no longer works properly
For guidance on what to do with an old helmet, read our article on how to dispose of an old bike helmet.
Final Thoughts
Learning how to measure for a bike helmet is a simple but vital step in staying safe on the road or trail. A well-fitted helmet can mean the difference between a minor scare and a serious injury. By following these steps—measuring accurately, checking sizing charts, trying on helmets, and adjusting for comfort—you’ll ensure your helmet does its job when it matters most.
Remember, safety starts with the right gear. Take the time to measure, fit, and maintain your helmet, and you’ll enjoy every ride with confidence.


