
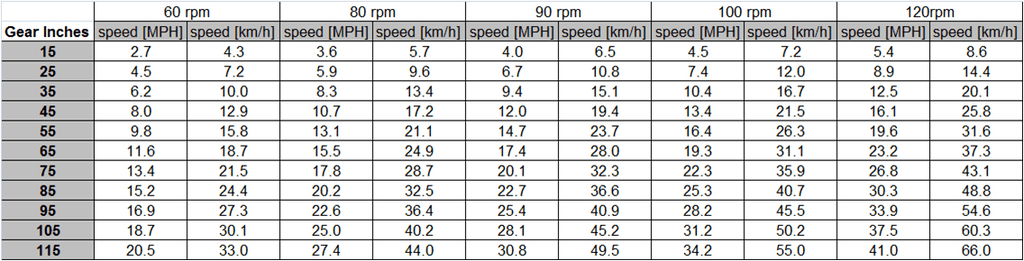
Have you ever been on a mountain bike trail and felt like your gears just weren’t cutting it? Understanding your mountain bike’s gear ratios can make a world of difference in your riding experience.
Whether you’re climbing steep hills or speeding down exhilarating descents, having the right gear can enhance your control and comfort. You’ll discover everything you need to know about mountain bike gear ratio charts. We’ll guide you through how to choose the perfect setup for your riding style and terrain.
Ready to boost your biking game? Let’s dive in and unlock the secrets of gear ratios that can transform your ride.
Credit: www.mtbr.com
Choosing The Right Gear Ratio
Gear ratiois crucial for mountain biking. Rider’s strength affects gear choice. Fitness level also matters. Experienced riders might choose harder gears. Beginners may prefer easier gears. Weather can change gear decisions. Wet or muddy paths need different gears. Personal preference plays a role too.
Terrain affects gear choice greatly. Flat groundneeds different gears than hills. Smooth paths require less effort. Rocky or uneven trails need more control. Uphill climbs demand lower gears. Downhill rides may use higher gears. Adapt gear choice to each terrain.
Finding balance is key. Too much speed can be dangerous. Control is vital for safety. Lower gears offer better control. Higher gears can increase speed. Choose gears wisely for both speed and control. Adjust gears for different track conditions.
Components Of Gear Ratios
Chainrings are the gears at the front. They connect with pedals. Cassettes are the gears at the back. They attach to the rear wheel. Together, they define the bike’s gear ratio. Smaller chainrings make pedaling easier uphill. Larger chainrings are better for speed. Cassettes have many sizes. More teeth make climbing easier. Fewer teeth help speed on flat roads.
Derailleurs move the chain between gears. Proper adjustment ensures smooth shifting. Misaligned derailleurs cause noisy gear changes. Regular checks keep them aligned. Adjustments need careful tuning. Ensure cables are tight but not too tight. Loose cables lead to poor shifting. Correct tension helps gears change smoothly.
Wheel size affects bike speed and control. Bigger wheels roll faster. Smaller wheels offer better control. Gear ratios change with wheel size. Large wheels need different gearing. Small wheels require fewer gear changes. Choose the right wheel for your riding style. Consider terrain and personal preference.
Benefits Of Gear Ratio Optimization
Choosing the right gear ratio makes climbing easier. Steeper hills feel less tiring. Pedaling becomes smoother and more efficient. Riders can conserve energy for longer rides. A good gear ratio helps maintain a steady pace uphill. Less strain on legs means more fun and less fatigue.
With optimal gear ratios, downhill rides become safer. Speed control is easier, preventing accidents. Riders gain confidence while descending fast slopes. Balance improves as the bike handles better. Enjoy the thrill of downhill rides with the right gears.
Gear ratio optimization boosts pedal power. It helps maintain consistent speed on flat surfaces. Riders use less energy while moving faster. Efficient gear ratios reduce wear and tear on the bike. Every pedal counts towards a smoother ride.

Credit: www.facebook.com
Creating A Custom Gear Ratio Chart
Analyze your bike’s current gear setup. Count the teeth on each gear. Record these numbers. Compare the front and rear sprockets. Identify the smallest and largest gears. This helps in understanding your gear range.
Consider your riding style. Do you prefer speed or climbing ease? Choose gears that match your needs. Adjust the gear ratios accordingly. Smaller gears for uphill, larger for flat terrains. Experiment with different combinations.
- Online gear calculators can help.
- Use apps for quick calculations.
- Manual calculations need patience.
These tools assist in finding the perfect gear ratio. They make adjustments easier.
Testing And Tweaking Gear Ratios
Mountain Bike Gear Ratio Chart simplifies finding the perfect setup for your ride. It helps in adjusting gear ratios for better performance on different terrains. Fine-tuning these ratios can improve your biking experience significantly.
Trial Runs On Different Terrains
Different terrains need different gear ratios. On a flat road, easier gears work best. Hills need tougher gears to climb. Testing helps find the right balance. Try riding on dirt, sand, and rocks. Each surface feels different. Adjust gears to match the terrain. Note how your bike performs. Speed, control, and comfort matter.
Fine-tuning Adjustments
Small changes make a big difference. Adjust gears one step at a time. Listen to the bike’s sound. Smooth gear changes mean good settings. Rough sounds mean more tweaking is needed. Keep adjusting until the ride feels right. Gears should feel easy to switch. Your legs should feel comfortable.
Feedback And Iteration
Feedback helps improve gear settings. Ask friends for their thoughts. Watch how others ride. Learn from their experiences. Make notes of what works and what doesn’t. Test again with new settings. Keep improving your ride. A good setup makes biking fun and safe.
Common Mistakes To Avoid
Choosing the wrong gear ratio can lead to inefficient rides. Avoid mismatched gears that don’t suit the terrain. Ensure compatibility with your bike’s setup for optimal performance.
Overlooking Terrain Variability
Different trails need different gear setups. Flat paths need easier gears. Steep hills need harder gears. Riders should change gears based on terrain. Staying in one gear can tire legs quickly. A good rider knows when to shift gears.
Ignoring Rider Strength
Riders have different leg power. Strong legs can handle harder gears. Weaker legs need easier gears. Choosing the wrong gear can make riding hard. Knowing your strength helps in gear choice.
Neglecting Maintenance
Bike gears need regular care. Dirty gears can cause problems. Clean and oil gears often. Check gear cables for wear. Replace worn parts quickly. Well-maintained gears work smoothly. Regular checks make rides safer and more fun.

Credit: www.gem.com.fj
Frequently Asked Questions
What Is The Best Gear Ratio For Mountain Biking?
The best gear ratio for mountain biking varies by terrain and rider preference. A common choice is 1:1. This offers balanced climbing capability and speed. Riders may adjust based on personal fitness and trail difficulty. Experiment to find what feels comfortable and efficient for you.
What Gear Ratio Is Best For Going Uphill?
A lower gear ratio is best for going uphill. It provides more torque, making pedaling easier on steep inclines. Opt for a granny gear or a low front chainring with a larger rear cog. This setup helps maintain a steady rhythm and reduces strain on your legs.
Which Is Better 7 Gear Or 21 Gear?
A 7-gear bike suits casual riders and flat terrains. A 21-gear bike is better for varied terrains and more control. Choose based on your riding needs.
Is 52/36 Good For Climbing?
A 52/36 chainring offers a balance for climbing, providing moderate gear options. It suits varied terrains well. For steep climbs, smaller chainrings might be preferable. Consider your fitness level and terrain to decide if it’s ideal for you.
Conclusion
Choosing the right gear ratio is essential for mountain biking. It affects your ride’s efficiency and comfort. A gear ratio chart simplifies this choice. It helps you understand the balance between speed and control. Consider your terrain and riding style.
This ensures an optimal experience. Remember, each rider is unique. So, experiment with different setups. Find what suits you best. Use this chart as a guide. Enjoy smoother rides and tackle trails with confidence. Happy biking!



