

Are you ready to take your mountain biking experience to the next level? Installing a dropper post on your mountain bike can transform the way you ride.
Imagine effortlessly adjusting your saddle height with the push of a lever, giving you more control and confidence on those tricky descents and technical trails. Whether you’re a seasoned rider or new to the sport, a dropper post can enhance your performance and enjoyment.
This guide will walk you through the installation process step-by-step, ensuring that you can confidently upgrade your bike without hassle. Dive in and discover how easy it is to unlock a smoother, more exhilarating ride.
Tools And Materials Needed
Installing a dropper post requires a few essential tools and materials. Gather a hex wrench set, bike grease, and a torque wrench. You’ll also need cable cutters and zip ties for clean cable management. These tools will help ensure a smooth installation process on your mountain bike.
Essential Tools
A torque wrenchis important for accurate tightening. Use Allen keysto fit various bolts. A cable cutteris needed for clean cuts. Keep a screwdriverhandy for adjusting the saddle.
Required Materials
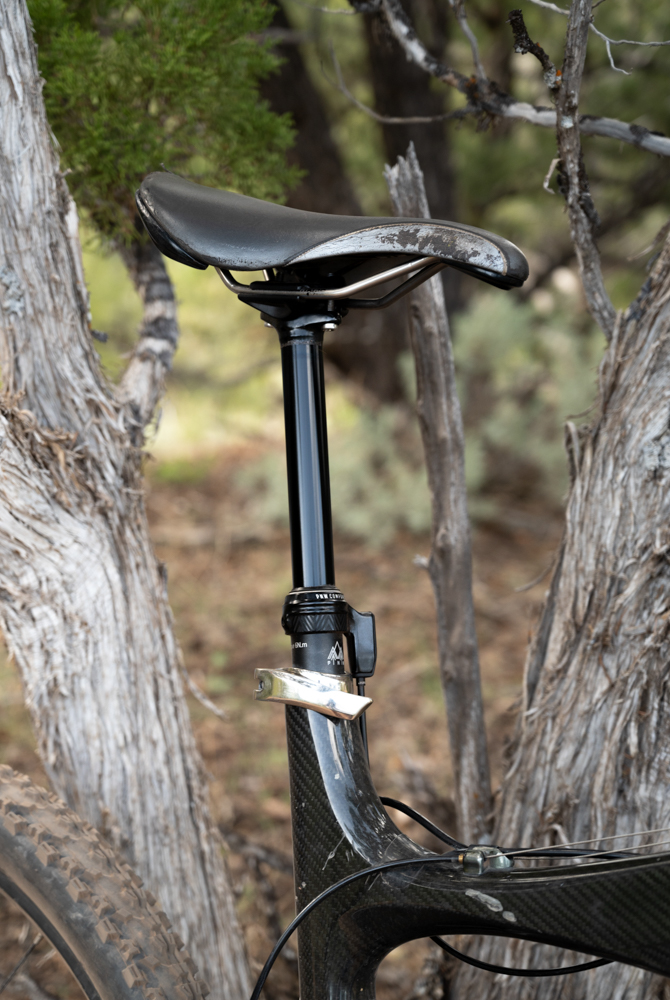
Get a dropper postsuitable for your bike. Choose a cable and housingthat match the dropper post. A remote leveris necessary for operation. Ensure you have greasefor smooth installation.
Credit: blog.outdoorprolink.com
Choosing The Right Dropper Post
There are three main types of dropper posts. First, the cable-actuateddropper post. It uses a cable for control. Second, the hydraulicdropper post. It relies on fluid pressure. Lastly, the electronicdropper post. This type uses battery power. Each type has unique features.
- Travel length: How far the post moves up and down.
- Diameter: Make sure it fits your bike’s seat tube.
- Weight: Lightweight posts are easier to handle.
- Durability: Strong materials last longer.
- Remote lever: Easy to reach while riding.
Choose a post that matches your needs. Check these key features before buying.
Preparing The Mountain Bike
Installing a dropper post enhances comfort and control on a mountain bike. Begin by removing the old seat post and carefully insert the dropper post. Secure it with the seat clamp, ensuring proper cable routing for seamless operation.
Cleaning The Seat Tube
First, take a clean cloth and wipe the seat tube. Remove all dirt and grease from the tube. Use mild soap if needed for tough spots. A clean seat tube helps the dropper post fit better. It also ensures smooth operation later. Make sure the tube is dry before moving on.
Removing The Old Seat Post
Loosen the seat clamp using an Allen key. Turn the key counterclockwise to loosen. Carefully pull out the old seat post from the tube. If it sticks, gently twist and pull. Check if the seat clamp is still in good shape. You might need to replace a worn-out clamp.
Credit: www.youtube.com
Installing The Dropper Post
Installing a dropper post on a mountain bike enhances ride comfort and control. First, remove the old seat post. Then, insert the dropper post into the seat tube and adjust it to your preferred height. Securely tighten the seat clamp.
Finally, connect the lever to control the post movement.
Inserting The Dropper Post
Make sure the bike is on a stable stand. Remove the old seat post carefully. Clean the tube to remove any dirt. Insert the new dropper post into the tube. Align the post with the seat tube properly. Tighten the clamp to secure the post. Check if the post moves smoothly up and down. Ensure all parts are snug and tight.
Adjusting The Saddle Position
Loosen the bolts under the saddle. Slide the saddle forward or backward. Find your comfortable riding position. Tighten the bolts to secure the saddle. Make sure the saddle is level. Test the position by sitting on the bike. Adjust again if necessary. Ensure you feel balanced and comfortable.
Routing The Cable
Routing the cable correctly is crucial for a smooth dropper post installation on a mountain bike. Ensure the cable is free from kinks and follows a clear path. This helps in maintaining efficient movement and longevity of the dropper post.
Internal Cable Routing
Internal cable routing keeps things tidy. First, find the frame’s cable entry point. Use a flashlight if needed. Gently push the cable through the entry hole. Guide it through the frame. Check the cable exits smoothly. Secure the cable with clips or cable ties. This helps avoid tangles.
Internal routing looks neat. It keeps cables safe inside. It can be tricky for beginners. Patience is key for this task.
External Cable Routing
External routing is simpler to do. Start by attaching the cable to the frame’s guides. Use clips to hold the cable in place. Ensure the cable is tensioned correctly. This prevents sagging or snagging. Double-check all connections are secure. The cable should move freely.
External routing is great for quick maintenance. It’s easy to inspect and adjust. Ideal for those new to bike upgrades.
Connecting The Lever
Begin by ensuring the lever is compatible with your handlebar. Attach the lever near the grip for easy access. Secure it tightly using the provided screws or clamps, adjusting its position for comfort and efficiency.
Attaching The Lever To The Handlebar
Start by loosening the clampon the lever. Slide it onto the handlebar. Make sure it’s easy to reach while riding. Position it close to the grip. This helps you control the dropper posteasily. Once in place, tighten the clamp securely. Check if the lever feels comfortable. Adjust its angle if needed.
Testing The Lever Functionality
Press the lever several times. Ensure it moves smoothly. The seat post should drop and rise easily. If it feels stiff or sticky, check the cable tension. Adjust the cable if necessary. Ensure everything is aligned properly. Test it again to confirm. A well-functioning lever makes your ride more fun.
Testing And Adjustments
Testing and adjustments ensure the dropper post operates smoothly. Check for proper alignment and secure connections. Test the dropper post’s movement and make necessary tweaks for optimal performance on trails.
Checking Dropper Post Movement
Check if the dropper post moves smoothly. Push down on the seat. See if it returns to the top quickly. A smooth movement means proper installation. Listen for any unusual sounds. Sounds can mean friction or blockage. Ensure the cable is not too tight. Adjust if necessary for smooth movement.
Fine-tuning The Setup
Adjust the seat height for comfort. Check if the dropper post locks firmly. Ensure the seat is aligned straight. Test the remote lever’s responsiveness. A quick response is important. Adjust the cable tension if needed. Make sure the dropper post is stable. Stability helps during rides.

Credit: www.youtube.com
Maintenance Tips
Installing a dropper post enhances control and comfort on rough trails. Begin by removing the old seat post. Insert the dropper post, ensuring the cable routing aligns with the frame. Adjust seat height for personal preference, and secure all components tightly for a smooth ride.
Regular Cleaning
Keep your dropper post clean. Dirt can damage parts. Use a soft cloth and mild soap. Avoid using harsh chemicals. Rinse well with water. Dry it completely before use. This helps prevent rust. A clean post works better.
Lubrication Advice
Lubricate your dropper post regularly. Use bike-specific oil or grease. Apply to moving parts. Do not use too much. Excess oil attracts dirt. Wipe away excess oil. Check for smooth operation. Lubrication keeps parts moving easily.
Frequently Asked Questions
Can You Add A Dropper Post To Any Mountain Bike?
Most mountain bikes can fit a dropper post, but check compatibility with your bike’s seat tube size and frame design. Ensure cable routing options are available. Proper installation can enhance your riding experience. Visit a local bike shop for expert advice on fitting a dropper post to your specific mountain bike model.
What Is The Disadvantage Of A Dropper Post?
A dropper post can be heavier than a standard seat post. It may also require more maintenance. Additionally, it can be expensive and might not fit all bike models. Some users experience reliability issues or failure in extreme weather conditions.
How To Use Dropper Post For Beginners?
Begin by adjusting the dropper post to your preferred height using the lever. Practice lowering and raising it smoothly. Use the dropper post to shift your weight and improve balance during descents and technical sections. Regular practice will enhance your riding experience and boost confidence on varied terrains.
How To Tell If A Bike Is Dropper Post Compatible?
Check for internal cable routing on the bike frame. Ensure seat tube diameter matches dropper post size. Verify compatibility with seat post clamp and frame design. Consult manufacturer’s specifications or bike shop for confirmation.
Conclusion
Installing a dropper post boosts your mountain bike experience. You gain smoother rides and more control on tricky trails. Follow these steps, and your bike will be ready for any adventure. Take your time with each step to ensure a perfect fit.
Practice using your new dropper post before hitting the trails. This helps you get comfortable with the adjustments. Enjoy the improved ride and flexibility. Keep exploring new trails with confidence. Happy biking!



