
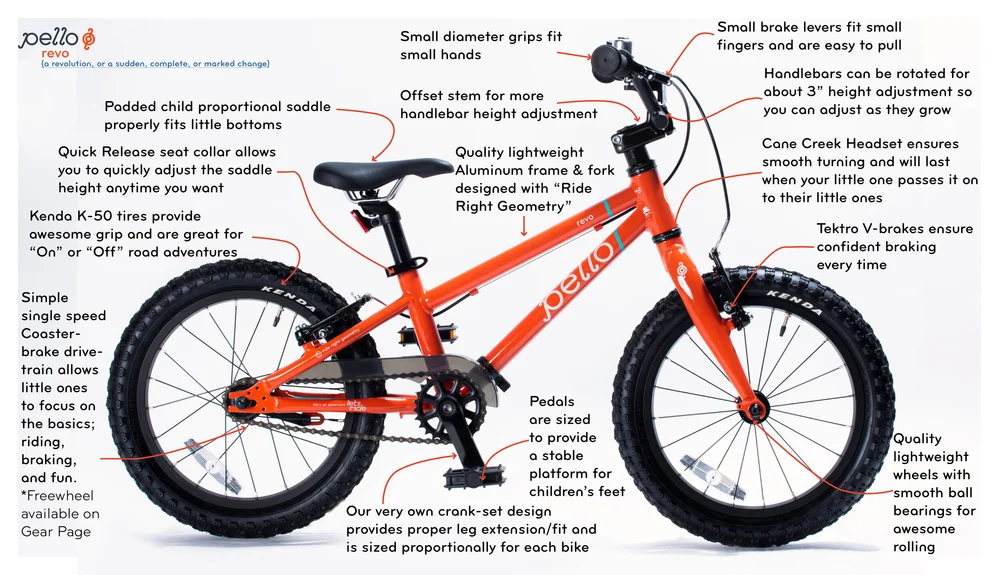
Are your child’s bike handlebars feeling too high, too low, or just uncomfortable? Adjusting the handlebars can make a huge difference in how your child rides and enjoys their bike.
If you want to keep your little one safe and happy while cycling, learning how to properly adjust the handlebars is a simple but powerful skill. In this guide, you’ll discover easy, step-by-step tips to get the perfect fit—making every ride smoother and more fun.
Keep reading to find out how you can quickly improve your child’s biking experience!
Choosing The Right Handlebar Height
Setting the right handlebar height is key for your child’s bike comfort. It helps them ride safely and enjoy their time outdoors.
Too high or too low handlebars can make riding hard. Adjusting height fits your child’s size and riding style.
Measuring Your Child’s Comfort Zone
First, check how your child feels on the bike. Their hands should rest naturally on the handlebars without stretching or bending too much.
Make sure their back is straight and not hunched. A relaxed position helps avoid tired arms and back pain.
Adjusting For Growth And Riding Style
Children grow fast, so check handlebar height often. Raise the bars as your child gets taller to keep the right fit.
Think about how your child rides. For fast riding, higher handlebars give better control. For casual riding, lower bars may feel more comfortable.
Tools Needed For Adjustment
Adjusting the handlebars on a children’s bike makes riding safer and more comfortable. You need the right tools to do it correctly.
Using the proper tools helps avoid damage to the bike and ensures a smooth adjustment process.
Essential Tools List
- Allen wrenches (commonly 4mm or 5mm)
- Adjustable wrench or spanner
- Screwdrivers (both flathead and Phillips)
- Torque wrench (optional, for precise tightening)
- Grease or lubricant
- Clean cloth or rag
These tools help loosen and tighten bolts and screws on the handlebars. The grease keeps parts moving smoothly.
Safety Tips During Adjustment
| Safety Tip | Reason |
| Wear gloves | Protect your hands from sharp edges and dirt |
| Keep the bike stable | Prevent it from tipping over while adjusting |
| Use the right tool size | Avoid stripping bolts or screws |
| Check handlebar tightness after adjustment | Ensure the handlebars do not move during riding |
| Work in a well-lit area | See all parts clearly to avoid mistakes |
Step-by-step Handlebar Adjustment
Adjusting the handlebars on a child’s bike helps make riding safe and comfortable. You can change the height and angle to fit your child’s size.
Follow these simple steps to adjust the handlebars correctly. Use basic tools and take care with each move.
Loosening The Stem Clamp
Find the stem clamp where the handlebar attaches to the bike. This clamp holds the handlebar tightly in place.
Use an Allen wrench or a suitable tool to loosen the bolts on the clamp. Do not remove the bolts completely, just loosen them enough to move the handlebars.
Raising Or Lowering The Handlebars
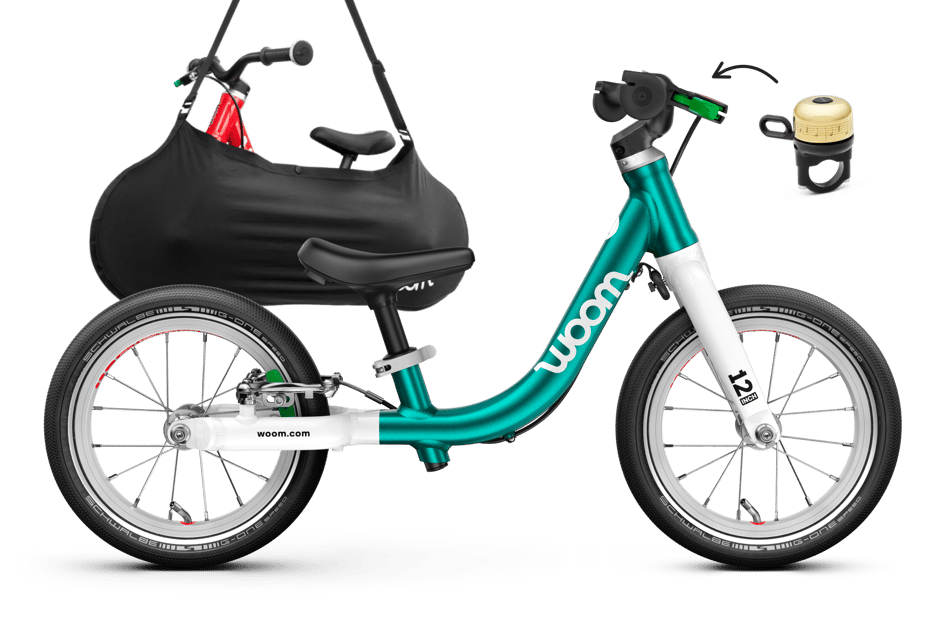
After loosening the clamp, adjust the handlebars up or down to the right height. The handlebars should be easy for your child to reach and control.
Make sure the handlebars are level and straight with the front wheel. This helps with balance and steering during riding.
Securing The Handlebars In Place
Once the handlebars are in the right position, tighten the stem clamp bolts firmly. Use the same tool you used to loosen the bolts.
Check that the handlebars do not move when you try to turn or twist them. If they move, tighten the bolts more until secure.
Credit: woom.com
Checking Handlebar Alignment
Proper handlebar alignment helps children control their bikes safely. It also makes riding more comfortable.
Checking the alignment is easy and takes just a few minutes. You only need to focus on two main points.
Aligning With The Front Wheel
Start by standing in front of the bike. Look straight down the front wheel and handlebar.
The handlebar should be centered and line up with the wheel. If it is off, loosen the handlebar clamp.
- Hold the front wheel steady.
- Turn the handlebar until it matches the wheel’s direction.
- Tighten the handlebar clamp firmly.
- Double-check the alignment after tightening.
Ensuring Proper Grip Position
Make sure the grips are comfortable and easy to hold. They should face forward and not twist sideways.
Check that the grips are secure. Loose grips can cause slipping and reduce control.
- Adjust the angle of the grips to fit the child’s hands.
- Push the grips fully onto the handlebar ends.
- Tighten any screws or clamps if the grips have them.
- Test the grips by gently twisting them to ensure they do not move.
Additional Handlebar Customizations
Adjusting a child’s bike handlebar can improve comfort and control. Small changes make a big difference for young riders.
This guide covers how to adjust the handlebar angle and change the handlebar type safely and easily.
Adjusting Handlebar Angle
Changing the handlebar angle helps your child find a comfortable riding position. It can reduce wrist strain and improve balance.
- Loosen the handlebar clamp bolts using an Allen key or wrench.
- Rotate the handlebars forward or backward to the desired angle.
- Make sure both sides are even and comfortable for the child.
- Tighten the clamp bolts securely to hold the position.
- Test the bike to ensure the angle feels right while riding.
Changing Handlebar Type
Switching the handlebar type can improve handling and style. Common types include flat bars, riser bars, and BMX bars.
| Handlebar Type | Description | Best For |
|---|---|---|
| Flat Bar | Straight and simple design | Easy control and quick steering |
| Riser Bar | Bars rise upward for a relaxed grip | Comfort and upright riding position |
| BMX Bar | Thicker and taller, built for tricks | Sturdy rides and stunt practice |
Common Mistakes To Avoid
Adjusting handlebars on children’s bikes needs care. Small mistakes can cause unsafe rides.
Learn which errors to avoid for a safe and comfortable bike handlebar setup.
Over-tightening Bolts
Too much force on bolts can damage bike parts. It may strip threads or crack the stem.
Use a proper tool and tighten bolts just enough to hold the handlebar firmly.
- Check manufacturer torque recommendations.
- Use a torque wrench if possible.
- Avoid using excessive strength to tighten bolts.
- Stop tightening when bolts feel snug and secure.
Ignoring Handlebar Stability
Loose handlebars can cause loss of control. They may move during riding, creating danger.
Always test handlebar stability after adjustment. Make sure it does not twist or wobble.
- Hold the front wheel and try turning the handlebars.
- Check if the bars shift under pressure.
- If unstable, readjust and retighten bolts.
- Regularly inspect handlebars for any looseness.
When To Seek Professional Help
Adjusting handlebars on children’s bikes is important for safety and comfort. Sometimes, it is best to ask a professional for help. Knowing when to seek expert advice can prevent accidents and improve the riding experience.
If you notice any problems or feel unsure about the adjustment process, a bike shop can provide the right support and tools.
Signs Of Incorrect Adjustment
Incorrectly adjusted handlebars can cause discomfort and unsafe riding. Watch for these signs that mean you should get professional help:
- The handlebars feel loose or wobbly during rides.
- Your child complains of hand or wrist pain.
- The bike pulls to one side when riding straight.
- The handlebars do not align with the front wheel.
- Handlebars are too high or low for your child’s height.
- Adjustments do not hold after tightening.
Finding A Bike Shop Near You
Finding a reliable bike shop can make handlebar adjustments safer and easier. A professional shop has the right tools and experience to fix problems quickly.
| How to Find a Shop | Benefits |
| Search online for local bike shops | Quick access to experts |
| Ask friends or family for recommendations | Trusted service providers |
| Check reviews and ratings | Quality and customer satisfaction |
| Visit shops and ask about services | Find the best fit for your needs |
Credit: woom.com
Credit: woom.com
Frequently Asked Questions
How Do I Loosen Handlebars On A Child’s Bike?
Use an Allen wrench or screwdriver to loosen the bolts on the handlebar stem. Turn counterclockwise until the handlebars can move freely.
When Should I Adjust My Child’s Bike Handlebars?
Adjust handlebars if your child experiences discomfort or poor control while riding. Regular checks ensure proper fit and safety.
Can I Raise Handlebars Without Special Tools?
Most bikes require an Allen wrench or screwdriver for adjustments. Check your bike’s manual for specific tool requirements.
How High Should Children’s Bike Handlebars Be Set?
Handlebars should be level with or slightly higher than the seat. This promotes comfortable posture and better bike control.
Conclusion
Adjusting handlebars on children’s bikes makes riding safer and more comfortable. Check the height and angle before each ride. Use simple tools to tighten bolts securely. Small changes can improve your child’s balance and control. Always ensure the handlebars are straight and stable.
Regularly inspect the bike for any loose parts. Happy rides start with a well-fitted bike. Keep practicing these steps to help your child enjoy biking every day. Safe, comfortable rides build confidence and fun.



