
Are you tired of getting splashed by mud and water every time you ride your bike? Installing fenders on your women’s bike is the simple fix you need to stay clean and comfortable on every ride.
Whether you’re biking to work or enjoying a weekend adventure, fenders protect you from dirt and rain, making your trips more enjoyable. In this guide, you’ll learn exactly how to install fenders step-by-step, even if you’ve never done it before.
Keep reading to discover easy tips that will have your bike ready to handle any weather in no time!
Choosing The Right Fenders
Fenders help keep you dry and clean while riding your bike. Picking the right fenders is important for comfort and protection.
Look at different types, materials, and sizes before buying fenders for your women’s bike.
Types Of Fenders
There are several fender types. Some cover the wheels fully, others only partially. Choose based on your riding style and bike type.
- Full-coverage fenders protect from mud and water well
- Clip-on fenders are easy to install and remove
- Road fenders are slim and fit narrow tires
- Mountain bike fenders are wider and strong for rough trails
Material Options
Fenders come in different materials. Each material offers different benefits like weight, strength, and durability.
- Plastic fenders are light, cheap, and rust-free
- Metal fenders, like aluminum, are strong but heavier
- Carbon fiber fenders are very light but costly
Size And Fit
Correct size and fit keep fenders from rubbing on tires. Measure your bike’s tire width and wheel size before choosing.
Check if the fenders fit your bike frame and fork for easy installation. Some fenders adjust to different sizes.

Credit: www.amazon.ca
Tools And Materials Needed
Installing fenders on a women’s bike requires specific tools and materials. Having the right items helps the process go smoothly.
This guide lists the essential tools and extra supplies you may need for the job.
Essential Tools
These tools help you attach the fenders securely to your bike frame and wheels.
- Allen wrench set (usually 4mm, 5mm sizes)
- Adjustable wrench or spanner
- Phillips and flathead screwdrivers
- Bike grease or anti-seize lubricant
- Measuring tape or ruler
- Clean rag for wiping parts
Additional Supplies
Extra supplies make the installation easier and ensure the fenders fit well.
| Supply | Purpose |
| Fender mounting hardware | Screws, bolts, and washers to fix fenders |
| Zip ties | Extra support for securing fender stays |
| Rubber or foam pads | Protect bike frame from scratches |
| Ruler or level | Ensure fenders are aligned straight |
| Spray lubricant | Help loosen tight bolts if needed |
Preparing Your Bike
Installing fenders on a women’s bike starts with good preparation. A clean and ready bike frame helps the fenders fit well. Checking key spots on your bike makes sure the fenders stay secure.
Take your time with these steps for a smooth installation. Clean surfaces and proper mounting points are very important for a lasting setup.
Cleaning The Frame
Before adding fenders, clean the bike frame carefully. Dirt or grease can stop fenders from fitting tightly. Use a soft cloth and mild soap to wipe the frame. Focus on the areas where fenders will attach.
- Use warm water with mild soap
- Wipe down frame and fork mounts
- Remove dust and grease completely
- Dry the frame with a clean towel
- Check for rust or damage on the frame
Checking Mounting Points
Look at your bike’s mounting points to see if fenders will fit. These points are small holes or eyelets near the wheels and fork. Make sure they are not blocked or damaged.
| Mounting Point | Location | Check for |
| Rear Eyelets | Near rear wheel axle | Clear holes, no rust |
| Front Eyelets | On front fork near axle | Unblocked, tight bolts |
| Brake Bridge | Above rear wheel | Space for fender stays |
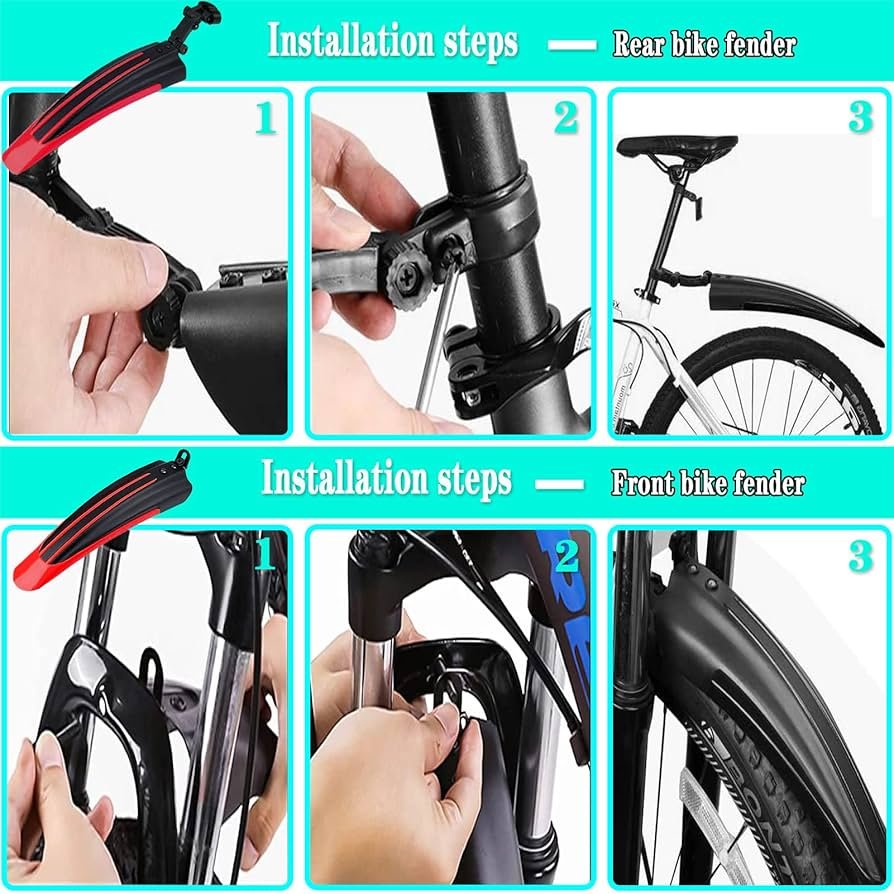
Installing Front Fender
Installing a front fender on a women’s bike helps keep dirt and water off. It makes riding cleaner and more comfortable. This guide shows how to put it on correctly.
Follow these simple steps to position the fender, secure it, and adjust it for best performance.
Positioning The Fender
Place the front fender over the wheel so it covers the top half. Align it so the fender follows the curve of the tire. Keep some space between the tire and the fender to avoid rubbing.
- Center the fender on the wheel.
- Make sure the front tip points slightly downward.
- Check that the fender does not touch the tire.
- Leave about 5 to 10 mm of clearance.
Securing Mounting Brackets
Mounting brackets hold the fender firmly in place. Attach them to the bike frame and fork using the screws provided. Tighten the screws to keep the fender stable.
| Bracket Part | Attachment Point | Tool Needed |
| Front fork bracket | Fork crown bolt hole | Allen key |
| Side stays | Fork legs | Wrench or pliers |
| Top stay | Brake bridge or fork crown | Allen key |
Adjusting For Clearance
Check the space between the fender and tire after securing the brackets. Adjust the brackets or stays if needed. Make sure nothing rubs when the wheel spins.
- Spin the front wheel slowly.
- Look for any contact between tire and fender.
- Loosen the bracket screws slightly.
- Move the fender to increase clearance.
- Tighten all screws securely once adjusted.
Installing Rear Fender
The rear fender protects you from mud and water splashes. It keeps your clothes clean while riding.
Installing the rear fender on a women’s bike is simple. Follow the steps carefully for a secure fit.
Aligning The Fender
Start by placing the fender over the rear wheel. Make sure it covers the tire fully from top to bottom.
Check the gap between the fender and the tire. It should be even on both sides to avoid rubbing.
Attaching Supports And Stays
- Locate the mounting points on the bike frame near the rear wheel.
- Attach the fender stays to these points using bolts or screws.
- Tighten the bolts just enough to hold the stays in place but allow small adjustments.
- Connect the fender to the stays with the provided clips or brackets.
- Adjust the stays so the fender stays straight and centered.
- Fully tighten all bolts to secure the fender and stays firmly.
Ensuring Stability
| Check Point | What to Do |
|---|---|
| Fender Movement | Gently shake the fender to see if it moves. Tighten bolts if loose. |
| Clearance | Ensure at least 5mm gap between tire and fender all around. |
| Supports | Make sure stays are straight and not bent. |
| Brake Function | Check that the fender does not block brake parts or cables. |
Following these checks will keep your rear fender stable and functional. It will protect you better during rides.
Final Adjustments And Testing
After installing the fenders on your women’s bike, it is important to make final adjustments. This ensures the fenders work well and do not cause any trouble while riding.
Testing the installation helps find any issues before you take the bike on the road. Check bolts, rubbing, and take a short ride to confirm everything is secure.
Tightening Bolts
Make sure all bolts holding the fenders are tight. Loose bolts can cause noise or make the fenders fall off during a ride.
- Use the correct size wrench or Allen key for each bolt.
- Tighten bolts evenly to avoid bending the fender.
- Check bolts on the front and rear fenders.
- Do not overtighten to prevent damaging the bike frame.
Checking For Rubbing
Check if the fenders rub against the tires or brakes. Rubbing can cause noise and wear on parts.
| Area | What to Check | Adjustment Needed |
|---|---|---|
| Front Fender | Clearance from front tire | Shift fender or tighten bolts |
| Rear Fender | Clearance from rear tire and chain | Adjust height or angle |
| Brakes | Fender contact during braking | Reposition fender or brake pads |
Test Ride Tips
Take a short ride to test the fenders after adjustments. Listen for noises and feel if the bike rides smoothly.
Follow these tips during your test ride:
- Ride on a flat surface first to check stability.
- Try turning the handlebars left and right slowly.
- Apply brakes gently to listen for any rubbing sounds.
- Look back to see if the fenders stay in place.
- Stop and retighten bolts if you hear any creaks or rattles.
Maintenance Tips
Fenders protect your bike from dirt and water. To keep them working well, regular care is important. Simple maintenance keeps fenders strong and clean.
Check your fenders often. Clean and inspect them to avoid damage. This helps your bike last longer and look good.
Regular Cleaning
Clean your fenders after every ride in wet or muddy conditions. Use a soft cloth or sponge with mild soap and water. Avoid harsh chemicals that can harm the fender material.
Rinse the fenders with clean water to remove soap. Dry them with a soft towel to prevent rust on metal parts. Regular cleaning stops dirt buildup and keeps fenders looking new.
- Use mild soap and water
- Wipe with soft cloth or sponge
- Rinse thoroughly with clean water
- Dry with a soft towel
- Clean after muddy or wet rides
Inspecting For Damage
Look over your fenders regularly for cracks or loose parts. Small cracks can grow bigger if not fixed. Check the bolts and brackets to make sure they are tight.
Replace damaged parts quickly to avoid further problems. Tighten any loose screws or nuts. Proper inspection helps keep your fenders safe and effective.
- Check for cracks or breaks
- Look for loose bolts and brackets
- Tighten screws and nuts as needed
- Replace broken parts quickly
- Inspect after rough rides or impacts

Credit: www.amazon.ca

Credit: www.temu.com
Frequently Asked Questions
How Do I Choose The Right Fenders For Women’s Bikes?
Select fenders that fit your bike’s wheel size and frame style. Consider material, width, and mounting type for durability and ease.
What Tools Are Needed To Install Bike Fenders?
You typically need a screwdriver, Allen keys, and sometimes a wrench. These tools help secure the fenders tightly and safely.
Can I Install Fenders On Any Women’s Bike?
Most women’s bikes with frame mounts or eyelets can support fenders. Check your bike’s frame compatibility before purchasing fenders.
How To Adjust Fenders To Prevent Wheel Rubbing?
Position fenders evenly above tires with slight clearance. Tighten mounting bolts securely and test for smooth wheel rotation.
Conclusion
Installing fenders on a women’s bike keeps you dry and clean. It protects from mud and water splashes during rides. The process is simple and only takes a few steps. Make sure to choose fenders that fit your bike size.
Tighten all screws and check for stability. Regularly clean and maintain the fenders for best use. Enjoy your rides without worrying about dirt or rain. A small change that brings great comfort. Ready to ride, rain or shine!


