
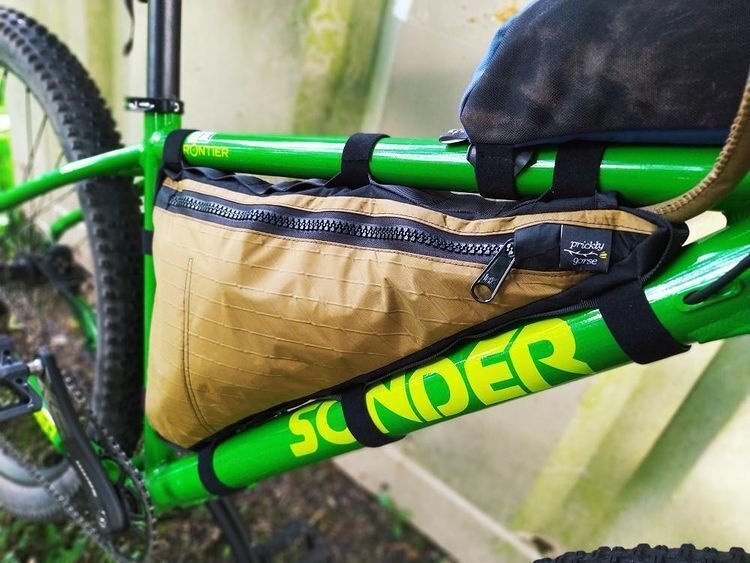
Are you tired of searching for the perfect bikepacking bags that fit your needs and budget? What if you could create your own, tailored exactly to your style and gear?
Making DIY bikepacking bags at home is easier than you think. Not only will you save money, but you’ll also gain bags designed just for your adventures. Keep reading, and you’ll discover simple steps and insider tips that will turn you into a bikepacking bag maker in no time.
Your next ride could be more organized and comfortable than ever before. Let’s get started!
Choosing The Right Materials
Making your own bikepacking bags starts with selecting strong and reliable materials. Good choices keep your gear safe and last a long time. This guide covers fabrics, waterproofing, and hardware for DIY bikepacking bags.
Choosing the right materials helps you build bags that fit your needs and stand tough on the road. Let’s look at the best options for each part.
Durable Fabrics For Bikepacking
Durability is key in bikepacking bags. You need fabrics that resist tears and wear. Common strong fabrics include nylon, polyester, and Cordura. Each offers different benefits for weight and strength.
- Nylon:Lightweight and strong, good for most bags.
- Polyester:Resists UV damage and dries quickly.
- Cordura:Very tough and abrasion-resistant.
- Dyneema Composite Fabric:Ultra-strong and light, but costlier.
Waterproofing Options
Keeping your gear dry is important. Waterproofing options protect your bag from rain and mud. You can choose from coatings, liners, or water-resistant fabrics.
| Waterproof Method | Advantages | Drawbacks |
| PU Coating | Affordable and effective | Can wear off over time |
| TPU Lamination | Strong and flexible | Heavier than coatings |
| Waterproof Liners | Removable and reliable | Adds bulk inside bag |
| Wax Treatment | Natural and easy to apply | Needs regular reapplication |
Hardware And Accessories
Hardware holds your bag together and adds function. Choose strong zippers, buckles, and straps that fit your design. Metal or heavy-duty plastic works best for durability.
- Use YKK zippers for smooth and tough closure.
- Pick side-release buckles that lock firmly.
- Select nylon webbing straps for strength and flexibility.
- Include D-rings or loops to attach extra gear.
Essential Tools You’ll Need
Making DIY bikepacking bags at home needs the right tools. Using good tools helps you work faster and get better results.
This guide covers the key tools for sewing, cutting, and other supplies. Prepare them before you start your project.
Sewing Machines And Needles
A strong sewing machine is important. It must handle thick fabrics like canvas and nylon. Use heavy-duty needles to avoid breaks.
- Heavy-duty sewing machine
- Leather or denim needles (size 16 or 18)
- Extra bobbins for quick thread changes
- Thread suitable for outdoor use, like polyester or nylon
Cutting And Measuring Tools
Accurate cutting and measuring tools make your bag parts fit well. Use sharp tools to get clean edges on fabric.
| Tool | Purpose |
|---|---|
| Rotary cutter | Cut fabric smoothly without fraying |
| Self-healing cutting mat | Protect surfaces and measure fabric |
| Measuring tape | Measure fabric lengths and widths |
| Clear ruler | Mark straight lines for cutting |
| Fabric chalk or pens | Mark fabric without damage |
Additional Supplies
Other supplies help finish your bikepacking bags. These include fasteners, adhesives, and protective parts.
- Heavy-duty thread for strong seams
- Seam sealer to waterproof stitches
- Webbing straps for handles and attachments
- Plastic buckles and clips
- Fabric glue for quick fixes
- Scissors for trimming threads
Designing Your Bikepacking Bags
Designing your own bikepacking bags lets you create gear that fits your needs. You can choose the style, size, and features that suit your bike trips.
Think about the type of trips you take and what gear you carry. This helps in making bags that are both useful and comfortable to carry.
Types Of Bikepacking Bags
There are several kinds of bikepacking bags you can make. Each type fits in a different place on your bike and holds different gear.
- Frame bags fit inside the bike frame and hold heavy items.
- Handlebar bags attach to the front and carry light, bulky gear.
- Seat bags hang under the seat and store clothes or tools.
- Top tube bags sit on top of the frame for snacks or small items.
Sizing And Capacity
Choose the right size for your bags based on how much gear you need. Bags that are too big can get in the way, while small bags may not hold enough.
Measure the space on your bike before making bags. This helps to fit them perfectly without causing problems while riding.
- Frame bags usually range from 2 to 6 liters.
- Handlebar bags can hold about 5 to 15 liters.
- Seat bags often have a capacity of 5 to 10 liters.
- Top tube bags are smaller, around 0.5 to 2 liters.
Customizing Features
Add features that make your bags easier to use and more practical. Think about zippers, pockets, and straps that fit your needs.
Water resistance and durability are important. Use sturdy fabric and strong seams to keep your gear safe.
- Waterproof zippers or roll-top closures keep gear dry.
- Multiple pockets help organize small items.
- Reflective strips improve visibility at night.
- Adjustable straps secure the bags tightly to the bike.

Credit: www.threads.com
Step-by-step Sewing Process
Making DIY bikepacking bags at home is a fun and useful project. This guide shows you how to sew your own bags using simple steps. You will need basic sewing tools and fabric.
Follow the process carefully to get strong, practical bags that fit your bike and gear. Let’s start with cutting the fabric pieces.
Cutting Fabric Pieces
Begin by selecting durable fabric like nylon or canvas. Measure and cut all parts according to your bag design. Use sharp scissors for clean edges.
- Cut main body pieces based on bag size
- Cut side panels for bag depth
- Cut straps and handle pieces
- Cut smaller pieces for pockets and flaps
- Mark seam allowances on each piece
Constructing The Main Bag
Sew the main body pieces together first. Use a strong stitch like a straight stitch or reinforced stitch. Join side panels to the body to create the bag shape.
Make sure seams are even and tight. Press seams flat with an iron to improve shape and strength. Check that the bag holds its form before adding extra parts.
Adding Pockets And Straps
Attach pockets on the outside for easy access. Sew straps and handles firmly onto the bag. Reinforce strap areas with extra stitching to prevent tearing.
| Part | Material | Attachment Method |
| Side Pocket | Lightweight Nylon | Topstitch around edges |
| Main Strap | Heavy-duty Webbing | Double stitch with box pattern |
| Handle | Canvas Strip | Backstitch at ends |
Sealing And Reinforcing
Seal seams with waterproof tape or seam sealer for weather resistance. Reinforce stress points with extra fabric patches or bar tacks.
- Apply seam tape on the inside of all seams
- Use heavy thread for bar tacking
- Test waterproofing before use
Attaching Bags To Your Bike
Attaching DIY bikepacking bags to your bike needs care. The right method keeps your gear safe and your ride smooth.
This guide covers how to mount bags, place straps, and keep them stable on your bike.
Mounting Techniques
Choose mounting spots that balance weight well. Common areas include the handlebars, frame, and seat post.
- Use frame bags for heavy items near the bike’s center.
- Handlebar rolls work for lightweight gear like clothes.
- Seat bags carry bulky items without affecting steering.
- Top tube bags are good for small essentials.
Strap Placement Tips
Secure straps tightly but avoid damaging your bike. Use padded straps if possible.
| Strap Location | Purpose | Tip |
| Top tube | Stabilizes frame bags | Keep straps flat and even |
| Seat post | Secures seat bags | Use wide straps to spread pressure |
| Handlebars | Holds handlebar rolls | Wrap straps around bars and brake levers |
| Fork or rack | Supports panniers | Attach straps tightly to avoid swaying |
Ensuring Stability
Check that bags do not move or block your pedaling. Test your setup on short rides before long trips.
- Double-check all straps for tightness.
- Balance weight on both sides of the bike.
- Avoid placing heavy gear too high.
- Make sure bags do not rub against tires or spokes.
- Adjust straps if bags shift during your ride.
Testing And Adjustments
After making your DIY bikepacking bags, testing and adjusting them is important. This step ensures your bags are safe, practical, and ready for any trip.
Testing covers how much weight your bags can hold, how they handle weather, and what small changes can improve comfort and function.
Load Testing
Load testing checks if your bags hold the weight you plan to carry. Start with light loads and increase gradually. Watch for any signs of strain or damage.
- Fill bags with weights similar to your gear.
- Attach bags to your bike and ride on flat roads.
- Check for loose stitches, tears, or weak points.
- Try rougher paths to test durability and stability.
- Note any discomfort or shifting of the bags.
Weatherproofing Checks
Make sure your bags keep your gear dry. Test them in wet conditions to find leaks or weak spots in the material or seams.
| Test | What to Check | Fixes |
|---|---|---|
| Spray water on bags | Look for leaks or damp spots inside | Seal seams with waterproof tape or glue |
| Submerge bag bottom briefly | Check if water seeps through base | Add extra waterproof layer or use liner bags |
| Zip or Velcro closures | Confirm water doesn’t enter through openings | Use waterproof covers or flaps |
Making Final Tweaks
After tests, adjust your bags for comfort and function. Small changes can improve your ride and gear protection.
- Tighten or add straps to reduce bag movement.
- Reinforce weak areas with extra fabric or stitching.
- Trim or reposition parts that rub against the bike or rider.
- Add padding where the bag touches your body or bike frame.
- Check all closures for easy use and security.
Maintenance And Repairs
DIY bikepacking bags need care to last long and work well. Regular checks keep bags ready for trips.
Fixing small problems early stops bigger damage. Clean bags and repair tears to protect your gear.
Cleaning Your Bags
Keep your bags clean to avoid damage from dirt and sweat. Use mild soap and water for cleaning.
Wipe gently with a soft cloth. Avoid strong detergents that can harm fabric and waterproof coatings.
- Empty all pockets before cleaning
- Use cold or lukewarm water
- Air dry bags away from direct sunlight
- Do not machine wash or dry
Fixing Common Issues
Small tears and broken zippers are common problems. Fix them quickly to keep bags usable.
Use strong thread to sew holes. Replace damaged zippers with new ones from a craft store.
- Sew tears with tight, even stitches
- Patch holes with fabric glue or patches
- Lubricate zippers with wax or silicone
- Check straps and buckles for damage
Extending Bag Lifespan
Store your bags in a cool, dry place. Avoid folding them sharply to prevent creases.
Inspect bags before each trip. Regular care helps bags last many seasons of bikepacking.
- Keep bags away from sharp objects
- Reapply waterproof coating yearly
- Fix small problems immediately
- Use bag liners to protect interiors

Credit: www.reddit.com

Credit: learnmyog.com
Frequently Asked Questions
What Materials Are Best For Diy Bikepacking Bags?
Durable, waterproof fabrics like ripstop nylon or canvas are ideal for DIY bikepacking bags. They resist wear and protect gear from rain and dirt.
How Do I Measure For Custom Bikepacking Bags?
Measure your bike’s frame sections and handlebars carefully. Ensure bags fit securely without obstructing pedals or wheels for safety.
What Tools Do I Need For Making Bikepacking Bags?
You’ll need a sewing machine, waterproof thread, scissors, measuring tape, and strong zippers or buckles for durability.
How Can I Make My Bikepacking Bags Waterproof?
Use waterproof fabrics and seam sealers. Adding waterproof zippers or covers also keeps your gear dry during rides.
Conclusion
Crafting your own bikepacking bags is rewarding and fun. You save money and gain unique gear. The process allows creativity and personalization. Choose materials that suit your needs. Follow steps carefully for best results. These DIY bags make your adventures special.
They reflect your style and effort. Enjoy the journey and the destination. Happy bikepacking with your handmade bags!



