
If you love hitting the open road on your touring bike, having a reliable GPS mount can make all the difference. You want your navigation device in clear view, easy to reach, and secure no matter how bumpy the ride gets.
But how do you add a GPS mount without messing up your bike’s setup? This guide will walk you through simple, practical steps to get your GPS mount installed right. Keep reading—you’ll soon have your route guidance exactly where you need it, making every trip smoother and more enjoyable.
Choosing The Right Gps Mount
GPS mounts come in many types. Some attach to the handlebar, others to the stem or fork. Choose the type that fits your bike best. Make sure the mount holds the GPS tight and steady.
| Feature | What to Look For |
|---|---|
| Compatibility | Fits the size and shape of your touring bike’s bars or frame |
| Durability | Made from strong materials like aluminum or tough plastic |
| Weather Resistance | Waterproof or water-resistant to handle rain and mud |
Durable mounts resist shaking and stay firm on rough roads. Weather resistance protects the GPS from rain, dust, and sun. A good mount keeps your device safe and easy to see.
Tools And Materials Needed
To install GPS mounts on touring bikes, you need some essential tools. A Phillips screwdriverhelps to tighten screws. A hex wrench setis useful for bolts of different sizes. A clean clothkeeps parts free of dust. A measuring tapeensures correct placement. A drillmay be needed for custom mounts. These tools make the job easier and safer.
Other accessoriescan improve the setup. Zip tieshelp secure cables neatly. Rubber padsprotect the bike frame from scratches. A mounting bracketis needed to hold the GPS firmly. Some prefer waterproof coversto protect the GPS in rain. These extra items make the GPS more stable and durable.
Preparing Your Bike For Installation
Start by cleaning the area where the GPS mount will go. Use a soft cloth and mild cleaner to remove dirt and grease. This helps the mount stick better and stay secure. Dry the area completely before moving on.
Next, check the handlebar space to make sure there is room for the mount. Look for any cables or accessories that might get in the way. Clear the area or adjust items if needed. A tidy handlebar makes installation easier and safer.
Credit: www.cbr500riders.com
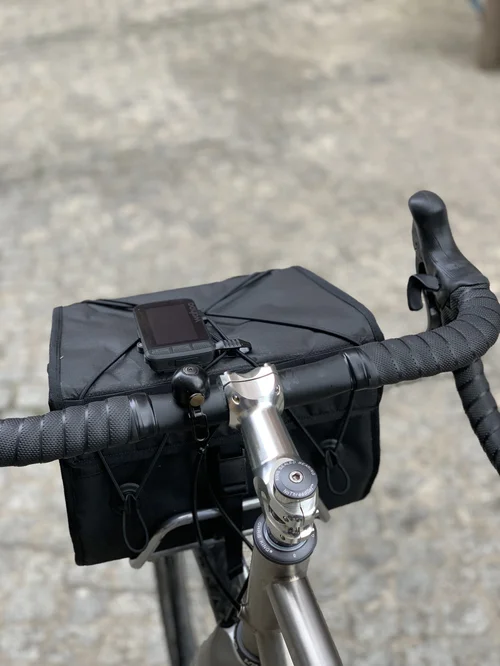
Step-by-step Installation Guide
Find a flat spot on the handlebars to place the mount. Use the rubber pads if included to prevent slipping. Tighten the clamp with a screwdriver or Allen key until it feels secure but not too tight. Check that the mount does not block brake cables or gear shifters.
Slide the GPS device into the mount until it clicks. Make sure it fits snugly to avoid falling off. Test by gently pulling the device to confirm it stays locked. Use the strap or locking mechanism if your mount has one for extra safety.
Adjust the angle of the GPS so you can see the screen clearly. Tilt it to reduce glare from the sun. Position the device within easy reach for quick access during rides. Make small adjustments and test visibility while seated on the bike.
Testing And Adjustments
Test the GPS mount by riding on rough roads. Check if it stays steady. A loose mount can distract or damage the device.
Adjust the mount to avoid shaking. Tighten screws or change the clamp size if needed. Use a rubber pad to reduce vibrations.
- Place the GPS mount where it’s easy to see but not in the way.
- Try different angles to find the most comfortable view.
- Make sure the device does not block your hands or bike controls.
Comfort is key for long rides. Move the mount slightly until it feels right. Test it by riding for a few minutes.
Safety Tips For Gps Mount Use
Secure the GPS mount firmly to avoid distractions while riding. Check the mount’s stability regularly to prevent accidents. Ensure the device stays visible but does not block your view or controls.
Avoiding Distractions
Keep eyes on the road, not just the GPS. Safety is the top priority. Adjust your GPS before you start riding. Use voice directions to minimize screen checks. Secure the mount tightly so it doesn’t wobble. Choose a spot that’s easy to glance at. Check the route in advance for better awareness.
Regular Maintenance Checks
Ensure the mount is in good condition. Inspect screws and clips regularly. Tighten any loose parts immediately. Clean the GPS screen and mount area. Replace worn-out parts as needed. Check the GPS for updates often. This ensures accurate directions. Keep batteries charged for long rides.
Alternative Mounting Options
Touring bikes can use handlebar clamps or stem mounts to hold GPS devices securely. Some riders prefer out-front mounts for better visibility and easier access. Choosing the right spot depends on comfort and bike setup.
Stem Mounts
Stem mounts are easy to attach on bikes. They fit near the handlebar. This makes it simple to see the GPS. Riders love this spot for its visibility. The GPS stays safe and secure while biking. Most stem mounts are adjustable. This helps in setting the GPS at the right angle. Easy to install and use, they are a top choice for many bikers.
Helmet Mounts
Helmet mounts offer a hands-free option. The GPS sits on top of the helmet. This is perfect for those who need eyes on the road. It keeps the screen close and easy to view. Lightweight and simple, these mounts don’t add much weight. Many bikers choose helmet mounts for easy navigation. It’s a smart choice for those who ride often.
Credit: www.panamericaforums.com
Credit: www.nordenforums.com
Frequently Asked Questions
What Tools Are Needed To Install Gps Mounts On Touring Bikes?
You need a screwdriver, Allen keys, and mounting brackets. Some mounts require zip ties or adhesive pads. Check your GPS mount kit for specific tools.
Where Is The Best Place To Mount A Gps On Touring Bikes?
Mount your GPS on the handlebar or stem for easy visibility. Ensure it doesn’t obstruct controls or cables. Stability and clear sight are key factors.
How Do I Secure The Gps Mount For Rough Terrains?
Use rubber washers or anti-vibration pads with the mount. Tighten screws firmly but avoid over-tightening. This keeps the GPS stable on bumpy rides.
Can I Install Gps Mounts Without Professional Help?
Yes, GPS mounts are designed for easy DIY installation. Follow the included instructions and use common bike tools. Take your time to ensure a secure fit.
Conclusion
Adding GPS mounts to your touring bike makes navigation easier and safer. Choose a mount that fits your bike and GPS device well. Secure the mount tightly to avoid movement during rides. Test the setup before heading out on long trips.
This simple step improves your riding experience and keeps you on track. Enjoy better control and peace of mind while exploring new routes.


